DJI Mavic, Air and Mini Drones
Friendly, Helpful & Knowledgeable Community
Join Us Now

Mavic FPVLR/Yagi Antenna Mod -Installation Guide and Review!

Intrglctcrevfnk

Well-Known Member
Joined
Jan 8, 2017
Messages
114
Reactions
52
Location
Memphis, TN
Hey everybody! Haven't seen to much on the Yagi antenna mod for the Mavic Pro outside of the one huge thread that the mod's almost locked due to lack of civility. So I thought I'd do a quick and dirty review/test/observation post.

I got a pair of the Yagi antennas from dronenerds.com. They were the FPVLR antennas (the original guy that makes them is from Italy, it was cheaper to pay their markup than to pay DHL to bring it around the globe). Didn't come with any instructions, so I found a few posts on the FPVLR website that helped me out.

Here's a youtube video on how to take apart the controller:

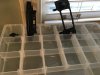
I got mine apart pretty easily, much easier than the video. Bottom plate and the top and bottom separation are the biggest challenge. Just go slow and be careful. I also used a Plano organizer to keep track of every section of removal and wrote down every step I did with crude diagrams and corresponding numbers to the sections on the Plano box.
I had the micro screw set and the spudger set from some iPhone repair kit I got years ago. I also got one of the recommended tool sets on mavichelp.com a while back - the Teton branded one. But you are going to want plastic prying tools for sure. You'll damage the plastic seam if you don't. Caveat emptor. You'll also need a dremel (or a file and a ton of patience) and an 8mm wrench or 8mm socket and some needle nose pliers.

That YouTube video got it apart, but then I had very little idea on how to take out the existing antennas, what to dremel out, and how to run the new wires around on the inside. Found a post on the FPVLR's Facebook page that helped (mostly, did not run the wires like the guy that posted all the pictures- tell you why in a second.)

facebook post:
Mavic antennas growing - Donato A Marcantonio | Facebook

Definitely look over the youtube vid and the Facebook post a few times. I also set up the iPad with the youtube vid right next to were I was working and paused as necessary. But neither show how to take out the stock antennas without destroying them. They have a clip system that has one beveled side and one plain side. Rotate the antenna 90* to stop position, then pull back towards the beveled side and the plain side will slide out. Hope I explained that well as I did not take pictures of that, but here's a crude markup:
IMG_1189 2.jpg

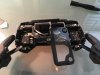
But here's why I ran the antennas differently- so this guy runs the wires a little to close to the magnetic stick sensor chips for my taste. Take a look at his layout (on the Facebook link) and decide for yourself. I ended up running mine so that they more closely matched the stock wire layout and as far away from the stick sensors as possible:
IMG_1192.jpg
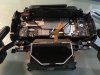
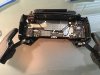
I'll attach a picture of the stock wire setup too, took it just in case. Now in this picture the wires are almost good to go. However you will need to torque/bend the right angle wires that come out of the nuts as close to the board as you are comfortable going. Ask me how i know ;-) If the are not then the screen/battery will not fit properly on the left antenna and the photo button will not function properly by the right antenna. Remember, go slowly and test fit before shoving it all back together.
IMG_1199.jpg

You'll need a dremel to file down the plastic on the screen bracket in order to clear the brass nuts now protruding into the case. Took several tries back and forth to the dremel till I got it right. Was scared of going too far and messing something up when grinding. This is what it looks like when done:
IMG_1194.jpg

Here's a view of the top where I dremel'd down, its ugly but it works:
IMG_1198.jpg

Here's a picture of the final fit - it all makes sense here. Got to clear room for those 8mm nuts.
IMG_1197.jpg
After that it's follow the steps you wrote down in reverse and put it back together!

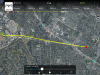
Think this is getting a bit long- I'll put a signal review in the first comment. I've added a few extra pictures including the stock antenna layout for those that need it. Unfortunately did not make a step by step picture process.

Thanks for looking and I hope this helps out some of my fellow mavicpilots!
 

Attachments

  • IMG_1187.jpg
    IMG_1187.jpg
    1.7 MB · Views: 359
  • IMG_1188.jpg
    IMG_1188.jpg
    1.5 MB · Views: 346
  • IMG_1189.jpg
    IMG_1189.jpg
    2 MB · Views: 378
  • IMG_1190.jpg
    IMG_1190.jpg
    2.2 MB · Views: 385
Last edited:
So after getting the antennas installed I powered up and connected to my Mavic to test every button and recalibrate the sticks. All worked well! Went for a really quick flight (just up and down, it was too windy and the KP index was at 6) and had signal. That means I didn't royally screw it up!

Took it out for 3 test flights this weekend, and I'm happy to report that it definitely worked well, even better than stock! All 3 flights were in the same place, in a park/field in the middle of a fairly dense urban area. East side of Memphis, TN. Tall oak trees, some tall buildings, high voltage power lines, cell phone towers, microwave backups, and pretty much everybody's house has wifi.

I did set the channel selection to manual, 10mhz width, and selected the section with the least interference. I only changed that setting once when getting out to distance to see what it would do. And it was still in the area with the lowest noise floor.

Even though these antennas are highly directional, in semi close flying (say 1/4 to 1/2 a mile) I didn't have to worry about losing signal if I wasn't directly pointed at the Mavic. So that's good! I also have some 4" dipole antennas with RP-SMA connectors coming in from Amazon for testing too. I really like just having options for antennas!

Distance:
My max distance was a little over 5600ft, but given the circumstance of just how noisy an urban environment is I am satisfied with how these work. Will post the healthydrones signal strength map also. I really think that these will go much further if needed but I don't want to test that BVLOS in a city. I also had other restraints such as the 5 mile class B (recreational, i was in the enhanced class B if I was flying under Part 107 to surface), large hill to the east along with high voltage power lines, and heavy urban area to the north. I also couldn't bring myself to cross the 240 loop, south of that it would be likely that someone might shoot it down. Got to know your neighborhoods in Memphis.

Here's the overlay of the 3 flights:
IMG_0017.PNG

Signal:
Signal was rock solid until it wasn't. What was different on this antenna is that the uplink would go down low while the downlink (HD) was 3/5 bars. The Mavic would get delayed responses even though the picture was crystal clear. I was working on the right angle to hold the controller, which became more important the further out I would get. Was flying around 385ft AGL and 45*-50* seemed to be the best angle to hold signal. I do plan on turning to the web to figure out the trigonometry for optimal angle for a given height and distance. Been to long since that math course.
EDIT: did the math on right angle triangles. At 385ft up and 5000ft out the correct angle is 44.2*. So pretty much hold the controller at a 45 degree angle.

Variables:
Take a look at the signal map from healthydrones in the below screenshots. What makes me think that it is urban interference is that the drops are sudden and severe. Knowing the optimal angles for the antennas would possibly help some. I'll have to work on that. Edit: optimal angle is 44.2 degrees, as noted above.


Flight1 Map & Signal Errors:
Flight1_SignalErrors.jpg
This one wasn't too bad at all. It was brief and momentary signal drop. Didn't want to go out further. Was already breaking rules...

Flight 2 Map:
Flight2_Map.jpg

Flight 2 Signal Errors:
Flight2_SignalErrors.jpg
This was the worst one. I have attempted flying around this same area a few times with stock antennas also. There is some sort of 2.4ghz vortex above that church area. If anyone can chime in on how it goes from basically perfect to absolutely gone I'd love to chat!
Edit: I have posted a similar flight to Flight 2 in the comments below where I used stock antennas and parabolic reflectors for signal error comparisons.

Flight 3:
Flight3_Map.jpg

Flight 3 Signal Errors:
Flight3_SignalErrors.jpg This 3rd flight great until I got over the dense urban corridor (Poplar Ave, a very very busy thoroughfare with lots of businesses and infrastructure).


TL:DR- These antennas are an improvement even in highly urban areas. But they won't save you from external interference.

BONUS:
A panorama from flight 2! (done at point 'S'). Looks great as a .psd file, but it goes from 160MB to 5MB when I made a quick .jpeg.
-- can't imbed it for some reason-- just check the attachment when you can. I'm in that big field just left of center.

Any other questions or whatnot just ask! And please can we refrain from BVLOS and drone police?
 

Attachments

  • SeaIsle_Panorama ORG copy2.jpg
    7.4 MB · Views: 210
Last edited:
Great review.....

However, there was way too much time & effort spent on the antenna mod with such little gain.

Thanks!

It was only 2 hours from start to finish, but yeah I would have hoped for a little more distance. Given how it improved signal quality in the situation I put it in I think it would provide exponential gains in more isolated areas.

But I'm sure there are more people out here that will try these or another type of antenna mod sometime, so I did want to help those out that might seek it.

I'm a person that loves to tinker, so the 2 hours went by really fast! Now that it's done I can add any RP-SMA type connector antenna I want and I like that.
 
  • Like
Reactions: Aumoe
Nice write up, I can see your not new to modding engineering (making things fit and work).
I think I only thought of one suggestion. Since the controller is known to get hot and the reason for the fan, instead of scotch tape to hold down the RF cable wires I would suggest kapton tape, it can take the heat and stay stuck down. The scotch tape might come up, shrink or even melt when the shielding cans get hot.

As for the kapton tape ide say as little as possible, I usually use 10mm wide kapton on smaller electronics like this. Big enough to hold the wire, and has enough coverage with adhesive to not come undone. Maybe one strip to cover both cables on the right this way it covers the least amount of wholes in the metal shielding that is probably for air circulation and venting of the chips when they get hot. And one small strip on the cable on the left.

I don't know if the firmware in the controller monitors temperature or anything else besides the battery, or if it logs these temps. But come summer time flying especially indirect sunlight if you start having any issues you may want to switch to a smaller tape to let the cans vent more.

The right cable location is good and not on top of that grey strip. I would suggest the same for others doing this mod since that grey strip is a grounding strap and you don't want an RF cable on top of the ground strap that could cause interfearance or malfunction.

Thank you,

Scott
 
  • Like
Reactions: butterflyslicer
@ScottJD
I actually used the same tape that was originally in there holding down the wires! Good old Chinese tape, think it shows in the attached pic of the unmodded wires. So no worries there.

I did split one piece in order to add a section to a non stock area however.

Also I think the fan is underneath that board underneath that chipset and against the bottom of the controller. I didn't see a fan during disassembly but I know there is one in there!
EDIT: yeah it's underneath that bottom board. The power lead for the fan is the thin black and red wires that come up from the bottom right and terminate into the board near the power distribution. Much like a PC, but really tiny
 
Last edited:
@ScottJD
I actually used the same tape that was originally in there holding down the wires! Good old Chinese tape, think it shows in the attached pic of the unmodded wires. So no worries there.
Interesting to have such a nice and well laced out PCB design and use scotch tape on something they know produces heat. But I also get the feeling more then one manufacturer is assembling these, so sometimes you see differences between one vs another just because who assembled it and what material they use or had in stock.
Well if I ever do this I will probably change it to laptop, I wouldn't want to open this controler more then once if I didn't have to.
Scott
 
  • Like
Reactions: butterflyslicer
By the way, the color coded signal strength imaged made me take a second look at healthy drone. I find it running how some show as a one minute flight, or even 4 minute flight and I never leave the ground. But I like it so far, it filled up the 100 flights fast. I saw you can delete some from the DJI app, so I want to try it again just leaving my real flights and not the calibration firmware tests. I'm hoping if I delete all the flights in HD and the ones I don't want in the DJI app it will upload just the ones I left for me to review.
Scott

Yep it's a pretty cool way to take a look at more info than the DJI Go app shows, and much easier than having to extract the DAT files and use BudWalker's CSVviewer. Plus it's free, just have to delete older flights when you hit the limit. You can delete them pretty easily on healthydrones on the left side of the page. No need to really keep all the flights there forever. I usually review them, check out the sensors and any errors, then move to the next one.

If you have litchi it comes with a free month of the "gold" membership. It was nice being able to view wind and battery data. Mine just lapsed back to the free membership, don't see the need for the paid subscription yet but I do appreciate the developer's effort. Might do a membership eventually just to support their effort.
 
Hmm, I would expect more from these FPVLR. In Silicon Valley area I've gotten 3.2 miles range with stock antenna. My FPVLR antenna has arrived, but I hardly feel motivated to modify the controller for installation if I don't see some significant improvement by other forum members.
 
  • Like
Reactions: Budmancan
If you have litchi it comes with a free month of the "gold" membership. It was nice being able to view wind and battery data. Mine just lapsed back to the free membership, don't see the need for the paid subscription yet but I do appreciate the developer's effort. Might do a membership eventually just to support their effort.
I figure I'll rename and keep my first few flights as starting benchmarks. My first beginner flight, non beginner, and fist sport mode flight so I have some starting data to compare to later if it starts acting up.

I plan on getting litchi, but figured ide wait until I get some more flight time in. I've been working on flight and setup, but not so much camera color manual profiles or gimbal control yet. Before buying an app that makes it easy I like to learn everything first in case I need to take manual control in worst case situation.
But it's good to know litchi comes with a free month of gold, I must of missed that when I was looking into buying the app.
 
Hmm, I would expect more from these FPVLR. In Silicon Valley area I've gotten 3.2 miles range with stock antenna. My FPVLR antenna has arrived, but I hardly feel motivated to modify the controller for installation if I don't see some significant improvement by other forum members.
That's really good for the Bay Area, I lived in the east bay for 18 years and know all the wireless frequencies in play around thag area. It's quite congested, of course I was mostly in Fremont, Pleasanton, and SF financial district. Other areas like Livermore and more north off 580 I expect would be good signal in some of the valleys with wide open fields.
What area are you in that you were able to get 3.2 miles distance?
Scott
 
Hmm, I would expect more from these FPVLR. In Silicon Valley area I've gotten 3.2 miles range with stock antenna. My FPVLR antenna has arrived, but I hardly feel motivated to modify the controller for installation if I don't see some significant improvement by other forum members.

That's an excellent distance! Maybe take one for the team and do the install to report back? As long as you take the antennas out properly you can always go back to stock. The dremel is the only permanent change and it's not a major structural change.

I have heard very little overall on these, can't find much online. Perhaps we should be the place for it?

I have made it further than I have before but Memphis is a terrible place to fly. If I can get out in the country this weekend I'll try to get a better test.
 
So in order to show that I did see an improvement here's a comparison between a flight with stock antennas & parabolic reflectors and one from this weekend with the Yagi antennas:

IMG_0107.PNG

The above flight is similar to Flight 2 geographically in my OP. At least the first leg. It's from by the church back towards the field. This is with the stock antennas. A lot more signal errors anywhere from 2,000 to 5,200 ft. Tried this one when my parabolic reflectors for the stock antennas came in.

Now here is Flight 2 from the second post, this is with the FPVLR antennas:
IMG_1463.JPG

It definitely did improve the overall range, but it also improved signal quality on the distance in between the max. And I think that is important to emphasize!

My max distance so far in this area is about 1NM. Pushed it another 10% or so with the parabolic reflectors and 20% with the FPVLR. Like I've stated before I think there are other variables for interference here that are coming into play. I would have loved to seen some insane range when I installed them but the trend is upwards improvement. Won't be able to truly test distance until I get out of the city. They do allow me to fly with more confidence.

So if @CyberNate could do the install and try a similar flight to his 3.5 mile flight in Silicon Valley we will have more data here to help others!
 
Like I've stated before I think there are other variables for interference here that are coming into play.
That's probably an understatement. When I used to work on wireless, what your computers say are around your and what is really broadcasting around your are totally different.
I ran this report testing an expsive tool at home one day back in 2013, my computers saw 10 may 12 wireless systems and channels with wifi scanning software. This tool saw 60 unique identified hardware broadcasting on 2.4Ghz and 5Ghz bands.

And I live north outside the city limits, since 2013 the city put up a microwave based wireless systems, the state also put one up state wide. The electric company changed all the meters to a wireless meter for reporting usage. And a lot more neighbors have new TVs and everything else that comes with wireless built in these days. If I had access to this tool today it would probably be close to 300 systems with mayor overlap in all channels being used that I could,d see from my house alone. And this doesn't include 2 meter or 70cm UHF and VHF private bands and Ham radio users with towers in the back yards, or local repeaters, and city radio frequencies for police, fire, EMT, and so on.

Now you have to think, if I can see this from my house and now we are flying through different neighborhoods it's just more interference. You don't see the radio repeaters or towers until your already to close to it and it's causing issue with your flight.

Also the wider the band then the more susceptible to accepting interfearance. So technically you should have a stronger signal at distances using the 10Mhz band and not the 20Mhz band. I don't know if this is the case with how DJI designed it, but it's usually the rule of thumb. The FCC even requires the devices to accept the interfearance if its using a wider band so it doesn't knock out things using a more narrow band.

Scott
 

Attachments

  • Local Signals 2013.pdf
    38 KB · Views: 13
  • Like
Reactions: Intrglctcrevfnk
[QUOTE="ScottJD, post: 120927, member: 11191]

Also the wider the band then the more susceptible to accepting interfearance. So technically you should have a stronger signal at distances using the 10Mhz band and not the 20Mhz band. I don't know if this is the case with how DJI designed it, but it's usually the rule of thumb. The FCC even requires the devices to accept the interfearance if its using a wider band so it doesn't knock out things using a more narrow band.
[/QUOTE]

One of the first distance flights I did with just the stock antennas was on Auto with 20mhz. I left the graph on screen and it was jumping and searching all over the place. Exactly why I use 10mhz and custom channel seclection now.

What frequency do the smart meters run on? Local utility company is rolling them out in the neighborhood now. Friends house over by the field already has one.

I've got a Uniden bcd436hp myself, love listening to local PD and fire. But isn't it true that even though they might be around 400mhz there are harmonics that repeat into upper frequencies? E.g. 400, 800,1200 and so on...

Also- got a pair of simple 6" dipole antennas coming in the mail today. Going to test them in the same area this week. Big thunderstorms today here.
 
That's really good for the Bay Area, I lived in the east bay for 18 years and know all the wireless frequencies in play around thag area. It's quite congested, of course I was mostly in Fremont, Pleasanton, and SF financial district. Other areas like Livermore and more north off 580 I expect would be good signal in some of the valleys with wide open fields.
What area are you in that you were able to get 3.2 miles distance?
Scott


I flew from Palo Alto near Foothill and Hillview Ave to Mountain View a few blocks from Shoreline Blvd. I was just testing the range with the new firmware.
 
I flew from Palo Alto near Foothill and Hillview Ave to Mountain View a few blocks from Castro street. I was just testing the range with the new firmware.
That's neat because I know those areas and can picture that.
Since I was moved to Ohio during the housing crash and didn't want to loose my job, ide be afraid to fly distance in some of the areas up north. I might get shot at.
 
That's neat because I know those areas and can picture that.
Since I was moved to Ohio during the housing crash and didn't want to loose my job, ide be afraid to fly distance in some of the areas up north. I might get shot at.
 

Attachments

  • IMG_0105.PNG
    IMG_0105.PNG
    7.4 MB · Views: 71
I think every smart meter is different. It depends on what the local electric company decides to buy and roll out. I think they are using the city network for ours, I've heard others use only Bluetooth and this way the people taking readings on have to walk the street. Some use a low powered proprietary private channel and might have to drive around every few blocks.

Yes, harmonics of frequencies will leak in higher bands and that's why I mentioned it. Not only the harmonics but also the wattage could affect the UAS from not receiving from your controler even if it's on a completely different band because other lelctronics might be affected from that radio wave like with repeaters.

I gave up on physical scanners when they moved to code hopping and bought an app that now lets me listen to different streams off the internet. I can listed to my old firehouse even though I live in another state now. It also lets me listen to the local airport ATC while I'm flying. If I have permission to fymthe class D when I'm in the area it's good to listen and tenapp runs in the background. It's still good to listen since they control the space for all the local medibac and hospitals so I'll know if a low flying heli is heading my direction even if I'm outside of the airspace.

A friend and I will also use a walki talkie to communicate when we are flying the same area. But these are the $30 Boafeng UV-5R radios that will let me program other local cities channels and ham repeaters, weather stations and much more.

Scott
 
Lycus Tech Mavic Air 3 Case

DJI Drone Deals

Members online

Forum statistics

Threads
131,089
Messages
1,559,732
Members
160,073
Latest member
testtest