


Hi
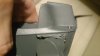
It landed hard on the rear left leg and only after getting it home did i noticed this damage.
If you look close you can see the damaged rear leg support is seperate from the main body and
given the spare part were available, it looks like a simple enough fix.
what would you guys reccomend?
If anyone knows where i could source the part. even if from a dismantled bird, i can bring mavic
back to its proud self.
*As an r/c person, imm used to building my kit, or having 'brand depending', a decent exploded diagram for inevitable ordering of repair parts, spare parts, etc.
i realise mavic is not a 250 racing drone, but a service manual, anything from DJI would be mint aswell
Attachments

Last edited:
")


