

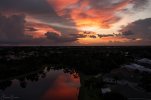
Hello all! Wanted to introduce myself. I've been an avid amateur photographer for 23 yrs, but now want to expand my creative choices, so bought a Mavic 2 Pro w/Smart Controller. Have only had 3 flights thus far. There's so much to learn, it's very overwhelming! Attached is a still I took last night, just after sunset. The rule is you can fly up to 20 mins after sunset? I normally shoot Sony A7 III, using 3 shot bracketing, then make an HDR using Aurora HDR. Want to do that with the Mavic, once I learn how! Anyway, I'll be hanging around, trying to absorb as much as I can.

You are using an out of date browser. It may not display this or other websites correctly.
You should upgrade or use an alternative browser.
You should upgrade or use an alternative browser.
Experienced photographer, newbie drone pilot
- Thread starter Goodwood
- Start date

Hi there & welcome to the forum !!!
My tip is that you put the photo shooting aside for a while & concentrate on mastering the craft & flying instead.
Below some easy points that most probably will minimize the risk of airborne mishaps ...
Read the user manual ...the thick downloadable one, not only the quick start, download here --> https://dl.djicdn.com/downloads/Mavic_2/20190124/Mavic_2_Pro_Zoom_User_Manual_v1.8_.pdf
Power on in the right order ... First power on your RC & start the app ... after that, power on the drone (& do it on the spot you're going to take off from). Reverse order to shut down.
Preferably power on the drone keeping it horizontal in your out stretched hand (without watches, rings or other magnetic objects) … once the live view have turned up in your mobile device you can put it on ground for take-off. (This supports the point below …)
Before take-off ALWAYS ... add in one very easy check to avoid a really scary event coming from accidentally powering on the drone in a magnetic disturbed place with following flyaway at height in an uncontrollable circular or straight flight path. After powering on your drone, connected to your RC/app & placed it in the take-off spot ... but before lift-off, ALWAYS check that the drone icon on the map in your app is pointing equal in relation to other objects in the map as the drone does in reality ... if not, abort launch attempt, POWER DOWN & move away, power up again and repeat.
Keep well under the wind spec where you fly ... and please note that it's not only at ground, it's at the altitude where you fly. The winds up to 400ft are very different than on ground. Use for instance the UAV Forecast app where you can get a feeling about the winds on higher altitudes, but please note that it's forecasts we are speaking of, a bit of common sense is good to apply to that ... "better skip flying a windy day & fly more another".
Don't go & calibrate everything on a regularly basis ... why fix things that are working, it's just a higher risk that you by mistake calibrate your compass in a magnetic disturbed area & the drone goes haywire 10 meters up in the air. Calibrate IMU + compass according to user manual, keep away from magnetic things like cars, metal tables & reinforced concrete at power on & compass calibrations. If the app recommend a compass calibration first try another launch spot on a far distance from the first ... if calibration still is recommended by the app do it, but only then.
Don't launch in a hurry ... wait until you have at least 8, preferable 10 locked satellites & wait for the lady voice announce that the Home point has been updated, check then on the map that it's in the correct spot. Learn how the RTH function works (it can work differently depending on scenario), don't set the altitude for that unnecessary high, look around were you are going to fly and set it to clear the highest obstacle, to high & the drone risks a blow away.
Seek up a large open place ... a soccer field, free of obstacles & people. Test off every function one at a time until you fully understand how it works & the logic behind, confirm through the user manual if needed. Fly low, slow & near. And don’t try to fly indoors before you exactly know what makes these machines fly stable … you only risk your interior & to damage your drone in the process.
Take the claimed control distance from DJI with a pinch of salt ... only doable out in the countryside completely free of WiFi disturbance & obstacles in between the Remote & Aircraft.
Don't rely 100% on the obstacle avoidance sensors ... they are good & handy to have to perhaps save you when making a mistake, but they can't see everything, especially thin branches & wires so don't think they will allow your drone to just bounce away from everything all the time. Also note that they need plenty of light to work properly, too dark & they will turn off.
The Pause button on the RC ... It's a handy one, it will stop all automated modes immediately (if you have GPS coverage). Place your thumb on that when you initiate an automated flight mode & be prepare to stop it if too close to a tree for instance.
Don't use the RTH button as a "panic button" it's usually the weakest mode of them all ... you will always have access to more power in the manual modes ... if slow against a bit to strong head wind, go for Sport mode, drop altitude & manoeuvre the drone home manually.
Learn the rules & regulation ... keep the drone within Visual line of sight & respect max altitudes, if you can't avoid going out of visual keep it at least in line of sight (unobstructed line between Remote & Aircraft even though you don't see it) so you don’t lose the connection.
Last edited:
Welcome to the forum from the beautiful woods of Maine!
Kendallfordguy
Well-Known Member
snowghost
Well-Known Member
- Joined
- Mar 3, 2017
- Messages
- 219
- Reactions
- 195
- Age
- 69
Welcome. You’ll need a strobe for night flying, visible for three statute miles.
dirkclod
Well-Known Member
Welcome to the forum.
I hope you will find our site helpful and look forward to any input , photo's/video's you might post .
Don't be shy and ask anything if you can't find it by searching .
I hope you will find our site helpful and look forward to any input , photo's/video's you might post .
Don't be shy and ask anything if you can't find it by searching .
Welcome from Long Island New York!! Your st the right place. Flysafe have fun and Godspeed DroniacHello all! Wanted to introduce myself. I've been an avid amateur photographer for 23 yrs, but now want to expand my creative choices, so bought a Mavic 2 Pro w/Smart Controller. Have only had 3 flights thus far. There's so much to learn, it's very overwhelming! Attached is a still I took last night, just after sunset. The rule is you can fly up to 20 mins after sunset? I normally shoot Sony A7 III, using 3 shot bracketing, then make an HDR using Aurora HDR. Want to do that with the Mavic, once I learn how! Anyway, I'll be hanging around, trying to absorb as much as I can.
Welcome to the forum. We look forward to your participation and more of your view of the world.
slup's list is a great set of recommendations. Just to be legal, you should also get the new FAA Recreation UAS Safety Test (TRUST) certificate. It's required and it's also a good introduction to safety basics. It's a free, quick, and simple process online.
 www.faa.gov
The civil twilight period extends 30 minutes after sunset and 30 before sunrise. You can fly as a recreational pilot during those periods, but you'll need an anti-collision light. Beyond those times, you'll need a Part 107 license (with night flight training) to stay legal. (I like the Firehouse Technology ARC V light.)
Have fun with the sunset shots. After you get comfortable flying, try the hyperlapse feature during the period where sunlight fades and the lights on the surface come on.
The Recreational UAS Safety Test (TRUST)
www.faa.gov
The civil twilight period extends 30 minutes after sunset and 30 before sunrise. You can fly as a recreational pilot during those periods, but you'll need an anti-collision light. Beyond those times, you'll need a Part 107 license (with night flight training) to stay legal. (I like the Firehouse Technology ARC V light.)
Have fun with the sunset shots. After you get comfortable flying, try the hyperlapse feature during the period where sunlight fades and the lights on the surface come on.
Welcome to Mavic Pilots! ? Enjoy the forum!
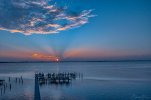
Thanks for the welcome, everyone, and yes, slup, I did fly it twice in a soccer field the get a feel for the controls, and never over 40 ft high. All this advice is excellent, and I will read it again and again. I did have a toy "Vello" drone before this one to get a feel for the control sticks. So far, I haven't flown more than 200ft away, and never more than 50 ft high, and luckily, never any wind. I also have a professional drone pilot friend who is helping me a bunch. This morning, , I couldn't figure out how to get into a "programmed" flight. Couldn't see it on the smart controller screen. Found out when I got home, You can't fly program flights while in Tripod mode! Duh! Lots to learn! Here's a shot I grabbed this morning that I wanted to do the time lapse with..Hi there & welcome to the forum !!!
My tip is that you put the photo shooting aside for a while & concentrate on mastering the craft & flying instead.
Below some easy points that most probably will minimize the risk of airborne mishaps ...
Read the user manual ...the thick downloadable one, not only the quick start, download here --> https://dl.djicdn.com/downloads/Mavic_2/20190124/Mavic_2_Pro_Zoom_User_Manual_v1.8_.pdf
Power on in the right order ... First power on your RC & start the app ... after that, power on the drone (& do it on the spot you're going to take off from). Reverse order to shut down.
Preferably power on the drone keeping it horizontal in your out stretched hand (without watches, rings or other magnetic objects) … once the live view have turned up in your mobile device you can put it on ground for take-off. (This supports the point below …)
Before take-off ALWAYS ... add in one very easy check to avoid a really scary event coming from accidentally powering on the drone in a magnetic disturbed place with following flyaway at height in an uncontrollable circular or straight flight path. After powering on your drone, connected to your RC/app & placed it in the take-off spot ... but before lift-off, ALWAYS check that the drone icon on the map in your app is pointing equal in relation to other objects in the map as the drone does in reality ... if not, abort launch attempt, POWER DOWN & move away, power up again and repeat.
Keep well under the wind spec where you fly ... and please note that it's not only at ground, it's at the altitude where you fly. The winds up to 400ft are very different than on ground. Use for instance the UAV Forecast app where you can get a feeling about the winds on higher altitudes, but please note that it's forecasts we are speaking of, a bit of common sense is good to apply to that ... "better skip flying a windy day & fly more another".
Don't go & calibrate everything on a regularly basis ... why fix things that are working, it's just a higher risk that you by mistake calibrate your compass in a magnetic disturbed area & the drone goes haywire 10 meters up in the air. Calibrate IMU + compass according to user manual, keep away from magnetic things like cars, metal tables & reinforced concrete at power on & compass calibrations. If the app recommend a compass calibration first try another launch spot on a far distance from the first ... if calibration still is recommended by the app do it, but only then.
Don't launch in a hurry ... wait until you have at least 8, preferable 10 locked satellites & wait for the lady voice announce that the Home point has been updated, check then on the map that it's in the correct spot. Learn how the RTH function works (it can work differently depending on scenario), don't set the altitude for that unnecessary high, look around were you are going to fly and set it to clear the highest obstacle, to high & the drone risks a blow away.
Seek up a large open place ... a soccer field, free of obstacles & people. Test off every function one at a time until you fully understand how it works & the logic behind, confirm through the user manual if needed. Fly low, slow & near. And don’t try to fly indoors before you exactly know what makes these machines fly stable … you only risk your interior & to damage your drone in the process.
Take the claimed control distance from DJI with a pinch of salt ... only doable out in the countryside completely free of WiFi disturbance & obstacles in between the Remote & Aircraft.
Don't rely 100% on the obstacle avoidance sensors ... they are good & handy to have to perhaps save you when making a mistake, but they can't see everything, especially thin branches & wires so don't think they will allow your drone to just bounce away from everything all the time. Also note that they need plenty of light to work properly, too dark & they will turn off.
The Pause button on the RC ... It's a handy one, it will stop all automated modes immediately (if you have GPS coverage). Place your thumb on that when you initiate an automated flight mode & be prepare to stop it if too close to a tree for instance.
Don't use the RTH button as a "panic button" it's usually the weakest mode of them all ... you will always have access to more power in the manual modes ... if slow against a bit to strong head wind, go for Sport mode, drop altitude & manoeuvre the drone home manually.
Learn the rules & regulation ... keep the drone within Visual line of sight & respect max altitudes, if you can't avoid going out of visual keep it at least in line of sight (unobstructed line between Remote & Aircraft even though you don't see it) so you don’t lose the connection.
Attachments
Chetk7677
Well-Known Member
Welcome. I'll be 83 in two days and an avid photography since about age 8. Drones are a whole different ballgame. You have a most impressive camera, for sure (Sony A7iii). For HDR and panoramas, I like to use the grid, and for panos, shoot manually. I shoot three or four images from left to right, overlapping them about 30%. I save in RAW. I bring those RAW images into my software (which is Photoshop CC 2021), and upload to Adobe Camera RAW (ACR). I'm sure Aurora has some option of this. Anyway, once the images are all uploaded in RAW to Bridge, I right click and open all (CTRL+A). The right click again, and "merge to Photoshop." Same engine is used in Lightroom. The stitching will occur automatically, and then after the merge you can follow the options to fill the image frame, and finally, open to Photoshop where additional edits can be made.Hello all! Wanted to introduce myself. I've been an avid amateur photographer for 23 yrs, but now want to expand my creative choices, so bought a Mavic 2 Pro w/Smart Controller. Have only had 3 flights thus far. There's so much to learn, it's very overwhelming! Attached is a still I took last night, just after sunset. The rule is you can fly up to 20 mins after sunset? I normally shoot Sony A7 III, using 3 shot bracketing, then make an HDR using Aurora HDR. Want to do that with the Mavic, once I learn how! Anyway, I'll be hanging around, trying to absorb as much as I can.
Your next challenge will be to learn video editing!!!
Dale
Miami
Greetings from ? Florida ? and welcome to the forum?
Yes, I have the grid enabled also. One thing I've already noticed, is the images in the A7 III are much cleaner with less noise in these early morning/late evening shots, as compared to the Mavic Pro. I have Topaz Denoise AI to combat that. No biggie, just an additional step. I will check out your website!Welcome. I'll be 83 in two days and an avid photography since about age 8. Drones are a whole different ballgame. You have a most impressive camera, for sure (Sony A7iii). For HDR and panoramas, I like to use the grid, and for panos, shoot manually. I shoot three or four images from left to right, overlapping them about 30%. I save in RAW. I bring those RAW images into my software (which is Photoshop CC 2021), and upload to Adobe Camera RAW (ACR). I'm sure Aurora has some option of this. Anyway, once the images are all uploaded in RAW to Bridge, I right click and open all (CTRL+A). The right click again, and "merge to Photoshop." Same engine is used in Lightroom. The stitching will occur automatically, and then after the merge you can follow the options to fill the image frame, and finally, open to Photoshop where additional edits can be made.
Your next challenge will be to learn video editing!!!
Dale
Miami
Welcome from South Central Florida and enjoy.
mrjohnc1
Well-Known Member
Similar threads
- Replies
- 2
- Views
- 689
- Replies
- 60
- Views
- 4K
- Replies
- 27
- Views
- 2K


DJI Drone Deals
1. Mini 2
2. Mini 3 Pro
3. Mini 4 Pro
4. Air 2s
5. Air 3
6. Avata 2
7. Mavic 3 Pro
8. Mavic 3 Classic
2. Mini 3 Pro
3. Mini 4 Pro
4. Air 2s
5. Air 3
6. Avata 2
7. Mavic 3 Pro
8. Mavic 3 Classic
New Threads
-
-
Am I the first non-USA person to have flown with RID established?
- Started by twickers14
- Replies: 0
-
Purchased Spektrum PPMA9500 remote ID anyone installed one on a Mavic 2 PRO
- Started by Sterk
- Replies: 1
-
3 Discovering The Charm Of Gili Air before we sail off-grid
- Started by Vernon
- Replies: 0
-

Members online
Total: 737 (members: 11, guests: 726)
Forum statistics
