Hi all
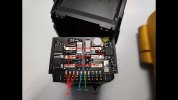
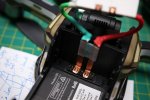
Im looking at soldering a connector to either the battery terminal on the quad itself or the wiring running to the battery terminal to allow me to run an additional lipo strapped to the top. I've seen this done on other mavics but can't find anything on the MA1.
Does anyone have any knowledge of what terminals will need soldering to allow the connection of an additional battery.
I've done the mod on other RC vehicles and airsoft guns but this is little different to say the least ?