DJI Mavic, Air and Mini Drones
Friendly, Helpful & Knowledgeable Community
Join Us Now

Mavic Pro Rear Arm Damage

Jxy97229

Member
Joined
Mar 14, 2019
Messages
7
Reactions
4
I recently bought a damaged MP that had its rear right arm basically torn out after a crash. As shown below.
s-l1600.jpg
I opened up the cover, and saw that the saddle piece was broken at the screwholes and at the circular "loop". I temporarily fixed this with glue, but don't trust it to stay fixed in the long term. However, this leaves me with a few questions that I hope you guys can help me out/offer some tips with.
1. Is there anywhere I can get the just the saddle plastic piece without the hinge piece inside? (Just trying to save some money; don't want to get the hinge piece because mine is intact)
2. Would it be necessary, to replace the middle shell due to the screw hole damage? It's damaged, but during test flights it works fine and holds tight. It also seems like kind of a pain to do a full gutting/teardown.
3. Unrelated, but any tips for a new pilot? This is my first drone and I'm excited to some flying after ensuring the drone reliable.
 
  • Like
Reactions: Former Member
Welcome to the forum. Maybe check with Thunderdrones on the first 2 questions.

I can only comment on #3: Read and understand the entire manual so that you are not unhappily surprised. Learn the “hover button” as it can be a life (drone) saver. Go through all the settings on your controller to learn them and be sure they are set as you like. Until your flying is al most instinctive stay in big open areas.
Also be sure your bird is FAA registered... even if the previous owner registered that drone may have been deregisterred by him.

Here’s a link to the Mavic Pro manual:
https://dl.djicdn.com/downloads/mavic/update+documentation/Mavic+Pro+User+Manual+v1.0.pdf

I’m flying M2P mostly now, but I love my MPP and still use it a lot.

Happy Flying and enjoy the forum!
 
Than you for mentioning me guys.

OP, first thing to do is reseat the arm joint into the middle shell. See if any of the screws or plastic supports are stripped or broken. There are 2 phillips head screws that hold the joint to the body. Make sure those are ok and their plastic holes are not broken.

The middle frame hole is broken, but if you are good at JB Weld, you can put everything back in place and JB Weld over that broken middle frame screw.

I recommend replacing the middle frame, but its up to you if you are good at JB Weld.
 
  • Like
Reactions: mnis and Jxy97229
Welcome to the forum. Maybe check with Thunderdrones on the first 2 questions.

I can only comment on #3: Read and understand the entire manual so that you are not unhappily surprised. Learn the “hover button” as it can be a life (drone) saver. Go through all the settings on your controller to learn them and be sure they are set as you like. Until your flying is al most instinctive stay in big open areas.
Also be sure your bird is FAA registered... even if the previous owner registered that drone may have been deregisterred by him.

Here’s a link to the Mavic Pro manual:
https://dl.djicdn.com/downloads/mavic/update+documentation/Mavic+Pro+User+Manual+v1.0.pdf

I’m flying M2P mostly now, but I love my MPP and still use it a lot.

Happy Flying and enjoy the forum!
Thanks! I'll keep that in mind.
Than you for mentioning me guys.

OP, first thing to do is reseat the arm joint into the middle shell. See if any of the screws or plastic supports are stripped or broken. There are 2 phillips head screws that hold the joint to the body. Make sure those are ok and their plastic holes are not broken.

The middle frame hole is broken, but if you are good at JB Weld, you can put everything back in place and JB Weld over that broken middle frame screw.

I recommend replacing the middle frame, but its up to you if you are good at JB Weld.
I reseated the piece and the holes are fine, but the saddle piece still is glued together. Do you sell the plastic part of the saddle (and if so, for how much)? Also, with the JB weld, are you suggesting that I weld all over the screw, and screwhole to stick them together? I'm a little confused.
Thank you all for you help, I appreciate it a lot!
 
  • Like
Reactions: Former Member
Thanks! I'll keep that in mind.

I reseated the piece and the holes are fine, but the saddle piece still is glued together. Do you sell the plastic part of the saddle (and if so, for how much)? Also, with the JB weld, are you suggesting that I weld all over the screw, and screwhole to stick them together? I'm a little confused.
Thank you all for you help, I appreciate it a lot!

Can you take some pics and post them up here.
 
Can you take some pics and post them up here.
This is what it looks like on the outside after reseating.
IMG_20190317_154947.jpg
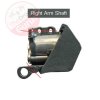
I forgot to take pictures when I had the top open, but basically the saddle piece broke in the places shown below.
1-Pair-Repair-Part-Left--Right-Rear-Arm-Shaft-Axis-For-DJI-Mavic-Pro-Drone-8-800x800-product_p...jpg
That's also where I applied my temporary glue fix.
 
Well, those are 2 important places, they hold the arm on.

To get the saddle joint, I take them off of a new arm. I have a few drawers full of arms with no joints left on them.

You can find OEM DJI arms in many places.
 
Could always epoxy a washer underneath then put screw back in assuming thats a hex.
 
No just let it run not good pic wise but balanced perfectly.Do have watch remote i turn it on aft 33ft hover. Do have question for u mp2 has foldable legs have you tried for mp1 yet
 
  • Like
Reactions: Former Member
Let’s stay on topic guys.
Thanks.
 
Could always epoxy a washer underneath then put screw back in assuming thats a hex.

Im careful about applying any extra metallic objects anywhere around the compass. Thats a good idea though, if he could find a plastic washer, and he really doesnt want to replace the middle frame.
 
Im careful about applying any extra metallic objects anywhere around the compass. Thats a good idea though, if he could find a plastic washer, and he really doesnt want to replace the middle frame.
Could always epoxy a washer underneath then put screw back in assuming thats a hex.
Thats a great idea actually! (assuming it works)
If I do end up replacing the middle frame do you guys have any tips for what to watch out for? Also, what's the risk factor associated with accidentally breaking something? I have some experience with hobby electronics/soldering so at least I wouldn't be completely clueless.
 
@Thunderdrones
Also, when resoldering motor wires, do you have any tips to prevent overheating of the board?

Melt some resin core solder on your iron first. While making contact with the board, add more solder to make the joint release the wire.

Do not leave a hot iron on a joint for too long or you can fry some of the components near it.

Most important... do not let the solder splatter anywhere! When you apply heat to the solder, watch the solder and if it splatters anywhere, track every single piece of splatter down and get it off. If one tiny bit of solder splatter gets into a component, you will get an error message that will be impossible to troubleshoot. Ive already received a few customers drones and found solder splatter in bad places that was causing error messages.
 
  • Like
Reactions: Jxy97229
This is what it looks like on the outside after reseating.
View attachment 66397
I forgot to take pictures when I had the top open, but basically the saddle piece broke in the places shown below.
View attachment 66398
That's also where I applied my temporary glue fix.
you can buy this piece on ebay very cheap. The other part I would try to fix because if you get a new lower case and switch all the parts you run the chance of tearing the ribbons and then it gets costly if you have to send it in.
 
Lycus Tech Mavic Air 3 Case

DJI Drone Deals

New Threads

Forum statistics

Threads
131,086
Messages
1,559,706
Members
160,069
Latest member
J S