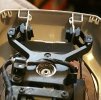
Dislodged from the drone body. Looks like the two rubber mounts came out of the slots in the drone body. The image shows the two side rubber mounting points That need to be reattached. What do you guys think?

No damage except the gimble popped out. YT ideas show the fix but the top case needs removing…..voiding the warranty.If that is all the damage just pop them back in. I can't remember if it is possible with the drone assembled but either way do it with care. BUT there is a ribbon cable running to the top of the gimbal, did it survive?
If so, be careful of it when refitting the dampers
Dislodged from the drone body. Looks like the two rubber mounts came out of the slots in the drone body. The image shows the two side rubber mounting points That need to be reattached. What do you guys think?View attachment 134205
Thank you, my friend…… I will check and see if I can turn them…Having looked more closely at your photo I am a bit confused by the photo, it seems to show the damper rubbers pointing outwards but to be showing them at the rear of the gimbal.
If I am correct and those are the damper rubbers at the rear of the gimbal then I think you have the damper rubbers pointing the wrong way, they should be pointing inwards.
The rear ones can be remounted without dismantling the drone, for this thread I have just tried it with my Mavic Mini (MM), (the Mini 2 and MM are indentical in this area).
If the front mounting are detached and looking at my MM it might just be possible to feed threads through each mounting hole in the drone and then loop the appropriate thread around the recess in the appropriate damper rubber then, with care, pull the damper rubber through the mounting hole. It would be tricky and no force should be used as the mounting holes are in fairly thin plastic. If trying this I would set up both damper rubbers and their threads before you actually try to refit the first one.
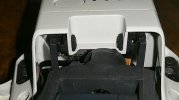
Attached is a photo showing the front mountings in an opened MM. The 2nd photo shows replacement damper rubbers which seem to have lead-ins, probably to make installation easier. I assume the lead-in is meant to be trimmed after the damper rubber has been installed.
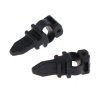
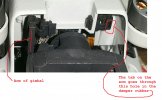
These are the rear rubber mounts. They Look like the tabs go in the slots in the body but I’m afraid to bend the arms that they are mounted toThey are easy enough to work, I tend to use tweezers with blunt ends, just work them carefully

Thank you so much for this pic. now I know what I need to do ??????They are easy enough to work, I tend to use tweezers with blunt ends, just work them carefully
No one has ever touched this drone but me. I think now they were installed bassAkwards from ChinaWho turned the damper rubbers around in the first place? Someone either turned them or replaced them the wrong way around after the crash.
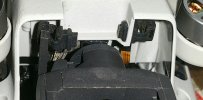
The attached is of the damaged MM that I have, as you can see one arm is missing and the arm you do see was broken and has been glued back together, and I dismounted the damper from the drone for that photo.
If you steady the arm of the gimbal with your fingers or tweezers etc. it might be easier to remove the damper rubber from the arm, turn it and then refit it rather than try to turn it in situ.
There is a tab on the arm that goes through a hole in the damper rubber see the photos
Treat the tab with care and bear in mind it is fairly thin plastic and you should be ok, when working the damper rubber stretch it just enough to remove, fit or turn it as needed and in stages.
It is a question of whether or not you feel confident enough to do the work, if you don't then it is probably best to send it to a repairer, if you broke the tab off the arm then it is almost certainly becomes a repair shop job.
I had no qualms 'messing' with the damaged MM but then I had nothing to lose, it was bought as a sacrificial scrapper.
BTW all the images I have attached can be enlarged, just click on them.
I very much doubt that, how would they fit? I suppose they could have got turned in the crash.I think now they were installed bassAkwards from China
Do the damper rubbers fit into the body First and then the gimbal arms slide into the damper rubbersI very much doubt that, how would they fit? I suppose they could have got turned in the crash.
Anyhow that doesn't really matter, hopefully you now know how to fit it or that you need to send it in for repair.
I very much doubt that, how would they fit? I suppose they could have got turned in the crash.
Anyhow that doesn't really matter, hopefully you now know how to fit it or that you need to send it in for repair.
??Thanks PF??I did BOTH dampers onto their arms first and then the other end of the dampers through the hole in the body. REMEMBER no force is needed, if you find yourself getting frustrated go have a cup of tea or something and come back to it later. It took me about a minute to refit the one I disconnected for the photos in post #10
Doing body first then the arms would, I think, make it near impossible to check that the dampers were correctly fitted around the arm's tab.
thanks, PF for all your help and images. I’ve got one of the rubber tabs back in it’s slot but the other one is kicking my Beehind……If that is all the damage just pop them back in. I can't remember if it is possible with the drone assembled but either way do it with care. BUT there is a ribbon cable running to the top of the gimbal, did it survive?
If so, be careful of it when refitting the dampers