DJI Mavic, Air and Mini Drones
Friendly, Helpful & Knowledgeable Community
Join Us Now

Air 2s Still kind of just winging getting used to these

karlblessing

Gerbil Charmer Extraordinaire
Premium Pilot
Joined
Oct 17, 2020
Messages
1,213
Reactions
893
Age
43
Location
Grand Rapids, MI
Site
karlblessing.com
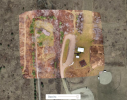
I'm still getting used to figuring it out, but I'm thinking maybe I need to go a little higher (this was at 130 feet AGL from take off). Was done with three flights (most of which were overcast but sun poked out a couple times).

First was a standard grid flight with 80% overlap and 80% sidelap traveling at 10mph. Then second flight rotated -10 degrees, and third flight rotated 10 degrees. All three flights had the camera tilted up slightly to -85 degrees instead of straight down (-90).

These are the render results from WebODM with the images resized to 2048px on the long edge since I'm using my little laptop (Ryzen 5, 16GB ram, integrated graphics, SSD storage) at the in-laws place (Also tried the DroneDeploy trial to render them).

orthophoto_smaller.jpgScreenshot 2022-12-31 225803.pngScreenshot 2022-12-31 225840.png

Screenshot 2022-12-31 232240.png
 

Attachments

  • Screenshot 2022-12-31 225905.png
    Screenshot 2022-12-31 225905.png
    1.2 MB · Views: 24
WebODM is a fun tool, but it takes some experimentation to figure out what all can be done with it.

You can drop a camera path onto the 3D model to animate the scene. In the Tools section, under Navigation, below the little helicopter symbol is a green squiggly line joining red dots with an eyeball. Click that and it adds a default camera track onto your model, with five camera locations and targets. Those can each be dragged around or up/down to aim the camera at whatever you like.

Then in the Scene section, under Objects, Other, you'll find "animation". Click to highlight the animation and it opens a Properties dialog below which you can delete or insert more camera points. Clicking on the little circle to the left of where it says keyframe shows the camera view as aimed from that control point.

A little further down you can adjust the "Duration" of the animation, and hit "Play".

I haven't discovered a way to save a camera track. It needs to recreated from scratch each time you open the model. And I don't see any way of recording the output of the animation, other than running a screen capture program while the animation is playing.

Here's one I did last April using my Phantom 3 Pro. The images were all recorded looking straight down and from too high up, as I wanted to be sure it was flying well clear of any trees. Still, it's pretty cool!

 
WebODM is a fun tool, but it takes some experimentation to figure out what all can be done with it.

Thanks for the information and the additional trick on what can be done with it.

Got done flying a path earlier today

318072704_880289406353852_36081978730943814_n.png


Technically only needed the first two flights (blue and yellow) that are separated by 20 degrees with a 5 degree uptilt , and just realized before then that I only needed 42~45% overlap when doing it that way as opposed to a single flight needing 75% overlap. I did a third one with the drone orientation facing south as a 'just in case'.

The funky curves off the side was a final video clip before landing.

About 50 acres of coverage above.
 
This is pretty cool, I need to get more into mapping with my air2s. I have two locations one 90% trees but about 2.3 acres and another with about 30% trees and 5 acres.

Needs to be two special projects for 2023.

Keep showing progress very cool, thx.
 
  • Like
Reactions: karlblessing
On that Farm one (58 or so acres based on the map projection). It's large, not particularly perfect. Height of 160 ft may be too low for good 2D renderings, but seems a little more suitable for 3D projections.

What DroneDeploy put out from the 590 files fed into it:

1672636348165.pngTwisty Truck
1672636373242.png
Preview of the 3D projection
1672636468074.png
1672636819192.png

And what I put thru WebODM (but with the files reduced to 1024 on the long side for quicker processing)

odm_orthophoto.jpg

1672636704222.png


1672637193724.png

Couple of specific things that's probably not the norm:
  • Set camera mode to manual (pro) with shutter speed locked to 1/200 since it was a dark overcast, and set the ISO to auto. This way I ensure the shutter doesn't drop lower than that, and the ISO tended to stay within 100 to 320.
  • Increased the cruising speed to 20mph so that each flight path was done in 13~14 minutes (though this may be a bit fast for a non-mechanical shutter camera, at lower altitude, shooting only 1/200th of a second while in motion).
  • Height was 50m (164ft) which was around 75 or so feet above the tallest trees in the area.
For comparison to the orthomosaic rendering, these are the single frames off the camera roughly around the same area of cropped above. There's definitely softness from motion blur.


DJI_0127.jpg
DJI_0304.jpg
DJI_0452.jpg

Today's nutshell is... definitely don't skimp on getting more shutter speed to freeze-frame it especially lower altitude. And don't push the cruising speed just to get one path done sooner (could have slowed it to 10mph and still had enough per battery to complete each grid). Also avoid higher wind days as well... as today's recorded inflight wind were 11mph sustained with occasional gusts up to 17mph, increasing to 20mph sustained and 27mph gust during the last grid (forecasted ground wind was 9mph).

1672638086771.png
 
This looks cool. What app are you using on your phone to do this? This looks like fun to explore.
 
Lycus Tech Mavic Air 3 Case

DJI Drone Deals

New Threads

Forum statistics

Threads
131,225
Messages
1,561,030
Members
160,178
Latest member
InspectorTom