These easy to make, as well as very inexpensive in both dollars and weight, gear extenders are in fact "better than bought" in a few ways.
1.) Weight. Some gear extenders add 18 grams to your Mini 2, These DIY gear extenders add <4 grams. Even less if some lightening holes were added to the front extenders(Sharpie caps).
2.) Cost. These will set you back less than five dollars.
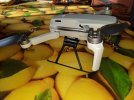
3.) Camera Ground Clearance. These DIY offer about 45mm of clearance for the gimbal.
Possible additional benefits include increased visibility, your choice of color, quick and tool-less install and removal. Requires no modification of the Mini 2.
Downsides.
1.) Looks may not appeal to all.
2.) May add more weight forward of CG than it does rearward of CG. It has been zero problem flying, but I may address the issue later by adding a little mass to the rear legs.
3.) Will need to remove extenders before storing in many cases, but they remove and install quickly, so not a huge negative IMO.
4.) May make people wonder why you would pay $450 for a drone and cheap out on the gear extenders. One word answer....Weight.
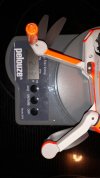
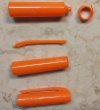
Using Sharpie Ultra Fine Tip marker caps, trim to remove excess weight, as shown in photo below. NOTE: For the first time, clean the inside of the caps before placing them on the Mini 2's legs to avoid residual ink inside the cap from staining the legs.
The Sharpie marker caps will not fit over the Mini 2's front legs as is, just squeeze them a little and they will slip on with a great friction grip. I squeeze on the Sharpie logos on the cap for grip, but pressing anywhere will work. I use the "h" in Sharpie to set the depth of the Mini 2's leg in to the cap.
The rear extenders are made from 3mm carbon fiber rod and some pieces of the small fuel line(tubing) used by weed-whackers, blowers etc.
A small piece of fuel line is inserted in to each of the chassis' rear screw holes, then the carbon fiber rod is inserted in to the tubing. I had to use a very sharp knife to slightly reduce the diameter of the rod where it goes in to the tubing in the chassis screw holes. As they were, they fit too tight and prevented deep enough insertion. They need to fit well, but not so tight that one cracks the Mini 2's screw holes. When inserting the rod in to the tubing, don't manhandle it, be gentle. I added some small pieces of fuel ling tubing to the bottom of the rear legs to increase their diameter. I may add some small beads to each instead, but this is the prototype.
Anyway, flies like normal, lands like a sweetheart and displays no instability on touchdown.
Give 'em a try.
PS May also work on the Mavic Mini(1).
1.) Weight. Some gear extenders add 18 grams to your Mini 2, These DIY gear extenders add <4 grams. Even less if some lightening holes were added to the front extenders(Sharpie caps).
2.) Cost. These will set you back less than five dollars.
3.) Camera Ground Clearance. These DIY offer about 45mm of clearance for the gimbal.
Possible additional benefits include increased visibility, your choice of color, quick and tool-less install and removal. Requires no modification of the Mini 2.
Downsides.
1.) Looks may not appeal to all.
2.) May add more weight forward of CG than it does rearward of CG. It has been zero problem flying, but I may address the issue later by adding a little mass to the rear legs.
3.) Will need to remove extenders before storing in many cases, but they remove and install quickly, so not a huge negative IMO.
4.) May make people wonder why you would pay $450 for a drone and cheap out on the gear extenders. One word answer....Weight.
Using Sharpie Ultra Fine Tip marker caps, trim to remove excess weight, as shown in photo below. NOTE: For the first time, clean the inside of the caps before placing them on the Mini 2's legs to avoid residual ink inside the cap from staining the legs.
The Sharpie marker caps will not fit over the Mini 2's front legs as is, just squeeze them a little and they will slip on with a great friction grip. I squeeze on the Sharpie logos on the cap for grip, but pressing anywhere will work. I use the "h" in Sharpie to set the depth of the Mini 2's leg in to the cap.
The rear extenders are made from 3mm carbon fiber rod and some pieces of the small fuel line(tubing) used by weed-whackers, blowers etc.
A small piece of fuel line is inserted in to each of the chassis' rear screw holes, then the carbon fiber rod is inserted in to the tubing. I had to use a very sharp knife to slightly reduce the diameter of the rod where it goes in to the tubing in the chassis screw holes. As they were, they fit too tight and prevented deep enough insertion. They need to fit well, but not so tight that one cracks the Mini 2's screw holes. When inserting the rod in to the tubing, don't manhandle it, be gentle. I added some small pieces of fuel ling tubing to the bottom of the rear legs to increase their diameter. I may add some small beads to each instead, but this is the prototype.
Anyway, flies like normal, lands like a sweetheart and displays no instability on touchdown.
Give 'em a try.
PS May also work on the Mavic Mini(1).
Attachments
Last edited: