DJI Mavic, Air and Mini Drones
Friendly, Helpful & Knowledgeable Community
Join Us Now

Comparing panorama stitching software

PanoVolo

Well-Known Member
Approved Vendor
Joined
Jun 30, 2023
Messages
356
Reactions
833
Location
Halifax NS Canada
Site
www.panovolo.com
A little something for the lazy Saturday afternoon. I decided to do a quick comparison of PanoVolo with 2 other popular stitchers.

Stitching was done from DNGs shot with DJI Mini3. Default settings in all software. DNGs straight from the drone, no pre-processing.

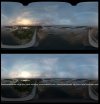
First PanoVolo vs PanoramaStudio4 Pro (trial). Default settings. "Place non-aligned images using metadata" turned on in PS4, Adaptive multiband blender turned on in PS4. No tone mapping or post processing applied to the final panorama.

Comparison image: Panovolo top, PS4 bottom
panovolo_panorama_studio.JPG

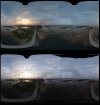
Next is PanoVolo vs PTGui13 (beta, trial). Default settings in both, multiband blender activated in PtGui, no tone mapping or post processing applied to the final panorama.

Comparison image: PanoVolo top, PtGui13 bottom. Black area on PtGui image is one of the images not aligning due to the lack of control points.
panovolo_ptgui.JPG
 
  • Like
Reactions: Paul Harvey
PanoVolo, I've used both PanoramaStudio3 Pro and PtGui12. Both are very good at stitching panoramas. I've always used post processing before stitching, never tried to stitch DNGs straight from the drone.
I would like to see a stitching comparison after post. Does the PanoVolo software enhance DNGs and is post processing not needed?
 
I purchased Panvolo just last week and just pointed it to the folders with the multiple DNG files from a panorama completed by my Mavic 3. ISO was set at 100 , f4 and exposure on auto. The output was excellent. I will post the file later today. I then processed the image minimally for tonality and cropping etc. I realize that is just one example- but the software really delivered. Picture later today.
 
  • Like
Reactions: Lens
PanoVolo, I've used both PanoramaStudio3 Pro and PtGui12. Both are very good at stitching panoramas. I've always used post processing before stitching, never tried to stitch DNGs straight from the drone.
I would like to see a stitching comparison after post. Does the PanoVolo software enhance DNGs and is post processing not needed?

both ways are possible - pre-process first, then stitch or stitch and then post-process panorama. Personally, I feel stitching first then post-processing (esp from DNGs) produces better results. If pre-processing applies too strong contrast to images, or increases vignette, exposure matching may not be able to equalize the exposure between the images well.

There is no post-processing in PanoVolo, I feel that LR or DxO is very hard (and unnecessary) to compete with, their color science will always be much better than any basic post-processing built into panorama stitchers.

Anything interesting you noticed in the comparison images, @Lens? )
 
I purchased Panvolo just last week and just pointed it to the folders with the multiple DNG files from a panorama completed by my Mavic 3. ISO was set at 100 , f4 and exposure on auto. The output was excellent. I will post the file later today. I then processed the image minimally for tonality and cropping etc. I realize that is just one example- but the software really delivered. Picture later today.

thanks Doug, looking forward to your images
 
Anything interesting you noticed in the comparison images, @Lens? )
The shadows look really good without losing detail in the sky in the PanoVolo image. I use DxO in post and I don't think I could make your pano look much better using your oringinal DNGs. Impressive pano in my opinion!
 
you have a keen eye. Yes, I did a little happy dance when I saw the rendering result - not easy to balance the high contrast scene properly without either blowing the highlights around the Sun or loosing contrast of the ground.
 
I have attached a panorama recently completed in Panovolvo. I pointed the program to the panorama folder copied directly from the Mavic 3 USB card. There were 21 separate DNG images each 43.3 MB and each 3948 by 5372 pixels. The program took 31 seconds on a MacBook Pro M-2 to create a DNG panorama (JPEG format attached) measuring 16,154 by 6641 pixels. No preprocessing was done. Post processing was in LR only . This is the entire image and no cropping was done in LR. Panovolvo delivered a rectangular cropped image at the dimensions above.
I cannot see any stitching artifacts and the complex building horizon looks unaffected. Distant detail was preserved. Here is a dropbox link - if it works. The file is about 20 MB jpeg.

 
  • Like
Reactions: Lens
I have attached a panorama recently completed in Panovolvo. I pointed the program to the panorama folder copied directly from the Mavic 3 USB card. There were 21 separate DNG images each 43.3 MB and each 3948 by 5372 pixels. The program took 31 seconds on a MacBook Pro M-2 to create a DNG panorama (JPEG format attached) measuring 16,154 by 6641 pixels. No preprocessing was done. Post processing was in LR only . This is the entire image and no cropping was done in LR. Panovolvo delivered a rectangular cropped image at the dimensions above.
I cannot see any stitching artifacts and the complex building horizon looks unaffected. Distant detail was preserved. Here is a dropbox link - if it works. The file is about 20 MB jpeg.

Wow. That's very nice. The detail is amazing. The fellow who owns the white van near the bottom of the image needs to put another quarter in the parking meter.
 
Next up is PanoVolo vs LR. Same conditions as above, stitching directly from out of drone DNGs, no pre-processisng. LightRoom 13.1 classic.

For unfamiliar with LR panorama stitching, it's pretty bare bones when it comes to settings and it either works or it does not. In this case it does not and fails to align 5 images out of 35 - my guess because it could not find control points in the sky. Hence the weird panorama appearance.

That being said, the superior Adobe's color science shines through - the overall tonality of the image is very pleasant, no blown out highlights (although the Sun was cut out, so who knows), no weird color bands near the horizon, well exposed ground (but because the sky is cut out the image has less EV variation compared to the full panorama, so again, who knows), the overall panorama WB is spot on.

The comparison image below, PanoVolo is on the left, LR classic is on the right.

panovolo_lr.JPG

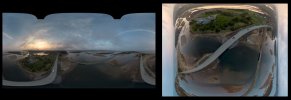
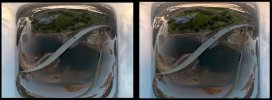
And to make a comparison easier, I re-oriented and cropped PanoVolo panorama to match the orientation and crop of the (incomplete) panorama in LR (PanoVolo - left, LR - right):

panovolo_lr_3.JPG
 
Last edited:
Interesting comparison. I am a long time PTGui user and I am wondering how you are dealing with the zenith hole in your 360 spherical panos. From your sample images, it looks like maybe you are stretching the top row of images to fill the hole. Is that essentially correct?
 
Hi @kayest , excellent question, I really need to write a guide on this subject. PanoVolo, PtGUI, and LR do not have any way to close the hole in zenith (at least as far as I know PtGUI features). PanoStudio has this feature, looks like a variant of context-aware fill or cloning? For PanoVolo I'm thinking on what to do and open to suggestions.

How to deal with this problem depends on the drone and size of the hole. For mini2, mavic 2/3 and even Air3 the options are - solid color fill, gradient fill, context-aware fill. Neither is ideal, but the hole is too large to be filled any other way. I had high hopes that Air3 will give us a full 360 pano, alas there is still a hole, albeit smaller than what mavics produce.

The drones that came tantalizingly close to having a complete 360 pano are minis 3 and 4. In fact, physically, it should be possible to have a complete sphere the way the gimbal pitches in these drones. But due to the arrangement of images in the sky, they leave a small, rectangular hole. I wish DJI fixes this in firmware. All they have to do is to either increase the pitch of 2 images a bit more, or add a 3d image and arrange the 3 images near zenith at 120 deg apart.

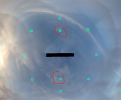
Here's how mini3 image arrangement looks for the upper hemisphere (I re-oriented panorama so it's easier to see; note 2 circled images near the rectangular hole, they are too close to other images, need to be pitched more):

1711825366880.png

I came up with a method for minis that in most cases allows to (almost seamlessly) plug the rectangular hole. Take the 2 images near zenith, and increase their pitch (on Review page of PanoVolo). You need to increase the pitch by about 2.2-3 deg, this is enough to close the gap in most cases.

1711825845258.png

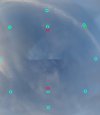
Here are I increased the pitch of both images by 2.4 deg on preview, you can see just how little the images needed to be moved (red circles). The hole is gone:
1711825591276.png

And after rendering of full size panorama, zenith looks like this:

1711825799753.png


I really hope that mini5 and air4 will finally give us complete 360 panoramas, not the "360s, but ignore a giant hole in zenith" kind we have today.
 
Thanks so much for your detailed explanation. I have actually used several panorama applications over the past few years and several different post processing methods and I agree that some work well sometimes but I've yet to find one that works well under all circumstances. In my experience, zenith patching is often the most labor intensive part of pano production and a good solution should capture significant market share.

I went to your website and read everything that might pertain to this. It appears you have a really nice, inexpensive, highly automatic, application that works really fast and produces nice results. That is quite an accomplishment.

My wishlist for the ideal app would be all the characteristics and features you currently have plus a choice of 2 or 3 zenith hole filling options. As none work perfectly for all circumstances, it would be great to give the user a choice of some of these:
1) What DJI seems to be doing in firmware (average pixel color then blur the edges).
2) Stretch and live with the seam
3) Solid color of users choice
4) Logo of users choice
5) Content aware fill
6) Polar to rectangular or cube face output for processing in another program.

Future camera and gimbal improvements might help fill the hole, but there are a lot of legacy drones out there that will be producing panoramas for years to come.

I look forward to watching your product evolve. You have a fantastic start.

-Steve
 
I used AutoStitch 15-20 years ago, before my phone did panoramas for me. It's still available, free, just dump photos in a folder and out comes a pano. For most of my panos, I go up 100' or so and take three overlapping stills with the bottom of the frame right on the horizon, so the drone camera adjusts the exposure for sky. Then three more stills just under the first ones, now with the horizon at the top of the frame, so the camera adjusts for land. Example below: Autostitch
1711832962236.png
 
I used AutoStitch 15-20 years ago, before my phone did panoramas for me. It's still available, free, just dump photos in a folder and out comes a pano. For most of my panos, I go up 100' or so and take three overlapping stills with the bottom of the frame right on the horizon, so the drone camera adjusts the exposure for sky. Then three more stills just under the first ones, now with the horizon at the top of the frame, so the camera adjusts for land. Example below: Autostitch
Unfortunately it seems that Autostitch can only work with JPG's.
 
Downloaded the trial version of Panovolo for Mac and tried it out. I like that the interface is simple and uncluttered and it can render a large pano from DNGs quite quickly. I have been a PTGui Pro user for quite some time so I am impressed at how well it can stitch panos especially difficult to stitch panos (over water). Adjusting the centre point of the pano is much easier and quicker in PTGui and the Pro version has the option to 'Fill Holes' which saves a trip to Photoshop. While PTGui Pro has many more features, it costs much more.

I found Panovolo better at blending seams where the exposure varies between frames - Why is this? In PTGui Pro, I will often get dark bands between frames where there are exposure variances especially when shooting on auto which I often do when shooting in sub zero temperatures.

Chris
 
Hi @kayest , excellent question, I really need to write a guide on this subject. PanoVolo, PtGUI, and LR do not have any way to close the hole in zenith (at least as far as I know PtGUI features). PanoStudio has this feature, looks like a variant of context-aware fill or cloning? For PanoVolo I'm thinking on what to do and open to suggestions.

How to deal with this problem depends on the drone and size of the hole. For mini2, mavic 2/3 and even Air3 the options are - solid color fill, gradient fill, context-aware fill. Neither is ideal, but the hole is too large to be filled any other way. I had high hopes that Air3 will give us a full 360 pano, alas there is still a hole, albeit smaller than what mavics produce.

The drones that came tantalizingly close to having a complete 360 pano are minis 3 and 4. In fact, physically, it should be possible to have a complete sphere the way the gimbal pitches in these drones. But due to the arrangement of images in the sky, they leave a small, rectangular hole. I wish DJI fixes this in firmware. All they have to do is to either increase the pitch of 2 images a bit more, or add a 3d image and arrange the 3 images near zenith at 120 deg apart.

Here's how mini3 image arrangement looks for the upper hemisphere (I re-oriented panorama so it's easier to see; note 2 circled images near the rectangular hole, they are too close to other images, need to be pitched more):

View attachment 173955

I came up with a method for minis that in most cases allows to (almost seamlessly) plug the rectangular hole. Take the 2 images near zenith, and increase their pitch (on Review page of PanoVolo). You need to increase the pitch by about 2.2-3 deg, this is enough to close the gap in most cases.

View attachment 173958

Here are I increased the pitch of both images by 2.4 deg on preview, you can see just how little the images needed to be moved (red circles). The hole is gone:
View attachment 173956

And after rendering of full size panorama, zenith looks like this:

View attachment 173957


I really hope that mini5 and air4 will finally give us complete 360 panoramas, not the "360s, but ignore a giant hole in zenith" kind we have today.
Mini 3 and 4 already do that
 
A little something for the lazy Saturday afternoon. I decided to do a quick comparison of PanoVolo with 2 other popular stitchers.

Stitching was done from DNGs shot with DJI Mini3. Default settings in all software. DNGs straight from the drone, no pre-processing.

First PanoVolo vs PanoramaStudio4 Pro (trial). Default settings. "Place non-aligned images using metadata" turned on in PS4, Adaptive multiband blender turned on in PS4. No tone mapping or post processing applied to the final panorama.

Comparison image: Panovolo top, PS4 bottom
View attachment 173702

Next is PanoVolo vs PTGui13 (beta, trial). Default settings in both, multiband blender activated in PtGui, no tone mapping or post processing applied to the final panorama.

Comparison image: PanoVolo top, PtGui13 bottom. Black area on PtGui image is one of the images not aligning due to the lack of control points.

View attachment 173703
So, difference between LR, PS, and Luminar Neo ( my preference ) worth the money?
 
Thanks so much for your detailed explanation. I have actually used several panorama applications over the past few years and several different post processing methods and I agree that some work well sometimes but I've yet to find one that works well under all circumstances. In my experience, zenith patching is often the most labor intensive part of pano production and a good solution should capture significant market share.

I went to your website and read everything that might pertain to this. It appears you have a really nice, inexpensive, highly automatic, application that works really fast and produces nice results. That is quite an accomplishment.

My wishlist for the ideal app would be all the characteristics and features you currently have plus a choice of 2 or 3 zenith hole filling options. As none work perfectly for all circumstances, it would be great to give the user a choice of some of these:
1) What DJI seems to be doing in firmware (average pixel color then blur the edges).
2) Stretch and live with the seam
3) Solid color of users choice
4) Logo of users choice
5) Content aware fill
6) Polar to rectangular or cube face output for processing in another program.

Future camera and gimbal improvements might help fill the hole, but there are a lot of legacy drones out there that will be producing panoramas for years to come.

I look forward to watching your product evolve. You have a fantastic start.

-Steve
thanks Steve

yes some patching is definitely possible, gradient fill is probably the simplest as a start point followed by more advanced methods.
 
Lycus Tech Mavic Air 3 Case

DJI Drone Deals

Forum statistics

Threads
131,135
Messages
1,560,218
Members
160,105
Latest member
anton13