


You are using an out of date browser. It may not display this or other websites correctly.
You should upgrade or use an alternative browser.
You should upgrade or use an alternative browser.

Thanks!!
"making my little brother fly it" I love it
BTW, welcome to the Forum!!
Rod ..
I've gotta be honest I do blame myself a little bit, I could have just not "made" him fly it but it is what it is. Any ideas as to what might be making it move like that though?
Felix le Chat
Well-Known Member
Mini2" data-source="post: 1638772" class="bbCodeBlock bbCodeBlock--expandable bbCodeBlock--quote js-expandWatch">Was the starboard (right hand) drift only happening in conjunction with forward stick input? Does the drone drift right with reverse pitch as well?Hi, I've faced a problem when flying my Mini 2 yesterday and would appreciate it if someone could enlighten me and help me out.
I've never experienced this before. Today, I took my Mini 2 out and decided to go on a joyride so I flew it down the road and above my place for a little while. For the first few minutes, everything seemed fine, but after a little while, my drone started completely losing control. I moved the stick forward and the drone flew to the right, the drift was often very strong and it was really just a mess. I managed to land it and was concerned because I couldn't see any pattern.
At times the drone did everything it should and then a minute later it was once again moving in the opposite direction and so on. I really don't know what's causing this and apart for a little crack in the leg thanks to my little brother (which I glued up and hasn't caused a problem since) there is no damage I know of.
Help!
Thanks a lot for any help, and have an awesome day,
KJ
I'll answer any questions as best I can to help with more information and will send any media needed if possibl
Bit of a silly question, but have you checked all four sets of props for splits/cracks/damage?
To be honest, you might find that the repaired crack at the rear arm swing joint is not as stable as it might be and that arm is dropping slightly while the motor is under load, this would give a slight twist to the airframe that could cause the kind of behaviour you have noticed.
Also.... Check all four motor arms for stress fractures (look for obvious cracks first, then GENTLY twist each arm to see if a slight spiral fracture opens up). These drones are flimsy by design and don't cope with hard knocks very well.
But first off, you might be better off replacing the middle shell completely.
I would advise you to repair that drone correctly NO GLUE allowed lol The other posts contain some great advice for you BUT I would not fly that drone until the arm repair is made. any variation in how your arm is seated will change the flight characteristics of the Drone Because you are basically changing one of the motors thrustlines by offsetting the arm.
Was the starboard (right hand) drift only happening in conjunction with forward stick input? Does the drone drift right with reverse pitch as well?
Bit of a silly question, but have you checked all four sets of props for splits/cracks/damage?
To be honest, you might find that the repaired crack at the rear arm swing joint is not as stable as it might be and that arm is dropping slightly while the motor is under load, this would give a slight twist to the airframe that could cause the kind of behaviour you have noticed.
Also.... Check all four motor arms for stress fractures (look for obvious cracks first, then GENTLY twist each arm to see if a slight spiral fracture opens up). These drones are flimsy by design and don't cope with hard knocks very well.
But first off, you might be better off replacing the middle shell completely.
Checked the arms but it does seem pretty stable and although that crack has been there for a while, it only did that weird stuff on before yesterday's flight, and I don't think anything changed since then. Yeah I thought of replacing the shell but I have two left hands (if that can be said in English) and I don't trust myself, I'm just happy that that crack is not anything on the inside and in the worst case can be fixed. Propellers look fine.
I would advise you to repair that drone correctly NO GLUE allowed lol The other posts contain some great advice for you BUT I would not fly that drone until the arm repair is made. any variation in how your arm is seated will change the flight characteristics of the Drone Because you are basically changing one of the motors thrustlines by offsetting the arm.
Thanks for the advice, I just find it strange that somehow it seemed to work just fine for the past month where that crack was there. Any thoughts about that?
mneeze
Member
Mini2" data-source="post: 1638943" class="bbCodeBlock bbCodeBlock--expandable bbCodeBlock--quote js-expandWatch">First, let me preface by saying i don't know jack..Thanks for the advice, I just find it strange that somehow it seemed to work just fine for the past month where that crack was there. Any thoughts about that?
Now with that out of the way - the arm could react much differently under differing loads from the motor. This is not something you'd be able to notice by just twisting/prying the arm while the drone is turned off.. Also just the tiniest bit of play in the arm could result in exaggerated movements once the motors are spinning at high rpm, then add wind etc to the equation and things can get squirrely real quick.
As for why the drone just now started exhibiting this behavior when the Crack had been there awhile, perhaps the glue has let go or been weakened ever so slightly, which would again be compounded once the motors are running and the wind is blowing etc. At first thought, that tiny crack didn't seem like the culprit to me, but the more i think about it, the more likely it could be. Adding directional input to the controller, regardless of direction (or very specifically in certain directions), could surely put many different stresses on the arm causing the drone to compensate by "moving itself" to try to remain stable during flight. Without seeing/knowing this, it would most definitely look like the drone had a mind of its own. Or at the very least, like it has a mind of its own when given certain specific directional input(s).
Unless someone finds the issue in the flight logs or there is a problem with the controller, I'm inclined to believe it actually does have to do with the broken/repaired arm. Again tho, be warned that i am no expert on any of the DJI platforms, but i believe this to be a "mechanical" issue rather than a software error etc.
If i think of anything else, i will surely try to help. Good luck with this, i hope it works out for you!
First, let me preface by saying i don't know jack..
Now with that out of the way - the arm could react much differently under differing loads from the motor. This is not something you'd be able to notice by just twisting/prying the arm while the drone is turned off.. Also just the tiniest bit of play in the arm could result in exaggerated movements once the motors are spinning at high rpm, then add wind etc to the equation and things can get squirrely real quick.
As for why the drone just now started exhibiting this behavior when the Crack had been there awhile, perhaps the glue has let go or been weakened ever so slightly, which would again be compounded once the motors are running and the wind is blowing etc. At first thought, that tiny crack didn't seem like the culprit to me, but the more i think about it, the more likely it could be. Adding directional input to the controller, regardless of direction (or very specifically in certain directions), could surely put many different stresses on the arm causing the drone to compensate by "moving itself" to try to remain stable during flight. Without seeing/knowing this, it would most definitely look like the drone had a mind of its own. Or at the very least, like it has a mind of its own when given certain specific directional input(s).
Unless someone finds the issue in the flight logs or there is a problem with the controller, I'm inclined to believe it actually does have to do with the broken/repaired arm. Again tho, be warned that i am no expert on any of the DJI platforms, but i believe this to be a "mechanical" issue rather than a software error etc.
If i think of anything else, i will surely try to help. Good luck with this, i hope it works out for you!
Thanks for this! What would something wrong in the flight logs actually look like, what do you mean with that?
mneeze
Member
Mini2" data-source="post: 1638954" class="bbCodeBlock bbCodeBlock--expandable bbCodeBlock--quote js-expandWatch">Im sorry but i don't know enough to tell you anything about the logs or what they should/ shouldn't look like. There are several very senior, very knowledgeable members on here that know exactly what they're talking about when it comes to the logs..consider searching something about "flight logs" and you will see which members I'm taking about. If no one answers about the logs, maybe DM these big brains that DO know what they're talking about, unlike me in this case...sorry i couldn't be more help.Thanks for this! What would something wrong in the flight logs actually look like, what do you mean with that?
Yorkshire_Pud
Well-Known Member
I will try to post an image of a stripped down mini 2 shell later but in the mean time.....
With regards to the crack, I have some concerns, I suggest that, out of doors, you have the drone hover in front of you, switch the flight mode to sports. Watch the damaged arm carefully and give the drone short bursts of full throttle climb and check whether or not the arm moves. Return the drone to an eye level hover after each climb.
If you see the arm move I think you will need a new shell, it's not a difficult job if you have the tools and can solder but at 15 you might not have the patience.
If a repair is necessary was this a new drone ? If so do you have care refresh ? If so and you decide to send it in remove all traces of the glue, traces of glue might invalidate care refresh.
Flying a mini 2 indoors I have formed the opinion that tripod mode is not the most stable mode, I can't remember using out doors.
Perhaps @slup or @Meta4 would have a look at the log.
Im sorry but i don't know enough to tell you anything about the logs or what they should/ shouldn't look like. There are several very senior, very knowledgeable members on here that know exactly what they're talking about when it comes to the logs..consider searching something about "flight logs" and you will see which members I'm taking about. If no one answers about the logs, maybe DM these big brains that DO know what they're talking about, unlike me in this case...sorry i couldn't be more help.
Well, thanks anyway!
I will try to post an image of a stripped down mini 2 shell later but in the mean time.....
With regards to the crack, I have some concerns, I suggest that, out of doors, you have the drone hover in front of you, switch the flight mode to sports. Watch the damaged arm carefully and give the drone short bursts of full throttle climb and check whether or not the arm moves. Return the drone to an eye level hover after each climb.
If you see the arm move I think you will need a new shell, it's not a difficult job if you have the tools and can solder but at 15 you might not have the patience.
If a repair is necessary was this a new drone ? If so do you have care refresh ? If so and you decide to send it in remove all traces of the glue, traces of glue might invalidate care refresh.
Flying a mini 2 indoors I have formed the opinion that tripod mode is not the most stable mode, I can't remember using out doors.
Perhaps @slup or @Meta4 would have a look at the log.
Bookmarked this, I'll try this at some point. Sadly not a new drone, bought it secondhand but in perfect condition. Otherwise would not have clued it but have sent it in that would have done the trick, but thanks! I could get my dad to try to work on it although he might be just as bad at I am. I enjoy building and fixing things so if I have to do that it wouldn't be a problem. Is there any danger that the movement is caused by something different though like faulty GPS? (Better to really be almost sure about the problem before I take it apart). I've got to be honest I would already be quite reassured if I hadn't busted something on the inside but who knows. Is it possible that it's the controller?
mneeze
Member
Mini2" data-source="post: 1638975" class="bbCodeBlock bbCodeBlock--expandable bbCodeBlock--quote js-expandWatch">No problem buddy, any time!Well, thanks anyway!
Felix le Chat
Well-Known Member
Mini2" data-source="post: 1638942" class="bbCodeBlock bbCodeBlock--expandable bbCodeBlock--quote js-expandWatch">There are plenty of very useful (and accurate) 'teardown' videos on YouTube that would walk you through the process.... If you do decide to give it a shot, think of it in terms of building a model kit, putting the bird back together is just a case of following the video steps backwards.... just make sure you're careful and methodical (and make sure you arrange all the fiddly little screws so that you know which holes to replace 'em in).Checked the arms but it does seem pretty stable and although that crack has been there for a while, it only did that weird stuff on before yesterday's flight, and I don't think anything changed since then. Yeah I thought of replacing the shell but I have two left hands (if that can be said in English) and I don't trust myself, I'm just happy that that crack is not anything on the inside and in the worst case can be fixed. Propellers look fine.
DIY repairs are nowhere near as daunting as you might think. Even the quite complex ones.
A little practise with light soldering will also pay dividends in case the rear arm needs replacing because of a damaged ball joint (also surprisingly common after a side-on prang).
Or you could find someone relatively local to you who has the skillset to do the job for you for a reasonable fee. Whatever you decide, I think you might find that a good, solid repair replacing knackered bits with new/undamaged components would be best. For peace of mind if nothing else.
Best of luck, I hope you manage to solve your problem in short order.
Last edited:
There are plenty of very useful (and accurate) 'teardown' videos on YouTube that would walk you through the process.... If you do decide to give it a shot, think of it in terms of building a model kit, putting the bird back together is just a case of following the video steps backwards.... just make sure you're careful and methodical (and make sure you arrange all the fiddly little screws so that you know which holes to replace 'em in).
DIY repairs are nowhere near as daunting as you might think. Even the quite complex ones.
A little practise with light soldering will also pay dividends in case the rear arm needs replacing because of a damaged ball joint (also surprisingly common after a side-on prang).
Well that's good to hear, I really don't trust myself with the soldering though, we'll see if I can practice a little bit still need to see if we even have a soldering iron in the basement otherwise might need to purchase a new one.
Felix le Chat
Well-Known Member
Mini2" data-source="post: 1638985" class="bbCodeBlock bbCodeBlock--expandable bbCodeBlock--quote js-expandWatch">A micro driver set, a pair of fine long-nose tweezers, a couple of little plastic pry bars that people use to replace tablet/phone screens, a guitar plectrum, a fine soldering iron and a reel of pre-fluxed fine circuit board solder are pretty much all the tools you need to get any drone repair done, now or at any point in the future.Well that's good to hear, I really don't trust myself with the soldering though, we'll see if I can practice a little bit still need to see if we even have a soldering iron in the basement otherwise might need to purchase a new one.
Just have a practise with the de-soldering and re-soldering on an old bit of circuit board from another bit of knackered electronic kit until you're steady handed and confident.
A micro driver set, a pair of fine long-nose tweezers, a couple of little plastic pry bars that people use to replace tablet/phone screens, a guitar plectrum, a fine soldering iron and a reel of pre-fluxed fine circuit board solder are pretty much all the tools you need to get any drone repair done, now or at any point in the future.
Just have a practise with the de-soldering and re-soldering on an old bit of circuit board from another bit of knackered electronic kit until you're steady handed and confident.
Yep, thanks, I'll take a look at it and see if that's the way to go.
You can also purchase solder practice boards To solder electronics without problems remember:
Use a soldering iron with a temp adjust The best on the market IMO the MINIWARE TS 101 costs around 50 bucks and comes with a nice tip!
Use the correct solder -- 63\37 and even if it has flux GET flux and use it!! no clean Flux is best. I like the flux pens.
Soldering irons are not made to melt solder!!!-- the biggest soldering myth is to grab the iron and melt the solder with the tip...NO!! Heat the pad and let the pad melt the solder! you can "Tin" the tip with a little solder to help with heat transfer but thats it. and if your new DO NOT increase the heat above 350 for now...
Last edited:
Yorkshire_Pud
Well-Known Member
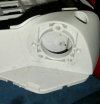
Photo attached, basically the rear arm's pivot is clamped to the middle shell by three screws with additional location provided by the two pimples that you can see. My concern is that the crack extends towards the top of the drone and may have weakend the bottom screw hole.
With regards to working on the drone .... if you decide to .... just take your time and don't let the prying tools go deeply inside the drone, there are thin ribbon cables that you might be able to tear with a prying tool that went to deep plus delicate connectors.
A hair dryer may also be useful to soften glue especially when trying to peel the 3? leg cable that goes to the gimbal and a sensor on the left? hand side.
Heating the top cover of the drone and the side walls might also be useful when trying to open the top of the drone as it will probably soften the pastic a bit and reduce the likely hood of breaking the catches ( easily done with at least some of them ).
Attachments
Last edited:
Yorkshire_Pud
Well-Known Member
Are you serious ? Genuine question.Soldering irons are not made to melt solder!!!-- the biggest soldering myth is to grab the iron and melt the solder with the tip...NO!! Heat the pad and let the pad melt the solder!
I must admit that I have found it useful to at least 'wet' the tip with solder to aid the conduction of heat to the work piece ....... or am I doing something wrong?
Similar threads
- Replies
- 1
- Views
- 269


DJI Drone Deals
1. Mini 2
2. Mini 3 Pro
3. Mini 4 Pro
4. Air 2s
5. Air 3
6. Avata 2
7. Mavic 3 Pro
8. Mavic 3 Classic
2. Mini 3 Pro
3. Mini 4 Pro
4. Air 2s
5. Air 3
6. Avata 2
7. Mavic 3 Pro
8. Mavic 3 Classic
New Threads
-

-
-

-

-
Looking for purchase link or WTB: Mavic Pro ND filters 64, 128, etc.
- Started by AdamBolonsky
- Replies: 1
Forum statistics
