DJI Mavic, Air and Mini Drones
Friendly, Helpful & Knowledgeable Community
Join Us Now

Advice on using correct camera settings for Mini2

jambros3

Active Member
Joined
Dec 10, 2022
Messages
27
Reactions
30
Age
52
Location
Phoenix, AZ, USA
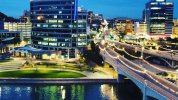
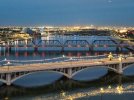
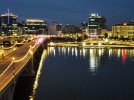
I went out taking photos predawn and was using the camera settings that were automatically placed in my mini2. To me they came kinda blurry and not as clear as I thought they could be. Is there any advice you could give on taking photos at night and during the day? I’m still learning how photography works but would like to know more how much the mini2 could do.
Thank you for your time.
Julian
 

Attachments

  • D8B6D554-861C-4557-94C0-2AD810550FD7.jpeg
    D8B6D554-861C-4557-94C0-2AD810550FD7.jpeg
    453.2 KB · Views: 26
  • 68F88A16-751D-49E7-81E3-26FCC8DC9712.jpeg
    68F88A16-751D-49E7-81E3-26FCC8DC9712.jpeg
    6.3 MB · Views: 27
  • 6DAFE4BC-88C5-4242-9EE2-8E7DAAC07465.jpeg
    6DAFE4BC-88C5-4242-9EE2-8E7DAAC07465.jpeg
    5.9 MB · Views: 26
Ok, you will need a pad of paper, a pen, your drone with a fresh format SD Card.

Before you go out learn how to set your camera into manual mode, learn how to change the Shutter Speed and the ISO Setting.

Below is the link to all of the downloads offered by DJI for the Mini 2, including the User Manual.

After you read the Manual, read it again, you will be surprised what you missed the first time and you will be better prepared for that first "scary moment…"


You might also what to view a few YouTube Videos on the Mini 2 camera settings as the Manual is not too helpful on this point…

Your photos appear to have been shot at too low an ISO Setting with too slow a shutter Speed

The ISO sets the "sensitivity" of the "film" (actually the sensor…) and the shutter.

You need to go out, at night, with your pen and paper. Lift off and set the ISO at the highest setting of
3200 (most sensitive), now start shooting one photograph at a time, starting at 1/2000 (Fast shutter speed), shoot the second at 1/1250 ( slower speed), third at 1/800 (even slower), 1/240, and then at 1/100. This last one will probably be blurry…

And as you shot each photo, mark on the paper the settings. So when you go back to review the photos, you know what setting works best.

Oh you are not done yet, you need to keep doing this, but now the second set is shot at ISO of 800, but use the same shutter speeds as you did before and be sure to write it all down.

Yo can probably stop at ISO 400 and go review what yu have done. You may not get the best photo, but you will get close, then the closest one to a Great photo is now the starting place to do this again, but you only go a little higher on the ISO and a little lower on the ISO and go a bit faster and slower on the shutter speed.

This is called "Bracketing" so that you get a photos, some a bit blurry, too bright, too dark, but like Goldilocks, you will get one that's "Just Right"

Good Luck!
 
...Is there any advice you could give on taking photos at night and during the day?
It's far less complicated than you think when you dive into it just a bit, it's very few thing's to keep in mind when it comes to still photography with a fixed focal lens without a aperture setting... & we are talking manual settings, not auto. Also add that it doesn't exist one set of settings that will be good... the lightening condition will always differ.

ISO: Higher makes the sensor more sensitive to light leading to shorter shutter times... but higher ISO leads also to more noise.
Shutter time: Longer let in more light which let you use lower ISO for a more noise free result... but with a longer (slower) shutter the risk for motion blur increases.
The desired exposure of the picture: Less light in to the sensor and/or a too low ISO the picture will be darker... the opposite the picture will be lighter. You set the exposure parameters (ISO & Shutter) where you get the look you want the picture to have & at the same time try to mitigate high ISO noise & motion blur... after all you can see the upcoming result directly on the screen before you shoot. (If you want to be more scientific here, Google Histogram & read up)

I will give you a quicker 2 point method to do it in the field than in the previous post (biased towards photography in low light... but the thinking is the same during day light).

1 Learn how your Mini 2 camera performs when it comes to ISO noise... how much noise can you accept in the picture.

Start out with taking one picture in a gloomy environment (noise is easier to see in the darker part of a picture)... Like I did below. Drone on the kitchen table & just take one picture at each ISO setting. Take each up in your editor & decide which ISO setting that have the most noise you can accept (you here can add your postprocessing skills when it comes to clean a picture from noise if you want). I settled for a max ISO at 1600 for my Mavic Air 1 (including my skills to clean the picture in post). So... then I know, never go higher than ISO1600.

2 The risk for motion blur... or how slow shutter can I use airborne without risking a blurry picture. Well, usually you can use a shutter up to close of 2sec in calm winds if you snap away up to 5-10 pictures... among them usually one is sharp enough to keep.

So in the end... if I can't use a ISO setting below 1600 with my drone, keep the shutter faster than 2sec & get a exposure of the picture I like... it's no longer of any use to shoot the picture.

(Click on the pic. to study the noise closer, ISO 100 on the top & 3200 in the bottom)
ISO100-3200.jpg
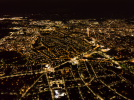
Below overview picture of my home town, was taken several hours after the sunset (9PM) in September... pitch dark. Shutter on 2sec with ISO200... not bad for a drone from 2018, fully possible to print in A3 format.

(Click on it to get it larger)
1678289858512.png
 
At 2 seconds it is almost impossible to get completely sharp images. What is needed is very still air and a stationary drone. You are asking for trouble shooting below 1/30 of a sec.
 
  • Like
Reactions: LoudThunder
This is exactly what I want to learn.
Here are some YouTube videos that will help you, I've subscribed to their channels…


Search within this YouTuber for your interests.


This is a list of all of their course, a lot are Free for the taking…


Also, Search within this YouTuber for your interests.

And search specifics on YouTube, such as "Drone Photography at night"

Good Luck!
 
At 2 seconds it is almost impossible to get completely sharp images...
Your wording about "completely" is of course debatable... but haven't had any serious problems to get fully acceptable sharpness up to 2 sec in very calm winds, not with only one shoot granted, it usually require 5-10 to get out one good.

When it comes to night photography it will always be a middle way between high ISO & longer shutter times ... both risk destroying details & sharpness...

Your recommended 1/30sec may be required if printing in huge formats or crops a lot.
 
  • Like
Reactions: LoudThunder
Before you go out learn how to set your camera into manual mode, learn how to change the Shutter Speed and the ISO Setting.
When someone has little understanding of photographic basics, using manual exposure settings is poor advice.
The drone in auto mode will get good results most of the time.
But it's very easy to get bad results in manual mode if you don't know what you are doing.

You need to go out, at night, with your pen and paper. Lift off and set the ISO at the highest setting of
3200 (most sensitive), now start shooting one photograph at a time, starting at 1/2000 (Fast shutter speed), shoot the second at 1/1250 ( slower speed), third at 1/800 (even slower), 1/240, and then at 1/100. This last one will probably be blurry…
There's no reason a 100th second shot should look blurry.
And as you shot each photo, mark on the paper the settings. So when you go back to review the photos, you know what setting works best.
There's no setting that "works best" because there's no single set of lighting conditions.
The setting that works best is the right setting for what you are shooting and the effect you want to capture.
This is going to be different all the time.
This is called "Bracketing" so that you get a photos, some a bit blurry, too bright, too dark, but like Goldilocks, you will get one that's "Just Right"
Bracketing in tricky lighting situations is good advice.
I went out taking photos predawn and was using the camera settings that were automatically placed in my mini2. To me they came kinda blurry and not as clear as I thought they could be.
Most of the blur in those images is the haze around the bright light sources - something that's hard to avoid at night.
... and "noise" which makes the image look grainy when using high ISO values with a tiny camera sensor.
Is there any advice you could give on taking photos at night and during the day? I’m still learning how photography works but would like to know more how much the mini2 could do.
Basic photography is much too big a subject to learn from a few forum posts.
Google will find many websites which offer detailed explanation of what you are looking for.
Here's just one example:
 
Lycus Tech Mavic Air 3 Case

DJI Drone Deals

New Threads

Forum statistics

Threads
131,144
Messages
1,560,343
Members
160,116
Latest member
henryairsoft1