DJI Mavic, Air and Mini Drones
Friendly, Helpful & Knowledgeable Community
Join Us Now

Diagnosing Gimbal Overload

benngeorge

Member
Joined
Jan 25, 2021
Messages
8
Reactions
2
Age
40
Location
Wales
Hello,

Looking for some advice. I have a gimbal Overload issue on my M2P.

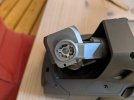
Can anyone advise on diagnosing the fault before I start dismantling the gimbal? It's outside warranty and bought it second hand a few months back. No crashes, but I now suspect it may have been crashed by the previous owner.

The main fault is that the camera is unable to pitch up and down. And when manipulating the camera by hand I can feel a slight resistance in bumps as I rotate it. Am I best just replacing the pitch motors?

Any advice would be much appreciated. Thanks.
 
How recently did you buy this?
Was it bought via the likes of ebay UK? If so, if the 'condition category' was "used" then it is supposed to work (see the definition of the condition category in the original advert) and, if push comes to shove, that overrides any declared faults in the advert's text. If it was sold as "used" it could be returned, at the sellers cost, via the "not-as described" process where the seller is responsible for the return postage and return postage is to be prepaid. I would not return it outside of any formal process and trackable carriage is a MUST.
I returned, via this method, a Phantom 3 bought via ebay because of significant and undeclared stress cracks.
 
Last edited by a moderator:
  • Like
Reactions: benngeorge
Welcome to the forum and enjoy.

Wow. The main reason to buying the M2P would be for the Gimbal, so because of that I would try to return it.
 
@benngeorge welcome to the forum,as others have said it sounds like you were sold a damaged drone ,depending on how you paid for it, or the terms of the purchase you might be able to get a refund ,one thing you could try is to blow the motors that control the gimbal with either a air puffer or some canned air ,as there could be some dirt or debris causing resistance to the smooth operation of the gimbal ,do not spray any type of lube on the moving parts as you will just make things worse,after you have started the drone does it go through its start up dance ok check that it is not catching on any part of the body and that it is attached to the gimbal plate correctly
 
Benngeorge
It sounds like dust/grit in a small space not allowing free movement.
First try as old man mavic says. Blow clean air into the pitch joints at the end of the roll arms.

Only one joint contains the motor. The other is a spacer through which the PTZ cable is threaded.
Try a gimbal calibration after blowing the joints. (Go 4 App; Controller icon top right; Remote Controller Settings; Camera icon with line above; Gimbal settings; Gimbal Auto Calibrate.)

Hopefully things might be slightly better after the above.

If not and you intend to go down the repair route there is something else you should try first.

If you dissemble and reassemble the gimbal there is some software you will need to run to reset/calibrate the gimbal.

If the above has not worked you might as well try the software first.

Let us know if you were successful or how you are to proceed.
 
Good afternoon all! Thanks so much for the helpful comments. To be clear I have had the drone a good few months now and probably should have pursued the returns option back in early 2020 when I had some niggling concerns. Nevertheless, I am where I am now unfortunately. Given the passage of time I think it's fair to say that ship has sailed.

I had found back in the end of 2020, that manually rotating the pitch would free it enough to allow for free movement and the gimbal would successfully run a calibration pre-flight. It just wont now, so perhaps there is some debris in there that needs to come out.

I have experience with having successfully replaced a ribbon cable in a Mavic Pro, so am reasonable confident at having a bash at fixing the M2P, but obviously would rather be able to diagnose so that I can take it apart and reassemble in one sitting, rather than having it in bits and then waiting for parts.

I think it's beyond having air blown into it, but may well try that. Can any of your recommend any particularly good videos showing disassembly of the gimbal unit? Thanks again to you all for your help and interest!
 
  • Like
Reactions: old man mavic
Benngeorge
It sounds like dust/grit in a small space not allowing free movement.
First try as old man mavic says. Blow clean air into the pitch joints at the end of the roll arms.

Only one joint contains the motor. The other is a spacer through which the PTZ cable is threaded.
Try a gimbal calibration after blowing the joints. (Go 4 App; Controller icon top right; Remote Controller Settings; Camera icon with line above; Gimbal settings; Gimbal Auto Calibrate.)

Hopefully things might be slightly better after the above.

If not and you intend to go down the repair route there is something else you should try first.

If you dissemble and reassemble the gimbal there is some software you will need to run to reset/calibrate the gimbal.

If the above has not worked you might as well try the software first.

Let us know if you were successful or how you are to proceed.
Sorry - should have said that I have done this. But the resistance in the motors is such that I am confident its a mechanical issue rather than software. And will repeat if I end up taking it apart.
 
@benngeorge welcome to the forum,as others have said it sounds like you were sold a damaged drone ,depending on how you paid for it, or the terms of the purchase you might be able to get a refund ,one thing you could try is to blow the motors that control the gimbal with either a air puffer or some canned air ,as there could be some dirt or debris causing resistance to the smooth operation of the gimbal ,do not spray any type of lube on the moving parts as you will just make things worse,after you have started the drone does it go through its start up dance ok check that it is not catching on any part of the body and that it is attached to the gimbal plate correctly
It goes through the "start up dance", which looks to be successful for the exception of the failure to operate camera pitch, which barely moves. So seems likely to have something internally which is preventing free movement. Thanks for your suggestions.
 
  • Like
Reactions: old man mavic
It goes through the "start up dance", which looks to be successful for the exception of the failure to operate camera pitch, which barely moves. So seems likely to have something internally which is preventing free movement. Thanks for your suggestions.
OK next step before disassembly is to run JointCoarse and LinearHall.
You will have to do that anyhow after disassembly so you might as well try that first.
I doubt it fix anything if there is a physical fault, but it is worth a try.

Go Here and download DJI Tools.
You will also have to download and install Python.

SUAS Gimbal Repair
The Process

JointCoarse will move the gimbal through its extremes of movement and store the result.
LinearHall will centre the camera between the extremes of movement.
 

Attachments

  • DJI Tools.jpg
    DJI Tools.jpg
    189.3 KB · Views: 14
Last edited:
OK next step before disassembly is to run JointCoarse and LinearHall.
You will have to do that anyhow after disassembly so you might as well try that first.
I doubt it fix anything if there is a physical fault, but it is worth a try.

Go Here and download DJI Tools.
You will also have to download and install Python.

SUAS Gimbal Repair
The Process

JointCoarse will move the gimbal through its extremes of movement and store the result.
LinearHall will centre the camera between the extremes of movement.
Evening. Firstly; thank you ever so much for taking the time to put this together for me. Exceptionally helpful!

I have run both JointCoarse & LinearHall and both seem to confirm there is something obstructing the pitch motor. I have uploaded a video here and would really appreciate any views on the matter:

You will note that neither test would start without me manipulating the pitch to overcome the initial resistance and then full range was clearly not available.

My current reflection is that whilst manipulating the pitch by hand seemed to free the mechanism enough to work on a number of occasions previously, whatever was obstructing that mechanism has probably worked its way in and am inclined to think I at least need to take it apart and reassemble in order to restore clean working, albeit I would really rather not.

Any other suggestions or observations would be warmly welcomed! Many thanks again.
 
@benngeorge watching your video it appears that the gap on the right side of the camera where it pivots is larger than the one on the left, as if something has moved inside the housing
 
Evening. Firstly; thank you ever so much for taking the time to put this together for me. Exceptionally helpful!

I have run both JointCoarse & LinearHall and both seem to confirm there is something obstructing the pitch motor. I have uploaded a video here and would really appreciate any views on the matter:

You will note that neither test would start without me manipulating the pitch to overcome the initial resistance and then full range was clearly not available.

My current reflection is that whilst manipulating the pitch by hand seemed to free the mechanism enough to work on a number of occasions previously, whatever was obstructing that mechanism has probably worked its way in and am inclined to think I at least need to take it apart and reassemble in order to restore clean working, albeit I would really rather not.

Any other suggestions or observations would be warmly welcomed! Many thanks again.
You are probably way ahead of me by now.
Anyhow my tips and notes.
You need a 1.5hex for the body screws,
and 00 cross-head for 99%
and 000 cross-head for the ribbon connector clamp on the Gimbal board.

Proceed as in these videos
SUAS 1
SUAS 2
iRepairMD

Personally I do not use a razor blade but you do need something sharp just to lift the side covers (They are just thin plastic and only lightly glued but you just need to get under them.)
All the other caps can be removed later by poking from the inside with a small screwdriver.

After removing the filter just use a plastic tool to prise the black shroud off. This will exposed the three camera screws, hidden beneath some silicon.

You should get all the information you need from the videos.
 
Last edited:
  • Like
Reactions: benngeorge
You are probably way ahead of me by now.
Anyhow my tips and notes.
You need a 1.5hex for the body screws,
and 00 cross-head for 99%
and 000 cross-head for the ribbon connector clamp on the Gimbal board.

Proceed as in these videos
SUAS 1
SUAS 2
iRepairMD

Personally I do not use a razor blade but you do need something sharp just to lift the side covers (They are just thin plastic and only lightly glued but you just need to get under them.)
All the other caps can be removed later by poking from the inside with a small screwdriver.

After removing the filter just use a plastic tool to prise the black shroud off. This will exposed the three camera screws, hidden beneath some silicon.

You should get all the information you need from the videos.
Thanks for this. I'll have a bash at it over the next few days. I'm really hoping to find something really obvious when I open it up. ?

I'll keep you posted. Thanks again for your views. Cheers.
 
Thanks for this. I'll have a bash at it over the next few days. I'm really hoping to find something really obvious when I open it up. ?

I'll keep you posted. Thanks again for your views. Cheers.
A little more thinking on this.
For minimum disruption with maximum incite.

Remove camera filter
Remove black shroud.
Unscrew the three front screws.
Remove the camera back plate.
Disconnect the PTZ cable.
Remove the camera from its housing.
With the camera out. Remove the cover plates on the pitch axis (ends of the roll arms).
With the covers removed undo the three obvious screws that hold the rotation stopper in place.
(cable side not the pitch motor side)

Lay the end connector parallel with the cable and push the PTZ cable and connector back through the centre hole in the side of the camera case and the loose stopper.

With the rotation stopper and the cable removed, the remaining camera housing, even with its side spacer still attached should turn freely through 360 degrees without any resistance. (Just spinning on the pitch motor.) It will not spin on its own but should turn freely through 360 degrees.


If you need to go further


remove the side spacer (it has three cross head screws)
remove the inner roll arm cover.

Disconnect the ribbon cable connector to the pitch motor. (once undone this can be troublesome to reconnect even with a new unit).

The pitch motor screws can now be undone and the camera housing; pitch motor; and ribbon cable; removed from the gimbal.


Reassembly is in reverse order.
Best of luck with the ribbon cable connection. (sometimes easier if the pitch motor is screwed in first)
fit the inner cover before fitting the spacer.
fit the spacer; groove aligns with the camera housing slot.
When fitting the rotation stopper be sure that the round hole in the camera housing is facing forwards(not backwards)
carry on in reverse order.
 
  • Like
Reactions: benngeorge
A little more thinking on this.
For minimum disruption with maximum incite.

Remove camera filter
Remove black shroud.
Unscrew the three front screws.
Remove the camera back plate.
Disconnect the PTZ cable.
Remove the camera from its housing.
With the camera out. Remove the cover plates on the pitch axis (ends of the roll arms).
With the covers removed undo the three obvious screws that hold the rotation stopper in place.
(cable side not the pitch motor side)

Lay the end connector parallel with the cable and push the PTZ cable and connector back through the centre hole in the side of the camera case and the loose stopper.

With the rotation stopper and the cable removed, the remaining camera housing, even with its side spacer still attached should turn freely through 360 degrees without any resistance. (Just spinning on the pitch motor.) It will not spin on its own but should turn freely through 360 degrees.


If you need to go further


remove the side spacer (it has three cross head screws)
remove the inner roll arm cover.

Disconnect the ribbon cable connector to the pitch motor. (once undone this can be troublesome to reconnect even with a new unit).

The pitch motor screws can now be undone and the camera housing; pitch motor; and ribbon cable; removed from the gimbal.


Reassembly is in reverse order.
Best of luck with the ribbon cable connection. (sometimes easier if the pitch motor is screwed in first)
fit the inner cover before fitting the spacer.
fit the spacer; groove aligns with the camera housing slot.
When fitting the rotation stopper be sure that the round hole in the camera housing is facing forwards(not backwards)
carry on in reverse order.
Morning Gents. I'm in the middle of taking the drone apart. Any views on the photo attached? It looks to me like there is some corrosion there, albeit I cannot explain why. Also the resistance does appear to be isolated to the motor. So maybe I'm heading towards a replacement.

Thanks again for the detailed advice - really helpful!
 

Attachments

  • PXL_20210130_100521659.jpg
    PXL_20210130_100521659.jpg
    1.1 MB · Views: 14
Good news! I think I have managed to sort it, thanks in no small part to your helpful advice. I am yet to test it in anger, but it appears to be starting up without issue now. Not really sure what I have done, but the pitch motor is now turning freely without any perceptible friction. So at the very least I have extended its life.

I have posted the results below and would welcome your observations.

Well done!
The only other thing I could add is. Use “Assistant 2 for Mavic” to update the firmware then carry out a gimbal calibration in the Go 4 App.
 
You are probably way ahead of me by now.
Anyhow my tips and notes.
You need a 1.5hex for the body screws,
and 00 cross-head for 99%
and 000 cross-head for the ribbon connector clamp on the Gimbal board.

Proceed as in these videos
SUAS 1
SUAS 2
iRepairMD

Personally I do not use a razor blade but you do need something sharp just to lift the side covers (They are just thin plastic and only lightly glued but you just need to get under them.)
All the other caps can be removed later by poking from the inside with a small screwdriver.

After removing the filter just use a plastic tool to prise the black shroud off. This will exposed the three camera screws, hidden beneath some silicon.

You should get all the information you need from the videos.
Have you worked out how to remove and replace the motors individually rather than replacing the entire arm?
 
Lycus Tech Mavic Air 3 Case

DJI Drone Deals

New Threads

Forum statistics

Threads
131,402
Messages
1,562,806
Members
160,328
Latest member
volpe