DJI Mavic, Air and Mini Drones
Friendly, Helpful & Knowledgeable Community
Join Us Now

HDR Videos....how

Hiwayman

Well-Known Member
Joined
Dec 28, 2018
Messages
305
Reactions
85
Location
Yorkshire. UK
Can someone please explain how to create the eye-poping videos we see of night cityscapes, all illuminated and amazingly bright.
I'm assuming filmed in 4k HLog but what is done in editing....I can't seem to get that effect
 
I use Adobe Premier
 
Not a lot of people do this, but I run a MAC with Final Cut Pro, shoot all video clips in HQ or FFOV using the HLG transfer function, then render as an HDR video with Rec 2020 HLG with Dolby. It lights up on an HDR capable screen after “cooking” on YouTube (YouTube may take a day or two to generate an HDR version).
 
  • Like
Reactions: Hiwayman
Not a lot of people do this, but I run a MAC with Final Cut Pro, shoot all video clips in HQ or FFOV using the HLG transfer function, then render as an HDR video with Rec 2020 HLG with Dolby. It lights up on an HDR capable screen after “cooking” on YouTube (YouTube may take a day or two to generate an HDR version).
I use DVR, and have a similar question. Can you explain the above in lay terms? LOL
 
I can help you out. I'm a Dolby certified colorist for television and web. Davinci Resolve is a good choice for your HDR work. I know I addressed this in some posts about a year ago, but here's a quick synopsis. First of all almost all video acquisition can be turned into HDR, but for stunning video, shoot In D-Log or HLG. Most productions are finished in Rec 709, but this means using a LUT and basically throwing away most of your extended color and dynamic range at the beginning of the process. Starting in Resolve, set your general settings with HDR metadata ticked and make sure you are working in a good colour depth, probably 10 bit for what you are doing. Dolbyvision can work in 12 bit, but this is overkill for Youtube and Instagram. Also Dolbyvision doesn't work on Youtube, but does work on Vimeo. You are better off using HDR 10+ for Youtube.

In your color tab I would work in Davinci wide gamut. This is a huge colour gamut and will also interpret your incoming footage correctly for say D-Log without any LUTs. Remember LUTS throw all the good data away so do not use. In Davinci wide gamut, you can select clips, right click and look at how the incoming color and gamma is being interpreted on a clip by clip basis. If there is any issue, you can select the correct color and gamma for each clip.

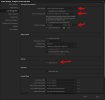
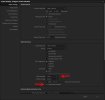
I'll include a couple of screen grabs for the color page under project settings at the end. To set up DWGamut, go to the top of the page and select Davinci color managed. Then under color processing mode go to custom. At this point select Davinci Wide Gamut RGB. This will be your intermediate color space, much larger color world than any camera data you will bring in. Your output color will be Rec 2020 and either HLG or ST 2084 as gamma for Youtube. Again I show this in a screen grab. I use ST 2084, which is a universal standard for gamma curve for HDR and is the magic sauce that extends the highlight data far beyond what Rec 709 can provide. Set your scopes to HDR. By the way, here are the specs for HDR on Youtube: Upload High Dynamic Range (HDR) videos - YouTube Help

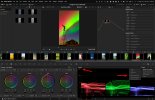
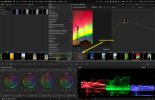
In the color room of Resolve set your video scopes in the HDR mode. Again, I'll add a screen grab to find the three little dots to select this. Select HDR as your scope style. You will now have levels available to 1000 nits. This is the current standard and in the future may go as high as 4000 or 10,000 nit, the theoretical limit, as technology catches up. Suffice to say that 1000 nit is adequate for current HDR work and you'll want to keep your highlights without clipping at 1000 nit or below. Rec 709 is only 100 nit, just so you know, so HDR stretches your highlights significantly, but these values are a log scale so not 10 times brighter.

Hopefully you are able to view your results on an HDR screen. If you are using a MacBookPro, go to settings/displays and set your monitor for HDR ST2084 so your screen will display HDR. I use a professional 32 inch Flanders HDR grading monitor, so I have the luxury of watching on a large in screen in HDR, but many laptops have excellent displays, especially the MacBookPros. (Sorry for the vertical resolution in my examples, but this was and HDR video I did for New Years for Instagram)

Once you have finished your color grading select the color menu and drag down to HDR 10+ and select analyze all. Sorry the words are greyed out here, but this was processed with DolbyVision so it doesn't recognize the HDR 10 menu selection. I have a big yellow arrow so you can see the greyed out words. This will set all the metadata for each shot for when you export. This metadata will tell your playback devices on Youtube how to display your production. If your metadata doesn't get embedded, your production may not process to HDR on Youtube.

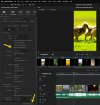
After this go to the deliver room and create and H265 movie. By default this will use the colour science you've previously set up so you don't need to change anything. For DoblyVision you have to select the 8.4 standard, but this is for HDR 10+ so I wouldn't change anything. You will want to tick embed metadata so the metadata is part of your movie. This does not get selected by default in Resolve. I usually use multi-pass encoding and turn off optimize for speed if it is selected by default. I've found this can cause some artifacts in the video.

Add your production to the render queue and render out. Upoad to Youtube and wait. Depending on the length and resolution it could take hours. I don't know why Youtube is so slow to generate the HDR results. Vimeo is very fast, in comparison. Don't give up hope and keep checking back. I think I've covered most of it. I'll try adding some screen grabs to this and then let me know how you make out.

Hopefully this is enough to get you going. Send me a message if you need more help. Cheers!
 

Attachments

  • Resolve HDR Project settings.jpg
    Resolve HDR Project settings.jpg
    251 KB · Views: 12
  • Resolve HDR Color settings.jpg
    Resolve HDR Color settings.jpg
    308.1 KB · Views: 12
  • Resolve HDR waveform settings.jpg
    Resolve HDR waveform settings.jpg
    1.2 MB · Views: 11
  • Resolve HDR metadata settings.jpg
    Resolve HDR metadata settings.jpg
    1.3 MB · Views: 12
  • Resolve HDR export settings.jpg
    Resolve HDR export settings.jpg
    686.6 KB · Views: 12
I can help you out. I'm a Dolby certified colorist for television and web. Davinci Resolve is a good choice for your HDR work. I know I addressed this in some posts about a year ago, but here's a quick synopsis. First of all almost all video acquisition can be turned into HDR, but for stunning video, shoot In D-Log or HLG. Most productions are finished in Rec 709, but this means using a LUT and basically throwing away most of your extended color and dynamic range at the beginning of the process. Starting in Resolve, set your general settings with HDR metadata ticked and make sure you are working in a good colour depth, probably 10 bit for what you are doing. Dolbyvision can work in 12 bit, but this is overkill for Youtube and Instagram. Also Dolbyvision doesn't work on Youtube, but does work on Vimeo. You are better off using HDR 10+ for Youtube.

In your color tab I would work in Davinci wide gamut. This is a huge colour gamut and will also interpret your incoming footage correctly for say D-Log without any LUTs. Remember LUTS throw all the good data away so do not use. In Davinci wide gamut, you can select clips, right click and look at how the incoming color and gamma is being interpreted on a clip by clip basis. If there is any issue, you can select the correct color and gamma for each clip.

I'll include a couple of screen grabs for the color page under project settings at the end. To set up DWGamut, go to the top of the page and select Davinci color managed. Then under color processing mode go to custom. At this point select Davinci Wide Gamut RGB. This will be your intermediate color space, much larger color world than any camera data you will bring in. Your output color will be Rec 2020 and either HLG or ST 2084 as gamma for Youtube. Again I show this in a screen grab. I use ST 2084, which is a universal standard for gamma curve for HDR and is the magic sauce that extends the highlight data far beyond what Rec 709 can provide. Set your scopes to HDR. By the way, here are the specs for HDR on Youtube: Upload High Dynamic Range (HDR) videos - YouTube Help

In the color room of Resolve set your video scopes in the HDR mode. Again, I'll add a screen grab to find the three little dots to select this. Select HDR as your scope style. You will now have levels available to 1000 nits. This is the current standard and in the future may go as high as 4000 or 10,000 nit, the theoretical limit, as technology catches up. Suffice to say that 1000 nit is adequate for current HDR work and you'll want to keep your highlights without clipping at 1000 nit or below. Rec 709 is only 100 nit, just so you know, so HDR stretches your highlights significantly, but these values are a log scale so not 10 times brighter.

Hopefully you are able to view your results on an HDR screen. If you are using a MacBookPro, go to settings/displays and set your monitor for HDR ST2084 so your screen will display HDR. I use a professional 32 inch Flanders HDR grading monitor, so I have the luxury of watching on a large in screen in HDR, but many laptops have excellent displays, especially the MacBookPros. (Sorry for the vertical resolution in my examples, but this was and HDR video I did for New Years for Instagram)

Once you have finished your color grading select the color menu and drag down to HDR 10+ and select analyze all. Sorry the words are greyed out here, but this was processed with DolbyVision so it doesn't recognize the HDR 10 menu selection. I have a big yellow arrow so you can see the greyed out words. This will set all the metadata for each shot for when you export. This metadata will tell your playback devices on Youtube how to display your production. If your metadata doesn't get embedded, your production may not process to HDR on Youtube.

After this go to the deliver room and create and H265 movie. By default this will use the colour science you've previously set up so you don't need to change anything. For DoblyVision you have to select the 8.4 standard, but this is for HDR 10+ so I wouldn't change anything. You will want to tick embed metadata so the metadata is part of your movie. This does not get selected by default in Resolve. I usually use multi-pass encoding and turn off optimize for speed if it is selected by default. I've found this can cause some artifacts in the video.

Add your production to the render queue and render out. Upoad to Youtube and wait. Depending on the length and resolution it could take hours. I don't know why Youtube is so slow to generate the HDR results. Vimeo is very fast, in comparison. Don't give up hope and keep checking back. I think I've covered most of it. I'll try adding some screen grabs to this and then let me know how you make out.

Hopefully this is enough to get you going. Send me a message if you need more help. Cheers!
You should make a YouTube tutorial!
 
  • Like
Reactions: mavictk
Does this suggest that alternative editors like those mentioned will provide the results I seek?
Is there a particular export setting I need to use?
No, I am not making that assumption as I only work with Premier.
 
I can help you out. I'm a Dolby certified colorist for television and web. Davinci Resolve is a good choice for your HDR work. I know I addressed this in some posts about a year ago, but here's a quick synopsis. First of all almost all video acquisition can be turned into HDR, but for stunning video, shoot In D-Log or HLG. Most productions are finished in Rec 709, but this means using a LUT and basically throwing away most of your extended color and dynamic range at the beginning of the process. Starting in Resolve, set your general settings with HDR metadata ticked and make sure you are working in a good colour depth, probably 10 bit for what you are doing. Dolbyvision can work in 12 bit, but this is overkill for Youtube and Instagram. Also Dolbyvision doesn't work on Youtube, but does work on Vimeo. You are better off using HDR 10+ for Youtube.

In your color tab I would work in Davinci wide gamut. This is a huge colour gamut and will also interpret your incoming footage correctly for say D-Log without any LUTs. Remember LUTS throw all the good data away so do not use. In Davinci wide gamut, you can select clips, right click and look at how the incoming color and gamma is being interpreted on a clip by clip basis. If there is any issue, you can select the correct color and gamma for each clip.

I'll include a couple of screen grabs for the color page under project settings at the end. To set up DWGamut, go to the top of the page and select Davinci color managed. Then under color processing mode go to custom. At this point select Davinci Wide Gamut RGB. This will be your intermediate color space, much larger color world than any camera data you will bring in. Your output color will be Rec 2020 and either HLG or ST 2084 as gamma for Youtube. Again I show this in a screen grab. I use ST 2084, which is a universal standard for gamma curve for HDR and is the magic sauce that extends the highlight data far beyond what Rec 709 can provide. Set your scopes to HDR. By the way, here are the specs for HDR on Youtube: Upload High Dynamic Range (HDR) videos - YouTube Help

In the color room of Resolve set your video scopes in the HDR mode. Again, I'll add a screen grab to find the three little dots to select this. Select HDR as your scope style. You will now have levels available to 1000 nits. This is the current standard and in the future may go as high as 4000 or 10,000 nit, the theoretical limit, as technology catches up. Suffice to say that 1000 nit is adequate for current HDR work and you'll want to keep your highlights without clipping at 1000 nit or below. Rec 709 is only 100 nit, just so you know, so HDR stretches your highlights significantly, but these values are a log scale so not 10 times brighter.

Hopefully you are able to view your results on an HDR screen. If you are using a MacBookPro, go to settings/displays and set your monitor for HDR ST2084 so your screen will display HDR. I use a professional 32 inch Flanders HDR grading monitor, so I have the luxury of watching on a large in screen in HDR, but many laptops have excellent displays, especially the MacBookPros. (Sorry for the vertical resolution in my examples, but this was and HDR video I did for New Years for Instagram)

Once you have finished your color grading select the color menu and drag down to HDR 10+ and select analyze all. Sorry the words are greyed out here, but this was processed with DolbyVision so it doesn't recognize the HDR 10 menu selection. I have a big yellow arrow so you can see the greyed out words. This will set all the metadata for each shot for when you export. This metadata will tell your playback devices on Youtube how to display your production. If your metadata doesn't get embedded, your production may not process to HDR on Youtube.

After this go to the deliver room and create and H265 movie. By default this will use the colour science you've previously set up so you don't need to change anything. For DoblyVision you have to select the 8.4 standard, but this is for HDR 10+ so I wouldn't change anything. You will want to tick embed metadata so the metadata is part of your movie. This does not get selected by default in Resolve. I usually use multi-pass encoding and turn off optimize for speed if it is selected by default. I've found this can cause some artifacts in the video.

Add your production to the render queue and render out. Upoad to Youtube and wait. Depending on the length and resolution it could take hours. I don't know why Youtube is so slow to generate the HDR results. Vimeo is very fast, in comparison. Don't give up hope and keep checking back. I think I've covered most of it. I'll try adding some screen grabs to this and then let me know how you make out.

Hopefully this is enough to get you going. Send me a message if you need more help. Cheers!
Thank you so much....
I will try and get my head around all of that, along with DVR. At least I know how it's done, even if I struggle with it.
Very much appreciated
 
I can help you out. I'm a Dolby certified colorist for television and web. Davinci Resolve is a good choice for your HDR work. I know I addressed this in some posts about a year ago, but here's a quick synopsis. First of all almost all video acquisition can be turned into HDR, but for stunning video, shoot In D-Log or HLG. Most productions are finished in Rec 709, but this means using a LUT and basically throwing away most of your extended color and dynamic range at the beginning of the process. Starting in Resolve, set your general settings with HDR metadata ticked and make sure you are working in a good colour depth, probably 10 bit for what you are doing. Dolbyvision can work in 12 bit, but this is overkill for Youtube and Instagram. Also Dolbyvision doesn't work on Youtube, but does work on Vimeo. You are better off using HDR 10+ for Youtube.

In your color tab I would work in Davinci wide gamut. This is a huge colour gamut and will also interpret your incoming footage correctly for say D-Log without any LUTs. Remember LUTS throw all the good data away so do not use. In Davinci wide gamut, you can select clips, right click and look at how the incoming color and gamma is being interpreted on a clip by clip basis. If there is any issue, you can select the correct color and gamma for each clip.

I'll include a couple of screen grabs for the color page under project settings at the end. To set up DWGamut, go to the top of the page and select Davinci color managed. Then under color processing mode go to custom. At this point select Davinci Wide Gamut RGB. This will be your intermediate color space, much larger color world than any camera data you will bring in. Your output color will be Rec 2020 and either HLG or ST 2084 as gamma for Youtube. Again I show this in a screen grab. I use ST 2084, which is a universal standard for gamma curve for HDR and is the magic sauce that extends the highlight data far beyond what Rec 709 can provide. Set your scopes to HDR. By the way, here are the specs for HDR on Youtube: Upload High Dynamic Range (HDR) videos - YouTube Help

In the color room of Resolve set your video scopes in the HDR mode. Again, I'll add a screen grab to find the three little dots to select this. Select HDR as your scope style. You will now have levels available to 1000 nits. This is the current standard and in the future may go as high as 4000 or 10,000 nit, the theoretical limit, as technology catches up. Suffice to say that 1000 nit is adequate for current HDR work and you'll want to keep your highlights without clipping at 1000 nit or below. Rec 709 is only 100 nit, just so you know, so HDR stretches your highlights significantly, but these values are a log scale so not 10 times brighter.

Hopefully you are able to view your results on an HDR screen. If you are using a MacBookPro, go to settings/displays and set your monitor for HDR ST2084 so your screen will display HDR. I use a professional 32 inch Flanders HDR grading monitor, so I have the luxury of watching on a large in screen in HDR, but many laptops have excellent displays, especially the MacBookPros. (Sorry for the vertical resolution in my examples, but this was and HDR video I did for New Years for Instagram)

Once you have finished your color grading select the color menu and drag down to HDR 10+ and select analyze all. Sorry the words are greyed out here, but this was processed with DolbyVision so it doesn't recognize the HDR 10 menu selection. I have a big yellow arrow so you can see the greyed out words. This will set all the metadata for each shot for when you export. This metadata will tell your playback devices on Youtube how to display your production. If your metadata doesn't get embedded, your production may not process to HDR on Youtube.

After this go to the deliver room and create and H265 movie. By default this will use the colour science you've previously set up so you don't need to change anything. For DoblyVision you have to select the 8.4 standard, but this is for HDR 10+ so I wouldn't change anything. You will want to tick embed metadata so the metadata is part of your movie. This does not get selected by default in Resolve. I usually use multi-pass encoding and turn off optimize for speed if it is selected by default. I've found this can cause some artifacts in the video.

Add your production to the render queue and render out. Upoad to Youtube and wait. Depending on the length and resolution it could take hours. I don't know why Youtube is so slow to generate the HDR results. Vimeo is very fast, in comparison. Don't give up hope and keep checking back. I think I've covered most of it. I'll try adding some screen grabs to this and then let me know how you make out.

Hopefully this is enough to get you going. Send me a message if you need more help. Cheers!
If they do a "Best Comment of the Year," this should be finalist.
 
Wow! Thanks so much. I'll give this a try on a night video I made. One initial question, I filmed on an Air 2 using D-Cinelike. Does that change any of your guidance?
It should not matter. D-Cinelike is an excellent starting point. I don’t think Resolve will determine D-Cinelike any different than regular D-log. Again you can check the input color and gamma Resolve has assigned to each clip in the media room. If it misses for some reason, assign the color profile manually. I’ve not see a specific input color profile for D-Cine. It will just come down to how you grade it. Nothing will be lost from the high quality input source data within Resolve. Now just grade to keep within limits of HDR. Also I should add, outputting as HLG instead of ST 2084 may be less problematic. If you run into issues just try HLG output instead and it will give equal results.
 
Mega thanks @JavaJack! That post was awesome and took a lot of time and effort. I learned a lot.

Thanks for really helping the community!
You're welcome. I posted that video a few minutes ago that was in the screen grabs, if anyone is interested in viewing. This has nothing to do with aerials, but very much to do with HDR. One of my disappointments with shooting and processing Northern lights, was trying to show off the amazing colours and dynamic range. This is a mix of Sony A1 raw and a couple of iphones stills. I had only posted this on Instagram before as a vertical video, but here it is in 4K UHD HDR on Vimeo. I uploaded to Youtube as well, as a test to support the settings I posted, but of course Youtube needs to crunch away on this for an hour or two. Here's the Vimeo version. Should display HDR on any modern phone or a computer set to HDR display. Cymric Aurora 2024
 
I can help you out. I'm a Dolby certified colorist for television and web. Davinci Resolve is a good choice for your HDR work. I know I addressed this in some posts about a year ago, but here's a quick synopsis. First of all almost all video acquisition can be turned into HDR, but for stunning video, shoot In D-Log or HLG. Most productions are finished in Rec 709, but this means using a LUT and basically throwing away most of your extended color and dynamic range at the beginning of the process. Starting in Resolve, set your general settings with HDR metadata ticked and make sure you are working in a good colour depth, probably 10 bit for what you are doing. Dolbyvision can work in 12 bit, but this is overkill for Youtube and Instagram. Also Dolbyvision doesn't work on Youtube, but does work on Vimeo. You are better off using HDR 10+ for Youtube.

In your color tab I would work in Davinci wide gamut. This is a huge colour gamut and will also interpret your incoming footage correctly for say D-Log without any LUTs. Remember LUTS throw all the good data away so do not use. In Davinci wide gamut, you can select clips, right click and look at how the incoming color and gamma is being interpreted on a clip by clip basis. If there is any issue, you can select the correct color and gamma for each clip.

I'll include a couple of screen grabs for the color page under project settings at the end. To set up DWGamut, go to the top of the page and select Davinci color managed. Then under color processing mode go to custom. At this point select Davinci Wide Gamut RGB. This will be your intermediate color space, much larger color world than any camera data you will bring in. Your output color will be Rec 2020 and either HLG or ST 2084 as gamma for Youtube. Again I show this in a screen grab. I use ST 2084, which is a universal standard for gamma curve for HDR and is the magic sauce that extends the highlight data far beyond what Rec 709 can provide. Set your scopes to HDR. By the way, here are the specs for HDR on Youtube: Upload High Dynamic Range (HDR) videos - YouTube Help

In the color room of Resolve set your video scopes in the HDR mode. Again, I'll add a screen grab to find the three little dots to select this. Select HDR as your scope style. You will now have levels available to 1000 nits. This is the current standard and in the future may go as high as 4000 or 10,000 nit, the theoretical limit, as technology catches up. Suffice to say that 1000 nit is adequate for current HDR work and you'll want to keep your highlights without clipping at 1000 nit or below. Rec 709 is only 100 nit, just so you know, so HDR stretches your highlights significantly, but these values are a log scale so not 10 times brighter.

Hopefully you are able to view your results on an HDR screen. If you are using a MacBookPro, go to settings/displays and set your monitor for HDR ST2084 so your screen will display HDR. I use a professional 32 inch Flanders HDR grading monitor, so I have the luxury of watching on a large in screen in HDR, but many laptops have excellent displays, especially the MacBookPros. (Sorry for the vertical resolution in my examples, but this was and HDR video I did for New Years for Instagram)

Once you have finished your color grading select the color menu and drag down to HDR 10+ and select analyze all. Sorry the words are greyed out here, but this was processed with DolbyVision so it doesn't recognize the HDR 10 menu selection. I have a big yellow arrow so you can see the greyed out words. This will set all the metadata for each shot for when you export. This metadata will tell your playback devices on Youtube how to display your production. If your metadata doesn't get embedded, your production may not process to HDR on Youtube.

After this go to the deliver room and create and H265 movie. By default this will use the colour science you've previously set up so you don't need to change anything. For DoblyVision you have to select the 8.4 standard, but this is for HDR 10+ so I wouldn't change anything. You will want to tick embed metadata so the metadata is part of your movie. This does not get selected by default in Resolve. I usually use multi-pass encoding and turn off optimize for speed if it is selected by default. I've found this can cause some artifacts in the video.

Add your production to the render queue and render out. Upoad to Youtube and wait. Depending on the length and resolution it could take hours. I don't know why Youtube is so slow to generate the HDR results. Vimeo is very fast, in comparison. Don't give up hope and keep checking back. I think I've covered most of it. I'll try adding some screen grabs to this and then let me know how you make out.

Hopefully this is enough to get you going. Send me a message if you need more help. Cheers!
Wow, thank you such a detailed response. I have saved it and will try to work through it!
 
Finally processed on YouTube. Here’s a link to the YouTube post. I’ll post some night aerial HDR at some point.
To view this content we will need your consent to set third party cookies.
For more detailed information, see our cookies page.
 
  • Like
Reactions: Hiwayman and Fergy

DJI Drone Deals

New Threads

Forum statistics

Threads
135,299
Messages
1,604,718
Members
163,762
Latest member
keyserlang
Want to Remove this Ad? Simply login or create a free account