DJI Mavic, Air and Mini Drones
Friendly, Helpful & Knowledgeable Community
Join Us Now

How to shoot a panorama photo in RAW with Mavic Mini 3 Pro?

TestPilot

Well-Known Member
Joined
Jan 19, 2017
Messages
60
Reactions
19
I bought a used Mavic Mini 3 Pro recently and have been trying out the features. I find it's really fun to fly, and it takes decent images. However, I can't seem to capture photos in Panorama mode in RAW. It always outputs as JPEG only. Does anyone know how to force it to output Panorama photos in RAW?

Another gripe is it always forgets my Camera settings and I have to always change them for every new flight or even just new mode. There does not seem to be a way to make it remember my settings, especially if I switch modes from 48mp to 12 mp and to Panorama, etc.
 
Will it give you a DNG of the pano assembled by the drone? No.

In the camera settings menu, you have the option to save original individual pano/hyperlapse shots as DNG. You then have to run these RAW shots through pano compositor software to assemble them.

If you want to shoot a manually framed pano using the 'rule of thirds' screen grid to work out a 30% overlap between each shot: set your capture options to JPG+DNG and you'll get the best of both worlds. But you'll still have to assemble them into a final pano yourself.
 
Last edited:
In the camera settings menu, you have the option to save original individual pano/hyperlapse shots as DNG. You then have to run these RAW shots through pano compositor software to assemble them.

If you want to shoot a manually framed pano using the 'rule of thirds' screen grid to work out a 30% overlap between each shot: set your capture options to JPG+DNG and you'll get the best of both worlds. But you'll still have to assemble them into a final pano yourself.
I've looked there in Camera Settings, there is nowhere that mentions Pano or Hyperlaprse. Just Format: JPEG or JPEG + Raw
 
It may be that you need to be in flight AND switch to panorama mode before you can set jpeg+raw option.
Great, I was wondering why when I looked in my SD card, it wasn't there. Just realized that there is a new folder called Panorama and all the RAWs were in there!

Thanks!
 
Last edited:
I bought a used Mavic Mini 3 Pro recently and have been trying out the features. I find it's really fun to fly, and it takes decent images. However, I can't seem to capture photos in Panorama mode in RAW. It always outputs as JPEG only. Does anyone know how to force it to output Panorama photos in RAW?

Another gripe is it always forgets my Camera settings and I have to always change them for every new flight or even just new mode. There does not seem to be a way to make it remember my settings, especially if I switch modes from 48mp to 12 mp and to Panorama, etc.
I never use the panorama mode for panoramas. I've spoken of this in this forum before but it was a while back so I'll review it.

Be sure your grid is turned on.
Start first RAW image on left side, rotate drone to the right, and shoot three to four or more images, moving from left to right and overlapping them about 30%.
Upload these images to a file folder.
Open the folder in Adobe Photoshop select all images (CTRL +A), right click on any of these images.
A drop down menu gives you the option, "Merge to Panorama."
After the merge, follow the prompts to remove the unwanted edges.
Then you have a RAW panorama, with which you can edit.

Here is an 1 image panorama that I have previously published on the forum, down with this technique. Click on image to enlarge.Distant view Brickell Key Panorama 2.jpg
 
  • Like
Reactions: didier praud
I never use the panorama mode for panoramas. I've spoken of this in this forum before but it was a while back so I'll review it.

Be sure your grid is turned on.
Start first RAW image on left side, rotate drone to the right, and shoot three to four or more images, moving from left to right and overlapping them about 30%.
Upload these images to a file folder.
Open the folder in Adobe Photoshop select all images (CTRL +A), right click on any of these images.
A drop down menu gives you the option, "Merge to Panorama."
After the merge, follow the prompts to remove the unwanted edges.
Then you have a RAW panorama, with which you can edit.

Here is an 1 image panorama that I have previously published on the forum, down with this technique. Click on image to enlarge.View attachment 180444

Are there any advantages merging in Photoshop over Lightroom? I just use Lightroom to merge and edit.
 
Are there any advantages merging in Photoshop over Lightroom? I just use Lightroom to merge and edit.
Absolutely not. According to Colin Smith web site Photoshop Cafe, they are run by the same engine.
Dale
 
Absolutely not. According to Colin Smith web site Photoshop Cafe, they are run by the same engine.
Dale
Good to know. Thank you.
 
Good to know. Thank you.
Skypod:

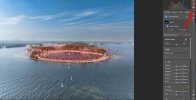
This is a RAW Photoshop image (RAW)

Here is a recent image I submitted to the Forum. I used Masking tool in Photoshop (it is also available in Lightroom). I used the radial mask and adjusted the size for the size of the lagoon. I can then edit ONLY this portion of the image. This technique (Masking tool-red arrow. Click to enlarge. Not red arrow pointing to masking tool, and masked lagoon.) can be used for masking sky, foreground, etc. of the merged panoramic image. You can find this same tool in Lightroom.

Dale

click to enlarge
RAW- mask.jpg
 

DJI Drone Deals

New Threads

Forum statistics

Threads
135,363
Messages
1,605,190
Members
163,814
Latest member
MarshJunkie
Want to Remove this Ad? Simply login or create a free account