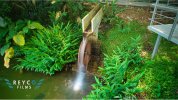
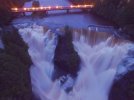
As I begin to explore flowing water and hyperlapses which both benefit from longer shutter speeds I am curious about how long a shutter speed is reasonable. I am confident my Mavic 3 can hold steady in more conditions than my Mini 3 (I refuse to add "pro") and my Mini has a fixed aperture which makes a difference. In any case I'm curious as to your experience where you found a limit to the length of shutter speed for video and/or for still images. I'm guessing that still images are less forgiving but am continually amazed at how steady these little puppies are. I have sets of ND filters but am realizing I need more powerful ones for my Mini 3 to get me where I want to be in bright light but I'll leave ND questions for later after doing some forum searching. Thoughts on shutter speed maximums?
You are using an out of date browser. It may not display this or other websites correctly.
You should upgrade or use an alternative browser.
You should upgrade or use an alternative browser.
Longest reasonable shutter speed?
- Thread starter akdrone
- Start date
Jagerbomb52
Well-Known Member
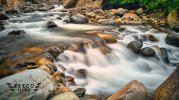
A fellow on Facebook group just posted this from his Air2S.
Long Exposure Photos
ISO 100
Filter nd 1000
2" of exposure
Long Exposure Photos
ISO 100
Filter nd 1000
2" of exposure

Jagerbomb52
Well-Known Member
A 10 stop ND and a 2 second exposure at that distance? Are you sure the aircraft wasn't sitting on a rock?I have never had a calm enough day to get that good of a result
Jagerbomb52
Well-Known Member
If he is getting those shots while airborne, then he's doing pretty good. But even in that second photo, the position looks to be near (or close) to the walkway that is winding around the shot.
In that first shot if you look at the sides of the stream, the rocks are clearly rising on both sides in a manner that would suggest; if he is in the air, it is very low and near rocks at that altitude.
Either way, nice shots but I cannot imagine a 10stop ND with an exposure of 2 seconds at altitude giving useable results
Jagerbomb52
Well-Known Member
Me I cheat, I use burst mode and layer them in Photoshop making sure correct for ghosting is turned off. Gives a fake long exposure effect. Not great but not any worse then my attempts at true long exposure. 
So I got curious and had to find out. At first I was wondering IF the drone was flown but; very close to ground/structure, could the vision positioning be so good as to allow a very close long exposure shot as shown above?
I ramped my M2P aperture to f11 and threw on an ND16 (four additional stops) to get a 2 second exposure (I am mid day Florida very bright for this test - no wind.) I then set the drone on a porch and fired a shot, then I took off and hovered 3 feet above the ground. In the photo that is flying you can see the bushes in the upper left (about 25 feet away) are not too blurred but anything within 10 feet or so (like the first picture above) is blurred severely.
SITTING -2 second exposure.

FLYING _ 2 second exposure

I ramped my M2P aperture to f11 and threw on an ND16 (four additional stops) to get a 2 second exposure (I am mid day Florida very bright for this test - no wind.) I then set the drone on a porch and fired a shot, then I took off and hovered 3 feet above the ground. In the photo that is flying you can see the bushes in the upper left (about 25 feet away) are not too blurred but anything within 10 feet or so (like the first picture above) is blurred severely.
SITTING -2 second exposure.

FLYING _ 2 second exposure

Jagerbomb52
Well-Known Member
I used to follow this guy on youtube but became very repetitive so I stopped but he does give you some very cool options to get fake long exposures. Sometimes hard to understand but watching this video to the end will give you the idea.
Jagerbomb52
Well-Known Member
LoudThunder
Part 107 Licensed
As I begin to explore flowing water and hyperlapses which both benefit from longer shutter speeds I am curious about how long a shutter speed is reasonable.
I would offer you this advice, go out and experiment yourself. All the other's advice (including mine…) will only go so far, as each photograph you take is unique to you.
The things to consider is lighting: the shutter speed determines how long light can enter the "film", the aperture determines much light can enter.
Think about it like this, you are the door-man at Walmart on Black Friday morning. You can open one or two doors and you get to determine how long the doors stay open. You open one door for 1-minute and 100 people enter; conversely, you open two doors but for only 30-seeconds and still 100 people enter…
It ain't the same, 100 of the first group is not the same group as the second group.
When you open the aperture one full stop, you need to cut the speed in half. When one goes up, the other has to go down…
Now, why isn't the "first group of people like the second group," it "mood" the saturation of the image changes and the photo looks different and only your intent can determine what is better…
Now for the water photos, the flow of the water makes a big difference, a slow bubbling stream can be shot slower than a raging river, if you shot the river at the same speed that is correct for the stream, the fiver would be just one blur and conversely, shooting the stream at the speed for the river would most likely stop all action (no movement).
You can take all the advice that will be given and then put it in your hat and adapt to your situation.
For example, shooting Niagara Falls at a certain speed and aperture may give you a perfect shot, but if you take those same settings and shoot a raging falls in your neck of the woods, with trees and cloud cover, would give you the same effect on the water, but it would be dark and brooding…
So, go out and experiment and when you find the perfect location, shoot a series of photos. It's called "Bracketing", where you shoot and change the settings, open this, close that, speed it up, and slow it down, and you do not even need to keep track of which is which.
When you get back home and you are in your warm, dry home, and you have a hot cup of coffee/hot chocolate/or even a shot of Rye in hand. Scan each photo and keep track of the ones you like, dump the one you don't, and then look at the photo info, write down what you felt looked the best for the type of photo you wanted. Each photo, keeps the info and that's why you can concentrate on the photograph rather than what you were dong when you shot it…
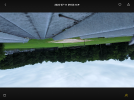
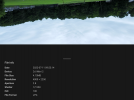
Here is an example of "carefree" shooting and then when you get home, you can see the settings that pleased you…
BTW: I took this photo with my Mini 2 and yes, the sky is in the wrong place… I included this particular photo to lighten the mood… I was coming too hot, forgot I was in Sport Mode, and I could not slow down enough. I was standing in front of a pavilion at a local park and it slid in for a landing on the pavilion roof. I am so, so lucky, it was almost stopped but not quite… It only flipped over. My wife was with me and I enabled the "Find My Drone" and it sounded so mournful up there on the roof, on it's back, so I took a photo… My wife told me to turn it off, "It sounds like it's crying…"
As I said, I was lucky, a foot lower and it would have smacked the girder that supports the roof.
Back on point, if you like the photo you shot, Scroll the photo up and the recorded data will be exposed (yes, an intention pun…) and you'll know where your speed and aperture is best set…
Enjoy!
thanks for all the tipsI would offer you this advice, go out and experiment yourself. All the other's advice (including mine…) will only go so far, as each photograph you take is unique to you.
The things to consider is lighting: the shutter speed determines how long light can enter the "film", the aperture determines much light can enter.
Think about it like this, you are the door-man at Walmart on Black Friday morning. You can open one or two doors and you get to determine how long the doors stay open. You open one door for 1-minute and 100 people enter; conversely, you open two doors but for only 30-seeconds and still 100 people enter…
It ain't the same, 100 of the first group is not the same group as the second group.
When you open the aperture one full stop, you need to cut the speed in half. When one goes up, the other has to go down…
Now, why isn't the "first group of people like the second group," it "mood" the saturation of the image changes and the photo looks different and only your intent can determine what is better…
Now for the water photos, the flow of the water makes a big difference, a slow bubbling stream can be shot slower than a raging river, if you shot the river at the same speed that is correct for the stream, the fiver would be just one blur and conversely, shooting the stream at the speed for the river would most likely stop all action (no movement).
You can take all the advice that will be given and then put it in your hat and adapt to your situation.
For example, shooting Niagara Falls at a certain speed and aperture may give you a perfect shot, but if you take those same settings and shoot a raging falls in your neck of the woods, with trees and cloud cover, would give you the same effect on the water, but it would be dark and brooding…
So, go out and experiment and when you find the perfect location, shoot a series of photos. It's called "Bracketing", where you shoot and change the settings, open this, close that, speed it up, and slow it down, and you do not even need to keep track of which is which.
When you get back home and you are in your warm, dry home, and you have a hot cup of coffee/hot chocolate/or even a shot of Rye in hand. Scan each photo and keep track of the ones you like, dump the one you don't, and then look at the photo info, write down what you felt looked the best for the type of photo you wanted. Each photo, keeps the info and that's why you can concentrate on the photograph rather than what you were dong when you shot it…
Here is an example of "carefree" shooting and then when you get home, you can see the settings that pleased you…
BTW: I took this photo with my Mini 2 and yes, the sky is in the wrong place… I included this particular photo to lighten the mood… I was coming too hot, forgot I was in Sport Mode, and I could not slow down enough. I was standing in front of a pavilion at a local park and it slid in for a landing on the pavilion roof. I am so, so lucky, it was almost stopped but not quite… It only flipped over. My wife was with me and I enabled the "Find My Drone" and it sounded so mournful up there on the roof, on it's back, so I took a photo… My wife told me to turn it off, "It sounds like it's crying…"
As I said, I was lucky, a foot lower and it would have smacked the girder that supports the roof.
Back on point, if you like the photo you shot, Scroll the photo up and the recorded data will be exposed (yes, an intention pun…) and you'll know where your speed and aperture is best set…
Enjoy!
View attachment 151949
View attachment 151950
Similar threads
- Replies
- 0
- Views
- 583
- Replies
- 6
- Views
- 1K
- Replies
- 6
- Views
- 370
- Replies
- 2
- Views
- 569
- Replies
- 8
- Views
- 3K
DJI Drone Deals
New Threads
-
-
-
-
-
Mini 5 Pro Drone generated pano (21 images) vs Photoshop Pano (21 images)
- Started by Dale D
- Replies: 2


