I suggest you check your observations.
I have just manually rolled two gimbals to their limit of travel whilst the drone being tested was sat on a hardback book. There was perhaps 1mm of clearance, not a lot I admit but clearance all the same. I also booted both drones and again there was clearance.
If your observations are correct then either the gimbal is hanging low or the front arms are sitting high or the surface on which the drone is sitting is not flat.
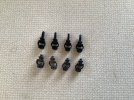
With regards to the gimbal, the assembly is suspended from 4 rubber dampers, it is not unusual for one of these to be displaced in a crash.
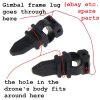
One end of each damper fits over a lug on the gimbal assembly's frame and into a 'groove' on that lug,
The drone end of each damper fits into and through a hole in the drone body, this end seems to be the one more likely to be displaced, There are several videos on you tube showing their reconnection, watch more than one, some repairers are a bit rough for my taste,
The rear dampers are easily reattached WITHOUT dismantling the drone. BUT I think it would be difficult to reattach the front dampers WITHOUT removing the drone's top cover, this is due to what looks to be very awkward access 'from below'.
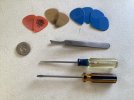
If a damper needs replaced DO NOT use tweezers etc. with sharp ends, I fear they might puncture and then tear the damper.
Ok thanks. I haven’t crashed it but I did buy it used. It looks pristine new but it still could have crashed…
So I did indeed check my observations:
My flat surface is dead flat.
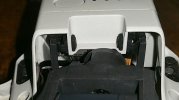
I do not see any displacement in the front legs - though I don’t think I could spot 1mm or 2mm of legs sitting high or low. The underbelly at the center frontmost clears the surface by appx 1.75mm. As Old Man Mavic said - these do sit very low…
Another several power up calibration observations - the gimbal audibly taps the surface the drone is on during calibration. 1mm of lift under the front legs is needed for the gimbal to not audibly tap the surface. I put a penny under each front leg (appx 1.25mm) and the gimbal just barely clears.
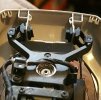
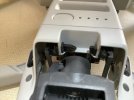
I took a closer look at the 4 mounting points. The four damper nubs appear to not be displaced and all appear to be mounted correctly in the frame, and none are torn. As you said the two at the front top are kinda difficult to spot but appear to be mounted correctly.
Those 4 gimbal mounts may very well be sagging down and not supporting the gimbal like when they were new. I don’t have another Mini to compare but IMO I think the gimbal should sit 2mm higher -and forward - of how it currently sits on a flat level surface.
I’m comfortable working on it and may replace the dampers, maybe, if not oh well, it still works and is a decent starter drone to learn on.
I have decided that the next (and more high end) drone I buy will be new and from an authorized reseller…now that I understand how delicate the gimbal is I will want a new drone for my next one - I take very good care of my things - and will want one that hasn’t been thru who knows what…
In the meantime these little devils sure are fun, and useful, I recently realized it’s a great way to examine my roof after a wicked storm haha…