DJI Mavic, Air and Mini Drones
Friendly, Helpful & Knowledgeable Community
Join Us Now

Newbie advice for photo/video settings

Duke_Mulligan

Well-Known Member
Joined
Jan 29, 2021
Messages
77
Reactions
117
Age
38
Location
Grand Rapids, MI
Hi all,

New Air 2 pilot here, I’ve had a very basic drone in the past, but totally new to any kind of manual photography. Seeking some tips for choosing the proper balance between ISO, shutter speed, and ND filters, to get the best shots.

I’ve read up on what each of the variables are and what they do, as well as aperture, which I believe is fixed on the Air 2.

For my first flight, auto mode was severely overexposing elements of the shot, so I switched to manual mode and changed shutter speed accordingly. Second flight, I added a filter (it was mid day in a bright/snowy area), and then tweaked shutter speed and ISO to find a good lighting balance. So, my point is, I think I understand the basics of how to balance the filters, shutter speed, and ISO, just to achieve visibility. But, I’m sure there are finer points I’m unaware of, in general, and specifically in relation to aerial photography. Wondering if there are, for example, situations where it would be more advantageous to use a faster shutter speed and higher ISO, vs a slower shutter speed and lower ISO, and where proper filter selection comes in, etc.

Any advice or links to a good guide are greatly appreciated!
 
In the MA2 you have as you said 3 ways to regulate the exposure (or regulate light allowed in) ... ISO, shutter speed & adding sun shades to the lens (ND filter). All comes with different effects that can be utilized or avoided by the videographer.

ISO: Increased makes the shutter faster, good if you want to freeze movements. But increased value induce noise in the vid.

Shutter: Slow: makes moving objects fuzzy & unsharp/blurry ... can give a sense of movement. Fast: freeze movement for maximum visibility & sharpness.

ND: Acts as sun shades for the lens/sensor, blocking light entering & by that slow down the shutter speed --> leading to that moving objects appear fuzzy & unsharp/blurry.

So with the exposure parameters fully understood ... we move over to the "correct exposure".

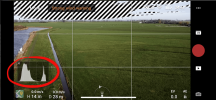
In order to capture the full spectrum of light you preferably want everything from whitest white all the way to blackest black ... a full dynamic range. Now, most cameras can't capture that in the same picture ... the sensors haven't that large dynamic range, you have to chose where you want the details to be captured ... & adjust the exposure parameters out from that. The tool you use for that is the Histogram (seen in below pic from the DJI FLY app) which tells you how the lightest & darkest pixels is spread out in the pic/vid with different exposure values.

1612034838998.png
To the right you have lighter & lighter pixels ... & in the very end to the right you have complete white pixels. To the left it's similar but here it ends with complete black. The ideal exposed image/vid have the graph (the mountain) spread out over the chart area but before crossing the left or right edge the graph falls down to the bottom. In the above histogram you see that the "mountain" is contained within the chart area & don't cross the left/right side ... this means that all light values in the motif is captured without being made completely white or black. This is the look you want to strive towards when setting the manual exposure. If it's not possible to keep both edges of the mountain inside the chart you have to chose ... going for detail in the lighter areas (see to that the right edge isn't crossed) or going for detail in the darkest areas (keep the left edge in the histogram not crossed by the mountain).

OK ...

So what about filming & other aspects then just the correct exposure (adjusting the Histogram). With filming you also need to pay attention to the "Cinematic look" ... meaning generating a motion blur in moving objects as seen by the human eye.

Here you have some worked out rules to start out with ... & they are: you should try to come as near as possible to a shutter speed equal to 2 x the frames/sec (FPS). So using 60fps you should have a shutter of 1/120sec. In order to slow down the shutter that much during day light (where you easily can have 1/800sec) you need to block out light other wise the vid will become completely white (just a high narrow spike in the right edge of the histogram crossing the edge). It's here you use a ND filter ... the filter block light so 1/120sec shutter will be enough to get a proper exposure (by observing the histogram). In a day light case like this you of cource take advantage of that you want to "block light" or make the shutter slow ... you use the lowest possible ISO for a noise free vid.

But if it's not daylight then ... it's a low light motif (sun set/rise)? Well here you again will aim for that 2 x the frames/sec (FPS) but here 1/120 isn't slow enough, will not let enough light enter for a correct exposure. Here you take the ND off of cource ... if that isn't enough you can increase the ISO & take that some noise is introduced. You can also chose a lower fps, let's say 25fps ... this because that leads to 2x25=1/50sec shutter= let more light in.

So there ... think I got in most of the pieces in the puzzle. Only some smaller heads ups remains ... flying over 30m height you can forget motion blur & Cinematic looks, it will not be seen at those height so no ND's needs to be used. Equal if it's stills you're taking ... usually no motion to consider there. Note that object motion also is flying at speed & having the close ground in view. Panning the camera is also a motion that should have some motion blur. Filming in very dark environments it's not adviceable to go with a slower shutter than the frame rate (25fps --> 1/25sec) other wise funny disturbances can start to occur in the vid. (most cameras will not allow this though).

Good luck ;)
 
In the MA2 you have as you said 3 ways to regulate the exposure (or regulate light allowed in) ... ISO, shutter speed & adding sun shades to the lens (ND filter). All comes with different effects that can be utilized or avoided by the videographer.

ISO: Increased makes the shutter faster, good if you want to freeze movements. But increased value induce noise in the vid.

Shutter: Slow: makes moving objects fuzzy & unsharp/blurry ... can give a sense of movement. Fast: freeze movement for maximum visibility & sharpness.

ND: Acts as sun shades for the lens/sensor, blocking light entering & by that slow down the shutter speed --> leading to that moving objects appear fuzzy & unsharp/blurry.

So with the exposure parameters fully understood ... we move over to the "correct exposure".

In order to capture the full spectrum of light you preferably want everything from whitest white all the way to blackest black ... a full dynamic range. Now, most cameras can't capture that in the same picture ... the sensors haven't that large dynamic range, you have to chose where you want the details to be captured ... & adjust the exposure parameters out from that. The tool you use for that is the Histogram (seen in below pic from the DJI FLY app) which tells you how the lightest & darkest pixels is spread out in the pic/vid with different exposure values.

View attachment 122806
To the right you have lighter & lighter pixels ... & in the very end to the right you have complete white pixels. To the left it's similar but here it ends with complete black. The ideal exposed image/vid have the graph (the mountain) spread out over the chart area but before crossing the left or right edge the graph falls down to the bottom. In the above histogram you see that the "mountain" is contained within the chart area & don't cross the left/right side ... this means that all light values in the motif is captured without being made completely white or black. This is the look you want to strive towards when setting the manual exposure. If it's not possible to keep both edges of the mountain inside the chart you have to chose ... going for detail in the lighter areas (see to that the right edge isn't crossed) or going for detail in the darkest areas (keep the left edge in the histogram not crossed by the mountain).

OK ...

So what about filming & other aspects then just the correct exposure (adjusting the Histogram). With filming you also need to pay attention to the "Cinematic look" ... meaning generating a motion blur in moving objects as seen by the human eye.

Here you have some worked out rules to start out with ... & they are: you should try to come as near as possible to a shutter speed equal to 2 x the frames/sec (FPS). So using 60fps you should have a shutter of 1/120sec. In order to slow down the shutter that much during day light (where you easily can have 1/800sec) you need to block out light other wise the vid will become completely white (just a high narrow spike in the right edge of the histogram crossing the edge). It's here you use a ND filter ... the filter block light so 1/120sec shutter will be enough to get a proper exposure (by observing the histogram). In a day light case like this you of cource take advantage of that you want to "block light" or make the shutter slow ... you use the lowest possible ISO for a noise free vid.

But if it's not daylight then ... it's a low light motif (sun set/rise)? Well here you again will aim for that 2 x the frames/sec (FPS) but here 1/120 isn't slow enough, will not let enough light enter for a correct exposure. Here you take the ND off of cource ... if that isn't enough you can increase the ISO & take that some noise is introduced. You can also chose a lower fps, let's say 25fps ... this because that leads to 2x25=1/50sec shutter= let more light in.

So there ... think I got in most of the pieces in the puzzle. Only some smaller heads ups remains ... flying over 30m height you can forget motion blur & Cinematic looks, it will not be seen at those height so no ND's needs to be used. Equal if it's stills you're taking ... usually no motion to consider there. Note that object motion also is flying at speed & having the close ground in view. Panning the camera is also a motion that should have some motion blur. Filming in very dark environments it's not adviceable to go with a slower shutter than the frame rate (25fps --> 1/25sec) other wise funny disturbances can start to occur in the vid. (most cameras will not allow this though).

Good luck ;)

GREAT stuff! Thank you for taking the time, this is extremely helpful!
 
Motion blur is not important for most drone video. Because of the height drones are flown, and their speed, the change from one frame to the next isn’t enough for the viewer to perceive strobing, which is the only thing shutter speed affects assuming your exposure is correct.
 
Motion blur is not important for most drone video. Because of the height drones are flown, and their speed...
The thumb rule here is if flying above 30m height motion blur for a cinematic look can be disregarded ... flying below, it starts to be a thing you might want to consider if really ambitious with your project.
 
The thumb rule here is if flying above 30m height motion blur for a cinematic look can be disregarded ... flying below, it starts to be a thing you might want to consider if really ambitious with your project.
Will it make a difference when panning or turning though. I always get the stuttering at 30fps when turning (albeit at a fairly fast turn rate) Does the altitude rule of thumb apply with panning as well?
 
Will it make a difference when panning or turning though. I always get the stuttering at 30fps when turning (albeit at a fairly fast turn rate) Does the altitude rule of thumb apply with panning as well?
What you are experiencing when panning is a video artifact called strobing or judder ...it's closely related to the so called "180 degree rule" (shutter 2xfps) you use for creating the right amount of motion blur for a cinematic look ... but it's also depending on the sensor size, focal length, fps & the panning speed.

This is a really good & extensive article from RED cameras covering all this --> PANNING SPEED BEST PRACTICES
 
  • Like
Reactions: MavicAir2Marc
What you are experiencing when panning is a video artifact called strobing or judder ...it's closely related to the so called "180 degree rule" (shutter 2xfps) you use for creating the right amount of motion blur for a cinematic look ... but it's also depending on the sensor size, focal length, fps & the panning speed.

This is a really good & extensive article from RED cameras covering all this --> PANNING SPEED BEST PRACTICES
Thanks @slup, thats a very interesting and informative article. That really helps in an area I've been struggling with.
 
WOW...Great info! I'm a little late to the game in this thread, but I'm really glad I discovered it. At this point I'm still learning to fly the thing, but I'd really like to be able to shoot some passable video in time. Thanks for the breakdown!
 
  • Like
Reactions: slup
Lycus Tech Mavic Air 3 Case

DJI Drone Deals

New Threads

Forum statistics

Threads
130,976
Messages
1,558,503
Members
159,965
Latest member
ozwaldcore