If we lived in a world where light quality was always perfect and subjects were perfectly lit, it would save a lot of effort. The reality is that most of the images you capture will need some corrective measures and modest color grading.
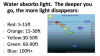
In Brett8883's excellent example you can see the RAW image has a lot of shadow, which is very challenging for even the larger sensor of the
M2P (
assuming you want to see some of the shadow detail). One would expect a lot of noise in the dark areas when viewing the '
unprocessed' RAW file. I'll assume the reason for shooting at this exposure is so the sun and highlights will not be completely blown out (overexposed). It's much easier to bring detail out of the shadows than to recover blown highlights. With a DSLR camera, I would typically bracket this image as a sequence so that I had multiple exposures to work with. Fortunately, the
M2P has auto-exposure bracketing as well (AEB).
My workflow would be to bring the 3 images into Lightroom, probably select 2 of the 3, depending on the areas of the image that would work best. Then adjust each image's exposure, noise, sharpness, etc. Select the 2 edited images>Open as Layers in Photoshop. In Photoshop, do an Auto-Align Layers so the images are aligned with each other. Then add a mask on the top layer and use the paintbrush tool with black/dark grey to mask the parts where you want the layer below to show through. Then save the PSD file, return to Lightroom for more refinements to saturation, selective edits, cropping, etc.
Of course, the
M2P also has an HDR (high dynamic range) setting to accomplish a similar result without all the steps. Frankly, the JPGs that come out of the
M2P are quite good and I save both even though I never use a JPG except for expediency in the field. The in-camera processing of smartphones and other image capture devices has gotten quite good for general use. Until you really learn the Lightroom/Photoshop workflow, you may be happy distributing the JPGs right off the card, but ALWAYS save both RAW and JPG so you can return to the RAW files for professional processing at a later date.
When I'm shooting professionally or travel destinations, I use a 3-image auto-exposure bracket for nearly everything (except portraits or moving objects) as I'm shooting a lot of pics of the same subject, attempting to keep up with my non-photographer travel companions (aka family). There's comfort in knowing that between the 3 images, I've got all the exposures I need for a single-image or multi-image composite. I shoot ONLY RAW as a rule, but will shoot JPG if I need to send the images wirelessly to my phone for distribution.
I learned just about everything I know about Lightroom/Photoshop workflows from this guy's many, many tutorials.
Serge Ramelli Photography


")
")