It's actually a pretty easy process.
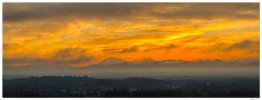
I start by shooting a sequence of shots that covers the scene I wish to include in the panorama from side to side with the drone at the desired height. In this case I am only using one panel in height so no gimbal movement is necessary - just turning the drone for the next shot. Overlap each shot by about 1/3 to aid the stitch. in this case I used DxO PureRAW to clean up some of the noise inside of Adobe Lightroom, adjust the colors and light to taste. I synced the LR adjustments for the four panels and then used LR's Photo Merge to Panorama for the stitch. I finish the processing in Photoshop (mostly light touchups), resize the image and then convert to sRGB color space for the web image above.
You may need a bit more color adjustments with a
Mavic 3 using the 162mm lens. I certainly did when I was using my
Mavic 3. The above image is from a
Mavic 3 Pro with the 166mm lens which has cleaner color output than the older 162mm.
