DJI Mavic, Air and Mini Drones
Friendly, Helpful & Knowledgeable Community
Join Us Now

How to effectively reduce your iso below 100 and increase image quality massively!

BigglesPippa

Well-Known Member
Joined
Dec 17, 2021
Messages
46
Reactions
98
Age
54
Location
Huddersfield, UK
This isn't an editing tutorial, it's a camera settings tutorial but I wasn't sure where else to post it.

Drones have small sensors compared to DSLRs. As a result, the light hitting the sensor is less, and therefore the noise levels and image quality at base iso isn't as good as a DSLR. There is however a way to make sure you are getting the best out of the sensor of whatever drone you fly. This technique is common in photography circles but I haven't seen it discussed much in the drone world so I made this video to explain why you should always make the most of the sensor's capabilities.

If you have any questions or require further clarification, let me know in the comments.

Happy flying and have a good weekend.

 
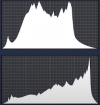
Good video Stephen. The thing is that the data shown in the histogram seems to have perfect dynamic range neither end of the spectrum exceeding 0 or 255. In the two histogram images below, both images stay off the right wall, but as presented, the lower contains more color data, while still capturing the data in the dark areas. So yes, what is shown in the lower image would be the better exposure considering the dynamic range involved. But once you exceed the dynamic range capabilities of the sensor you just have to make a decision to allow the darks to go black without detail or lose the detail in the highlights. Fortunately we have the ability to accomplish HDR with a couple different approaches. A different discussion.

One important point is that it is critical that you get a precise exposure because while the brighter part of the captured data has the most colors, once you pass the threshold of 255 you no longer have ANY detail in that exposure area. Same thing with 0. And while you are correct in your approach to a better image, it is also important to note that you can more often, while noisier, bring out more detail from a slightly underexposed image than an overexposed one. In other words, stay off the right "wall" (of the histrogram) except for a slight touch.

In general I tend to watch the lower part of the histogram to stay off the left wall, which generally insures (in most cases) while certainly being aware of what's happening on the right,. With this approach I get as much of the dynamic range as possible as I know that I can more easily bring out more detail in shadows and then reduce noise than attempt to recover data in the highlights that isn't able to be recorded. A lot depends on the colors of the subject matter and the lighting. Once you raise exposure more than is shown in the lower image, regardless of the dynamic range you get into what I consider the "danger zone" where highlight detail, cannot be resurrected in post if over-exposed. Again, understanding dynamic range is critical to all of this.

I just thought I'd add that to the conversation.


1642188203284.png
 
Last edited:
Great video! The one note I'd add is that your explanation of how digital sensors handle bit depth is specific to RAW files. This concept can totally be applied to compressed video too, but it'll work best with a log profile such as D-log (same allocation, just less data).
 
This isn't an editing tutorial, it's a camera settings tutorial but I wasn't sure where else to post it.

Drones have small sensors compared to DSLRs. As a result, the light hitting the sensor is less, and therefore the noise levels and image quality at base iso isn't as good as a DSLR. There is however a way to make sure you are getting the best out of the sensor of whatever drone you fly. This technique is common in photography circles but I haven't seen it discussed much in the drone world so I made this video to explain why you should always make the most of the sensor's capabilities.

If you have any questions or require further clarification, let me know in the comments.

Happy flying and have a good weekend.

Exposing to the right is good practice. It’s actually quite simple though. Camera sensors record light as data. The more light it records the more data it will have (as long as it’s not over saturated with light)

Noise in digital images is what you get when there’s not enough data. Light=data, so more light=more data=less noise. This is why larger sensors have less noise, their larger surface area collects more light and therefore data.
 
Good video Stephen. The thing is that the data shown in the histogram seems to have perfect dynamic range neither end of the spectrum exceeding 0 or 255. In the two histogram images below, both images stay off the right wall, but as presented, the lower contains more color data, while still capturing the data in the dark areas. So yes, what is shown in the lower image would be the better exposure considering the dynamic range involved. But once you exceed the dynamic range capabilities of the sensor you just have to make a decision to allow the darks to go black without detail or lose the detail in the highlights. Fortunately we have the ability to accomplish HDR with a couple different approaches. A different discussion.

One important point is that it is critical that you get a precise exposure because while the brighter part of the captured data has the most colors, once you pass the threshold of 255 you no longer have ANY detail in that exposure area. Same thing with 0. And while you are correct in your approach to a better image, it is also important to note that you can more often, while noisier, bring out more detail from a slightly underexposed image than an overexposed one. In other words, stay off the right "wall" (of the histrogram) except for a slight touch.

In general I tend to watch the lower part of the histogram to stay off the left wall, which generally insures (in most cases) while certainly being aware of what's happening on the right,. With this approach I get as much of the dynamic range as possible as I know that I can more easily bring out more detail in shadows and then reduce noise than attempt to recover data in the highlights that isn't able to be recorded. A lot depends on the colors of the subject matter and the lighting. Once you raise exposure more than is shown in the lower image, regardless of the dynamic range you get into what I consider the "danger zone" where highlight detail, cannot be resurrected in post if over-exposed. Again, understanding dynamic range is critical to all of this.

I just thought I'd add that to the conversation.


View attachment 141950
Yes, you are right. I mention in the video to make sure you don't hit the right-hand side of the histogram and mention that people will know when they have as a bar will start to shoot up the very right-hand side. I maybe didn't make it clear enough as I didn't point out that it would result in lost data. I should have made it clearer how important that point is.

My follow-up tutorial is about how to edit the data that has been purposely over-exposed as it needs to be "darkened" again.
 
Very informative, thanks for sharing!
 
  • Like
Reactions: BigglesPippa
Definitely educated me on where the sweet spot is on the histogram, thank you! But when Ilm flying freestyle and shooting video it feels way too risky to be operating in the plus side of the exposure, really easy to end up blowing out a good bit of the footage. . . Never to be seen again.
 
Definitely educated me on where the sweet spot is on the histogram, thank you! But when Ilm flying freestyle and shooting video it feels way too risky to be operating in the plus side of the exposure, really easy to end up blowing out a good bit of the footage. . . Never to be seen again.
I agree. It is so hard to calculate a manual setting when every direction you turn your drone changes the "proper" exposure, from a little to a lot.

The other thing that we have to acknowledge, is that most of the time there will be sky in the image along with earth bound items that have detail and of course a different optimal exposure. I've found a partial solution to that: Gradient filters! And to my amazement nobody makes those any more. I got a set of PolarPro gradients which REALLY helps 99% of the time (for my Mavic 2 Pro) but they discontinued them. I found a set in Japan of all places and they were expensive, but well worth it. Honestly, there are times when the gradient isn't needed, but the sublety I am shocked that Freewell or Skyreat or someone hasn't picked up on that. IMO they are so much better than straight ND filters (I use Skyreat because they're accurate and a great value). I'm sure Polarpro discontinued them because of poor sales. However I don't think they marketed them very well. One of the filter makers would be smart to pick up on the concept and actually do some marketing. Skyreat... are you listening?
 
This isn't an editing tutorial, it's a camera settings tutorial but I wasn't sure where else to post it.

Drones have small sensors compared to DSLRs. As a result, the light hitting the sensor is less, and therefore the noise levels and image quality at base iso isn't as good as a DSLR. There is however a way to make sure you are getting the best out of the sensor of whatever drone you fly. This technique is common in photography circles but I haven't seen it discussed much in the drone world so I made this video to explain why you should always make the most of the sensor's capabilities.

If you have any questions or require further clarification, let me know in the comments.

Happy flying and have a good weekend.

Spot on.One small point is that sometimes there are specular highlights or bright areas that you can accept with no details.That allows you to get a bit more light in.
 
  • Like
Reactions: BigglesPippa
I totally agree in theory using the gradient filters should be the best and as soon as I actually get a good chance to use one I will comment again. I did find a 3 pack for my air 2s on Amazon and am very excited to try them! I have not used them yet since there has been snow on the ground lately, so crazy bright on the wrong side of the frame. I do have high hopes. I think the nd 8 to nothing will be my starting point. Excited to use more of the best part of the sensor, especially with the air 2s. love that picture quality already!
 
  • Like
Reactions: BigglesPippa

I totally agree in theory using the gradient filters should be the best and as soon as I actually get a good chance to use one I will comment again. I did find a 3 pack for my air 2s on Amazon and am very excited to try them! I have not used them yet since there has been snow on the ground lately, so crazy bright on the wrong side of the frame. I do have high hopes. I think the nd 8 to nothing will be my starting point. Excited to use more of the best part of the sensor, especially with the air 2s. love that picture quality already!
You found gradients??? Wow. I had to check it out. Obviously Chinese , "bizofft" and "valeurs" (gotta wonder how the Chinese come up with these names), both identical and have 3 week delivery quoted. There is no bottom ND on these filters, just the top, but they might be ok. The Polarpro set that I have with three filters cost $120 and have ND on top and bottom. I've boiled down my filter pack to Polarpro ND8/0, ND 16/4, and ND32/8. Keep in mind that the Mavic 2 Pro has variable aperture so there is a lot of flexibility in terms of ND+F stop to get the proper shutter speed which isn't quite as convenient on fixed aperture cameras as with the Minis, and Airs with fixed F2.8 apertures.

I will be very interested to know how the Chinese gradients work out for you.
 
  • Like
Reactions: BigglesPippa
I’ll post my results when the snow melts, could be awhilebut, I know there are a few videos on YouTube that show it pretty well and looked good to me.
 
  • Like
Reactions: BigglesPippa
ETTR is a good idea in general... The only problem is that I often shoot in high dynamic range situations (e.g. sunrise and sunset) where I am absolutely maxing out the dynamic range of the sensor, so all the shadow detail ends up on the left side of the histogram and then get's raised in post with masks. It is noisy but a little temporal NR in Davinci cleans it up pretty well, and the 10 bit codecs on the 1" sensor drones handle the stretching better than 8 bit.
 
  • Like
Reactions: BigglesPippa
Definitely educated me on where the sweet spot is on the histogram, thank you! But when Ilm flying freestyle and shooting video it feels way too risky to be operating in the plus side of the exposure, really easy to end up blowing out a good bit of the footage. . . Never to be seen again.
You do need to make sure you expose for the brightest area so if you are shooting a long clip with a lot of exposure changes you Would have to be very careful so probably best to allow a safety buffer.
where a shot transitions from a dark to bright area or vice versa and the transition is slow, I’ve even used auto exposure.
 
I agree. It is so hard to calculate a manual setting when every direction you turn your drone changes the "proper" exposure, from a little to a lot.

The other thing that we have to acknowledge, is that most of the time there will be sky in the image along with earth bound items that have detail and of course a different optimal exposure. I've found a partial solution to that: Gradient filters! And to my amazement nobody makes those any more. I got a set of PolarPro gradients which REALLY helps 99% of the time (for my Mavic 2 Pro) but they discontinued them. I found a set in Japan of all places and they were expensive, but well worth it. Honestly, there are times when the gradient isn't needed, but the sublety I am shocked that Freewell or Skyreat or someone hasn't picked up on that. IMO they are so much better than straight ND filters (I use Skyreat because they're accurate and a great value). I'm sure Polarpro discontinued them because of poor sales. However I don't think they marketed them very well. One of the filter makers would be smart to pick up on the concept and actually do some marketing. Skyreat... are you listening?
I’m surprised they can’t be bought too. Would be very helpful. I suspect it is expensive to produce a small filter with a gradient with sufficient quality and that why they stopped.
 
Spot on.One small point is that sometimes there are specular highlights or bright areas that you can accept with no details.That allows you to get a bit more light in.
Yes. Thank you for mentioning that. If the highlights are something like street lights in a dusk scene, I would be happy to blow the core out to get the rest brighter.
 
  • Like
Reactions: offtheback

DJI Drone Deals

New Threads

Forum statistics

Threads
130,592
Messages
1,554,170
Members
159,596
Latest member
da4o98