DJI Mavic, Air and Mini Drones
Friendly, Helpful & Knowledgeable Community
Join Us Now

3 Light Painting & Northern Lights

RAC DJI

Well-Known Member
Joined
Sep 26, 2022
Messages
214
Reactions
317
Location
Prince George, BC, Canada
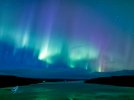
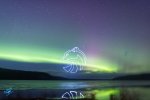
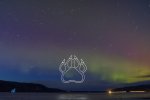
I tried out some new light paintings last night and the Northern Lights decided to join me. The first two are the light paintings. One is tracked with a star tracker and one is not. The last one is taken from my Mavic 3 Pro with settings F2.8 ISO 800 and Exp 8 Sec.

IMG_3133.jpegIMG_3131.jpegIMG_3135.jpeg
 
Nice!
 
  • Like
Reactions: sarahb
Totally beautiful and amazing! How in the heck do you do this? Is there video I can watch?
Dale
Thanks Dale. There is no video tutorial but it’s done mostly using Litchi Mission Hub and utilities found on this website Litchiutilites.com. All of the utilities found here are designed by Wes Barris, a well known drone enthusiast. Without his input this would not be possible.
 
Thanks Dale. There is no video tutorial but it’s done mostly using Litchi Mission Hub and utilities found on this website Litchiutilites.com. All of the utilities found here are designed by Wes Barris, a well known drone enthusiast. Without his input this would not be possible.
Dale, I put this together for a Facebook inquiry. Try it out if your interested.

Here’s my condensed workflow.
  1. Find a black and white clip art image that you like and take a screenshot of it and crop it close. Save to photos. START WITH SOMETHING SIMPLE!
  2. Use this online app to convert the the photo to an SVG file.
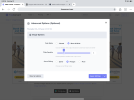
PNG to SVG - FreeConvert.com. Use the settings in the photo attached.

IMG_3148.png

  1. Go to https://www.litchiutilities.com/ and convert the generated file from an SVG file to a Litchi Waypoint Mission. To make it a bit easier use gps coordinates from where you plan to fly the mission.
  2. Import the generated file into Litchi Mission Hub and see if that’s what you want. You can move it around and resize it but don’t use the rotate feature at this point.
  3. Save it as a Litchi Mission and name it but end the name with “Flat” as to not mix up the files. Then export as a CSV file.
  4. Run the file through the “Remove Close Waypoints “ utility on the Litchi Mission Utilitiessite and save it.
  5. Run that file through the “Litchi Mission Rotator” utility.
  6. Import that file back into the Mission Hub. At this point you can move it around and rotate it so it faces the camera location you’ve chosen. Save the mission.


A couple of notes at this point:

All the utilities on this site https://www.litchiutilities.com/ were designed by Wes Barris and without his knowledge and great effort it would not be possible to accomplish this. Please acknowledge him and his website.

Each utility at https://www.litchiutilities.com/ has an extensive explanation of how it works and options you can choose. READ THEM CAREFULLY!

All my missions are between 200 & 250 meters from the take off location and the minimum distance above ground level is 15 meters. This is relative to the launch location.

For my setup the light on the drone faces backwards so the drone always faces away from the camera unless I want it to turn away so as not to leave light trails between segments.

At the first and last waypoints I set the mission to pause for 10 seconds to give me time to open and close the shutter at the appropriate times.


  1. At this point the mission can be run using Litchi or Litchi Pilot depending on your drone. If you are using the Mini 4 Pro, the Air 3 series or the Mavic 3 series you will have to convert the file to a DJI Waypoint Mission using the utility on Litchi Mission Utilities. Then import it to your controller (DJI RC 1 or 2, DJI RC Pro or phone)
Final Notes.

Be careful and make sure you are comfortable with every step in the process. You are responsible for your drone and where it flies.

I recommend starting with a very basic image and setting it up to fly over an open field to make sure that it runs smoothly.


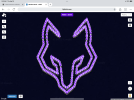
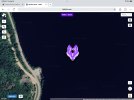
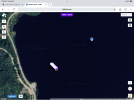
These are a couple of screenshots of what the missions look like in Litchi Mission Hub.


IMG_3152.png

IMG_3154.png

IMG_3153.png


Please keep in mind these missions are risky and you’re doing them at your own risk. It took me a while to get it right with lots of trial and error.
 
  • Like
Reactions: EyesWideShut
I second @RAC DJI mention of @DJ Wes Mission Utilities. Without all of his hard work and dedication, complex light paintings like these would be out of reach to most people and would be limited to basic spirals and orbits.

Chris
 
  • Like
Reactions: EyesWideShut
Dale, I put this together for a Facebook inquiry. Try it out if your interested.

Here’s my condensed workflow.
  1. Find a black and white clip art image that you like and take a screenshot of it and crop it close. Save to photos. START WITH SOMETHING SIMPLE!
  2. Use this online app to convert the the photo to an SVG file.
PNG to SVG - FreeConvert.com. Use the settings in the photo attached.

View attachment 182093

  1. Go to https://www.litchiutilities.com/ and convert the generated file from an SVG file to a Litchi Waypoint Mission. To make it a bit easier use gps coordinates from where you plan to fly the mission.
  2. Import the generated file into Litchi Mission Hub and see if that’s what you want. You can move it around and resize it but don’t use the rotate feature at this point.
  3. Save it as a Litchi Mission and name it but end the name with “Flat” as to not mix up the files. Then export as a CSV file.
  4. Run the file through the “Remove Close Waypoints “ utility on the Litchi Mission Utilitiessite and save it.
  5. Run that file through the “Litchi Mission Rotator” utility.
  6. Import that file back into the Mission Hub. At this point you can move it around and rotate it so it faces the camera location you’ve chosen. Save the mission.


A couple of notes at this point:

All the utilities on this site https://www.litchiutilities.com/ were designed by Wes Barris and without his knowledge and great effort it would not be possible to accomplish this. Please acknowledge him and his website.

Each utility at https://www.litchiutilities.com/ has an extensive explanation of how it works and options you can choose. READ THEM CAREFULLY!

All my missions are between 200 & 250 meters from the take off location and the minimum distance above ground level is 15 meters. This is relative to the launch location.

For my setup the light on the drone faces backwards so the drone always faces away from the camera unless I want it to turn away so as not to leave light trails between segments.

At the first and last waypoints I set the mission to pause for 10 seconds to give me time to open and close the shutter at the appropriate times.


  1. At this point the mission can be run using Litchi or Litchi Pilot depending on your drone. If you are using the Mini 4 Pro, the Air 3 series or the Mavic 3 series you will have to convert the file to a DJI Waypoint Mission using the utility on Litchi Mission Utilities. Then import it to your controller (DJI RC 1 or 2, DJI RC Pro or phone)
Final Notes.

Be careful and make sure you are comfortable with every step in the process. You are responsible for your drone and where it flies.

I recommend starting with a very basic image and setting it up to fly over an open field to make sure that it runs smoothly.


These are a couple of screenshots of what the missions look like in Litchi Mission Hub.


View attachment 182095

View attachment 182096

View attachment 182094


Please keep in mind these missions are risky and you’re doing them at your own risk. It took me a while to get it right with lots of trial and error.
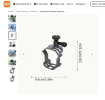
What light and mount do you use? I have a mavic 3 pro and interested in starting to try this. Thanks
 

Attachments

  • IMG_2186.jpeg
    IMG_2186.jpeg
    345.4 KB · Views: 1
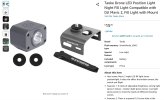
Here's one that's listed on Temu and also on Amazon for the Mavic 3 Pro. I haven't tried it yet as I still use my Phantom 3 Standard for light painting.


Screenshot 2025-04-25 at 11.13.26 AM.png
Also, a vendor on this forum @IronSky1 makes mounts for the Mavic 3 Pro that can hold up to 3 lights.

Chris
 
lumecube (stupid autocorrect)
Lumecubes are well known and have been around for a long time but they are expensive. I use Ulanzi cube lights also available on Amazon. They are a fraction of the cost and work great. They also come with colour filters so you can change the colour.

Chris
 

DJI Drone Deals

New Threads

Forum statistics

Threads
136,562
Messages
1,618,831
Members
165,199
Latest member
kapek
Want to Remove this Ad? Simply login or create a free account