DJI Mavic, Air and Mini Drones
Friendly, Helpful & Knowledgeable Community
Join Us Now

LUTs for M2 D-Log?

vindibona1

Well-Known Member
Joined
Jun 21, 2020
Messages
3,977
Reactions
3,962
Location
Democratic Peoples Republic of Crook County
I'm learning to edit video as I learn to fly drones, as if one by itself isn't consuming enough. I now understand the benefits of D-Log, but without the knowledge of how to color grade in post its usefulness is questionable. So I'm working on learning to color grade (and use DaVinci Resolve 16). I came across this video [Color Grading and LUTS ] and this has my mind blown. I took notes and could actually execute the process... IF I KNEW WHAT VALUES/PROFILES/LUTS to plug in.

Does the M2P have a particular profile (the term we'd use in still photography) and preferred LUT? As a bonus, I'd appreciate it if you'd look at the video and tell me what exactly was the logic the presenter was providing. I saw what he did but didn't understand why he did it. I think I understand the first "color space transform" but I don't understand the why of the second. I can see the potential benefits, but do not understand why he prefers not to use a simpler process.

This is probably overall a better question for the Black Magic Design forum, but I was wondering if folks here knew of the LUTs, profiles or input values for the M2 (P) both in Rec709 and D-Log?

Thanks for humoring my questions.
DJI has released a camera LUT for M2Pro found here


They also have a manual for using the LUT and color grading in Resolve with the distortion correction values as well. This is broad but at least you have an overview and of the steps and the order of operations specifically for d-log M2 footage.

 
DJI has released a camera LUT for M2Pro found here


They also have a manual for using the LUT and color grading in Resolve with the distortion correction values as well. This is broad but at least you have an overview and of the steps and the order of operations specifically for d-log M2 footage.


Thank you so much. I downloaded the LUT and briefly looked through the DJI D-log→Rec709 guide. I had to grin when I saw the first editor on their list was DaVinci Resolve. I know at some point I'll pay up for the Studio version and appreciate having a full feature free version to cut my teeth on and am so glad that I don't have to do any more business with Adobe than I already do, may they rot in a cold, deep, dark place.
 
Last edited:
  • Like
Reactions: brett8883
The DJI supplied LUT is very basic and I after first trying it (and moving on), I haven't touched it.

I would continue your quest to color grade manually. I don't believe there any "DJI M2P" specific settings because it really depends on a) the scene and b) your target look, both of which could be different from shot to shoot.

But it's convenient to have some better LUTs, and there are plenty that are made just for the camera on the M2P. I use the Film Poets SkyGrades collection. I trailed with the natural (where the previous link goes to), but decided to full Collection since it wasn't that much.

I've heard good things about the SpectrumGrades Cine Collection, but haven't bought them (they're about twice the price of the above collection).

I used the DaVinci free version for a while, but eventually moved up to Studio. It's really a relatively low-cost non-subscription option for what you get (quite a bit). Combined with a good graphic card that supports h.265 enc/dec as well others, it's pretty powerful.

Chris
 
The starting point will always be exposure. Without consistent exposure a log lut gives wildly different results as it is expanding from different points on the gamma curve. I end up adjusting each shot individually in post to get consistent good results. I have tried a lot of the flog LUTS out there with little encouraging results.
 
  • Like
Reactions: vindibona1
The starting point will always be exposure. Without consistent exposure a log lut gives wildly different results as it is expanding from different points on the gamma curve. I end up adjusting each shot individually in post to get consistent good results. I have tried a lot of the flog LUTS out there with little encouraging results.

As a disclaimer, I know nothing about LUTs and very little about video editing and color grading. However I have decades of experience color correcting still images, largely working from RAW images. And while I understand little (yet) about cinematography which is a much different animal than still photography, I'm not afraid to tweak images. What I've found in photography, in color correction as well as retouching, if you know what it should look like, the "how" becomes aparent in any medium very quickly, and is often approached in mulitple ways for the same result.

As I begin experimenting with LUTs a lot of it, I think, is having an idea what a specific LUT can lend to an image. The question in my mind is whether I can create the same look from scratch just as easily as applying a LUT? As a parallel metaphor (simile?), I've used Photoshop CS3 for decades, and have a subscription to PS 2020, and frankly I prefer working in CS3 because I don't have to out-think what an automated or AI function might do. I'll have to begin experimenting in D-Log and see what happens.
 
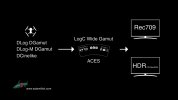
Hi, already posted in another thread. I am not only Mavic Pro 2 owner but also professional colourist and colour scientist and I developed mathematical transforms to correctly transform mavic pro2 and mavic air footage to rec709/HDR and also ACES and LogC which are common grading colourspaces. maybe have a look here. demos and check this demo video:
DJI transform HDR_complete_workflow.jpg
 
@bigtobz Thanks. I'll take a look at the video when I can get on my good computer that can best handle the video.

In the meantime, the one LUT that I found worked as a starting place on my last project was the GCHeron Dlog-Rec709 one from Ground Control. I did have to do some individual tweaking and I'm not sure what I like best yet...but I'm getting there. I tend to be predisposed to rich saturated color but have to be careful not to go too far with it. Back in film days my go-to film was Fuji Reala (220), which replaced Kodak VPS. I'll bet you're not old enough to remember them :).
 
if it works for you go for it ;) My DJI tools are not introducing a kind of look. they bring you technically correct in a known environment where you can easily apply other looks, dedicated for cineon/logc or ACES, so it is streamlines everything for multiple camera projects. I am just young enough to miss the real film time, just grabbed a bunch of experience when I started around 2007.
 
As a disclaimer, I know nothing about LUTs and very little about video editing and color grading. However I have decades of experience color correcting still images, largely working from RAW images. And while I understand little (yet) about cinematography which is a much different animal than still photography, I'm not afraid to tweak images. What I've found in photography, in color correction as well as retouching, if you know what it should look like, the "how" becomes aparent in any medium very quickly, and is often approached in mulitple ways for the same result.

As I begin experimenting with LUTs a lot of it, I think, is having an idea what a specific LUT can lend to an image. The question in my mind is whether I can create the same look from scratch just as easily as applying a LUT? As a parallel metaphor (simile?), I've used Photoshop CS3 for decades, and have a subscription to PS 2020, and frankly I prefer working in CS3 because I don't have to out-think what an automated or AI function might do. I'll have to begin experimenting in D-Log and see what happens.
Think of it like this. When you take a photo or video the camera collects a bunch of water in a bucket that is data. The goal here is to take as much of that water with you into your editor of choice which will give you more latitude to transform that image or video into how you want the photo or video to look.

With RAW photos this is easy. The full bucket is small enough that we can take the whole thing with us into photoshop and do what we want with it because the bucket has to carry only one frames worth of water.

However with video the bucket just can’t hold all the water the sensor collects so some has to poured out right away. This leaves you with less water to work with in your video editor and therefore you are stuck with the camera deciding what data it keeps and what it throws out. However with log recording we found a loophole.

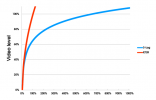
With log we can fit more water into the same sized bucket by squeezing by compressing in on itself. Think of how air can be compressed and more of it will fit in a smaller space. It looks terrible but there’s more data there in the end. Looking at the graph below we see how the gamma curve for log has been bent back? Well that’s the extra data and to use it we must bend it back straight or else it will continue to look terrible. 61FAAD01-5DB0-41BC-8269-FA895DF59860.png

We can do this either with a technical LUT (which is what I linked in the beginning of this thread or what @bigtobz has created) or by manually straightening it out in the editor. Since the log curve is asymmetric though it is going to be difficult to do this manually and consistently.

There are also “creative LUTs” which hold a particular look that you can apply to the video once you have corrected it with a technical LUT but these aren’t necessarily camera specific and they are neither good or bad they just are. Technical LUTs on the other hand will either work or they won’t and ARE camera specific because different manufacturers use different log curves and to make it even harder DJI uses a different log curve for different camera models. The one used on the M2Pro is called D-log M.

The only differences between good technical LUTs is the colorspaces they work in and how they expect the log video to be exposed. Some may want you to overexpose your footage and some may work better when you under expose.
 
Last edited:
Think of it like this. When you take a photo or video the camera collects a bunch of water in a bucket that is data. The goal here is to take as much of that water with you into your editor of choice which will give you more latitude to transform that image or video into how you want the photo or video to look.

With RAW photos this is easy. The full bucket is small enough that we can take the whole thing with us into photoshop and do what we want with it because the bucket has to carry only one frames worth of water.

However with video the bucket just can’t hold all the water the sensor collects so some has to poured out right away. This leaves you with less water to work with in your video editor and therefore you are stuck with the camera deciding what data it keeps and what it throws out. However with log recording we found a loophole.

With log we can fit more water into the same sized bucket by squeezing by compressing in on itself. Think of how air can be compressed and more of it will fit in a smaller space. It looks terrible but there’s more data there in the end. Looking at the graph below we see how the gamma curve for log has been bent back? Well that’s the extra data and to use it we must bend it back straight or else it will continue to look terrible. View attachment 116351

We can do this either with a technical LUT (which is what I linked in the beginning of this thread or what @bigtobz has created) or by manually straightening it out in the editor. Since the log curve is asymmetric though it is going to be difficult to do this manually and consistently.

There are also “creative LUTs” which hold a particular look that you can apply to the video once you have corrected it with a technical LUT but these aren’t necessarily camera specific and they are neither good or bad they just are. Technical LUTs on the other hand will either work or they won’t and ARE camera specific because different manufacturers use different log curves and to make it even harder DJI uses a different log curve for different camera models. The one used on the M2Pro is called D-log M.

The only differences between good technical LUTs is the colorspaces they work in and how they expect the log video to be exposed. Some may want you to overexpose your footage and some may work better when you under expose.
Ok... As you can see the thread was started on August 10th, almost 2 months ago. I've since learned a lot in those two months. Once D-log was described I had a very good idea of what it was an how to use it as I've been working with RAW still images for decades. While different, D-log and RAW are similar enough for practical purposes. I now have a better understanding of LUTs and at least found one, that I think you could call a "techincal" LUT that worked with my last project. I was actually able to throw it on the timeline, then make minor tweaks along the way.

What I do not yet fully understand is the various VIDEO color spaces and conversions into other color spaces. Awhile back I saw a video where a guy would convert a color space then somehow convert back. If I find the video I'll post it. Like many videos we see on YouTube he explains what he does but doesn't explain why he does it. And while I was able to monkey mimic what he was doing I didn't come away with any undestanding of what he was going after and why. At the time I didn't know how to save the actions for easy repeatability, so I just filed it in the back of my brain as general information.
 
What I do not yet fully understand is the various VIDEO color spaces and conversions into other color spaces
that is a common technique to make the grading tools work in a way you want it. if we say we use a tool called "lift" or "blacks" and you use it directly on you iphone video, you will lift everything up and that looks in most cases not very natural. but if you convert the colourspace to a more logish/flat space, apply the same amount of lift there and after that convert back to the original space, you will see a much more natural change in the shadows. I demonstrate it in this video at around 1:00
 
What I do not yet fully understand is the various VIDEO color spaces and conversions into other color spaces. Awhile back I saw a video where a guy would convert a color space then somehow convert back. If I find the video I'll post it. Like many videos we see on YouTube he explains what he does but doesn't explain why he does it. And while I was able to monkey mimic what he was doing I didn't come away with any undestanding of what he was going after and why. At the time I didn't know how to save the actions for easy repeatability, so I just filed it in the back of my brain as general information.
Sometimes if I have a really good clip I want to use but I am having trouble grading just how I want I will transform it into different color spaces and you can feel when you are adjusting the levels that different color spaces will respond differently when you adjust the levels. Sometimes I even find one that lets me do exactly what I want to do with the clip. There are people like @bigtobz who actually understand what is happening there but all I know is that the controls respond differently depending on the color space. We are getting pretty far down the rabbit hole though.
 
Sometimes if I have a really good clip I want to use but I am having trouble grading just how I want I will transform it into different color spaces and you can feel when you are adjusting the levels that different color spaces will respond differently when you adjust the levels. Sometimes I even find one that lets me do exactly what I want to do with the clip. There are people like @bigtobz who actually understand what is happening there but all I know is that the controls respond differently depending on the color space. We are getting pretty far down the rabbit hole though.
As far as "getting down the rabbit hole" I don't see it that way. I see this discussion as a tremendous learning opportunity. Part of the issue with any kind of editing, video or stills, is that one has to almost first learn what can be done or should be done. These discussions and videos can create the kinds of questions, that with a bit of research and study can provide huge leaps in our progress. As an example, until yesterday I didn't even know what a DCTL was. Today I don't know exactly how it functions or how to acquire or create them... but tomorrow I might. And the discussion brings a level of awareness of what higher level editors are thinking and doing, styles that we might never think to explore and ideas for filming. Again, I disagree with the rabbit hole metaphor, only in as much as there is a whole technicolor world once we travel down it.
 
As far as "getting down the rabbit hole" I don't see it that way. I see this discussion as a tremendous learning opportunity. Part of the issue with any kind of editing, video or stills, is that one has to almost first learn what can be done or should be done. These discussions and videos can create the kinds of questions, that with a bit of research and study can provide huge leaps in our progress. As an example, until yesterday I didn't even know what a DCTL was. Today I don't know exactly how it functions or how to acquire or create them... but tomorrow I might. And the discussion brings a level of awareness of what higher level editors are thinking and doing, styles that we might never think to explore and ideas for filming. Again, I disagree with the rabbit hole metaphor, only in as much as there is a whole technicolor world once we travel down it.
I didn’t mean it as a bad thing ?
 
The DJI supplied LUT is very basic and I after first trying it (and moving on), I haven't touched it.

I would continue your quest to color grade manually. I don't believe there any "DJI M2P" specific settings because it really depends on a) the scene and b) your target look, both of which could be different from shot to shoot.

But it's convenient to have some better LUTs, and there are plenty that are made just for the camera on the M2P. I use the Film Poets SkyGrades collection. I trailed with the natural (where the previous link goes to), but decided to full Collection since it wasn't that much.

I've heard good things about the SpectrumGrades Cine Collection, but haven't bought them (they're about twice the price of the above collection).

I used the DaVinci free version for a while, but eventually moved up to Studio. It's really a relatively low-cost non-subscription option for what you get (quite a bit). Combined with a good graphic card that supports h.265 enc/dec as well others, it's pretty powerful.

Chris
Totally agree with the film poets LUTs. I too have been using Resolve Studio for a number of years - simply the best product out there for a one-time 300 bucks! Adobe's "renting" software pricing is quite ridiculous. Recently I am processing all my DlogM footage into HDR10 using the SpectrumGrades M2 PURE with reducing gain/contrast (avoid highlight compression) then followed by MBOX Rec 709 to HDR10 LUT onto the Rec 2020 timeline and then apply some additional grading pushing mostly shadows and add contrast and adjust the gain. The results processed into 10-bit HDR H265 viewed on my HDR OLED are absolutely out of this world.
 
Totally agree with the film poets LUTs. I too have been using Resolve Studio for a number of years - simply the best product out there for a one-time 300 bucks! Adobe's "renting" software pricing is quite ridiculous. Recently I am processing all my DlogM footage into HDR10 using the SpectrumGrades M2 PURE with reducing gain/contrast (avoid highlight compression) then followed by MBOX Rec 709 to HDR10 LUT onto the Rec 2020 timeline and then apply some additional grading pushing mostly shadows and add contrast and adjust the gain. The results processed into 10-bit HDR H265 viewed on my HDR OLED are absolutely out of this world.
Where can someone learn to do that?
 
Lycus Tech Mavic Air 3 Case

DJI Drone Deals

New Threads

Forum statistics

Threads
131,073
Messages
1,559,540
Members
160,050
Latest member
invertedloser