

Just had another run. Trying to get a good run in with stock so I can compare with after mod. The problem is that I'm battery limited rather than range. There is around a 7 mph crosswind so was only able to get out 18,386 feet all the way across the peninsula to shoreline park in Mountain View before I had to turn around at 53% battery. I'll need the battery mode to really test, or at least a no wind day. I will say that I had a lot of interference stock. So while I'm able to do it, by RC link is showing 0 or 1 bar and getting some short disconnects along the way. It will be interesting to fly the same route with the FPVLR antennae once I get them installed.

You are using an out of date browser. It may not display this or other websites correctly.
You should upgrade or use an alternative browser.
You should upgrade or use an alternative browser.
Mavic FPVLR/Yagi Antenna Mod -Installation Guide and Review!
- Thread starter Intrglctcrevfnk
- Start date

Just had another run. Trying to get a good run in with stock so I can compare with after mod. The problem is that I'm battery limited rather than range. There is around a 7 mph crosswind so was only able to get out 18,386 feet all the way across the peninsula to shoreline park in Mountain View before I had to turn around at 53% battery. I'll need the battery mode to really test, or at least a no wind day. I will say that I had a lot of interference stock. So while I'm able to do it, by RC link is showing 0 or 1 bar and getting some short disconnects along the way. It will be interesting to fly the same route with the FPVLR antennae once I get them installed.
Wow! 18,000 ft just on stock? I've got to get out of the city to try out some real distances. Of course battery would be a factor at that point.
Only thing is that in the the rural areas aren't much to look at down in the southern US delta.
So going back to my OP the antennas did improve signal quality and distance. Can't wait to see what happens with your flights. I'd imagine you'd probably get to 18-19K again with battery being the factor, but with higher signal bars and less errors. Which isn't a bad thing!
Made it out 22604ft (4.28 miles) and that was with a strong head wind flying low at 164 ft altitude in the city. I turned around at 42% battery to come back which gives you an idea of the amount of wind I flew into and still had just under 10% when landing. Completely stock.
The limit on this thing isn't signal, it's the battery.
The limit on this thing isn't signal, it's the battery.
Attachments
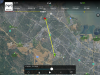
I do know one place I can test the new antenna. When I fly out to the Apple spaceship building I get a lot of interference. As you can see in this picture. I can get past it, but if I try to pan around it, connection is very bad.
By the way, that warning regarding zone is just at the edge of where I took the picture.
By the way, that warning regarding zone is just at the edge of where I took the picture.
Attachments

Made it out 22604ft (4.28 miles) and that was with a strong head wind flying low at 164 ft altitude in the city. I turned around at 42% battery to come back which gives you an idea of the amount of wind I flew into and still had just under 10% when landing. Completely stock.
The limit on this thing isn't signal, it's the battery.
That's nuts! I could barely get past 4800ft stock without losing signal. 5600 with the Yagi.
Wonder if I've got an issue with my drone/remote? It's otherwise been perfect. Mountain Vew/Palo Alto is a pretty populated area right? Figured it would have the same interference variables as my city. Course California has stricter regulations on most everything as compared to Tennessee. No way I could shower with a California valve ;-)
Anyone else getting crazy distance in a city?
The key is to fly from a slight elevation and make sure that you are aiming directly at the craft with antennae oriented correctly. My compass is a off by like 7 degrees and I compensate for that while aiming. My take off point is maybe 50-100 ft higher than the terrain I'm flying over. There should be nothing in the line of sight of the drone. Even trees which are somewhat near to the line of sight will cut down the signal. I actually have some trees around which affect me, but still get good distance. I think stock can do even 5 or 6 miles in ideal conditions, like flying from a beach over water. I'll find out once I get my battery mod.
Agreed. Unfortunately gaining an elevation difference is very hard here in the Mississippi delta. There are a few hills around here but otherwise this is a very flat city. Trees are always getting in the way here of LOS even at 400ft. And spring is here so signal breakdown is only going to get worse.
I can go up from that field 180ft and see all the way downtown. Can see the pyramid and FedEx forum. But the trees around me are 120-150 ft. I have my RTH altitude set at 45meters! Trying to figure the trigonometry for the relative angle... but it's escaping me. So the proper angle in a wide open area 400ft up and 5000ft out is just about 45*. But what about the 150ft tree that is in the way(with a variable distance I suppose, say 100ft, 300ft, 500ft out from home point).
Got any math majors here?
Also- my compass point is off relative to the drone by 15*, got to get out and do some calibration. Using the on screen compass is a bigger help if it's correct! Tested that yesterday when I took out the replacement dipole antennas that I got in from amazon. It was back to stock like distances in my area (i.e. Not that far)
During the installation, I see that you used a dremel tool on the plastic to make space. I bought my kit from DroneNerds and they have a video which has the steps WITHOUT any dremel cutting. I haven't installed yet, but here's the video:
This is ideal, as the remote can be returned to stock configuration with minimal damage.
This is ideal, as the remote can be returned to stock configuration with minimal damage.
During the installation, I see that you used a dremel tool on the plastic to make space. I bought my kit from DroneNerds and they have a video which has the steps WITHOUT any dremel cutting. I haven't installed yet, but here's the video:
This is ideal, as the remote can be returned to stock configuration with minimal damage.
Nice! I'm 99% sure that guide wasn't there when I purchased my antennas from them...
Also curious how they managed to get that screen bracket it without deforming the casing enough to effect the pins the shoulder buttons sit on.
When you do your install check back and let me know if it works- I'll revise my OP for future visitors.
So, I tried to install the antennae per the DroneNerds installation video. Unfortunately I've encountered an issue with the small ribbon cable slot. The lever has come off and now the level is broken after trying to get it back on the slot.
Here's the slot:


I had already inserted the ribbon cable and locked it, but in the process of trying to make lcd screen fit, I somehow managed to knock the lever off. I really don't see how the LCD screen can fit if the washer is used on the inside. The installation video doesn't show if he used a washer on the inside (he skipped over that step), only shows the outside one. The kit includes 2 washers, with one being a lock washer. I assume one goes on the inside and the other on outside.
So, do any of you know how I can work around that broken ribbon cable level? The cable needs to be pressed down against the pins and I don't see a good way to lock it in there without the lever. The plastic pins on the level are broken after MANY attempts at getting it back on the socket.
Everything was going smoothly until this **** ribbon socket issue.
Here's the slot:
I had already inserted the ribbon cable and locked it, but in the process of trying to make lcd screen fit, I somehow managed to knock the lever off. I really don't see how the LCD screen can fit if the washer is used on the inside. The installation video doesn't show if he used a washer on the inside (he skipped over that step), only shows the outside one. The kit includes 2 washers, with one being a lock washer. I assume one goes on the inside and the other on outside.
So, do any of you know how I can work around that broken ribbon cable level? The cable needs to be pressed down against the pins and I don't see a good way to lock it in there without the lever. The plastic pins on the level are broken after MANY attempts at getting it back on the socket.
Everything was going smoothly until this **** ribbon socket issue.
Last edited:
Ok, not all hope is lost. I spoke with a DroneNerds tech and he says that once I get the ribbon cable inserted, secure it with some other means (tape, glue, etc) and it will be fine. I was worried that the pins wouldn't make good contact without the latch, but he says it will. The latch just keeps it from pulling out. What do you guys think is a good way to secure the ribbon cable? I'm thinking some sort of silicon glue that can also be removed. Would hot glue work just outside the connector? There's plenty of ribbon cable slack, so not worried out that.
Ok, not all hope is lost. I spoke with a DroneNerds tech and he says that once I get the ribbon cable inserted, secure it with some other means (tape, glue, etc) and it will be fine. I was worried that the pins wouldn't make good contact without the latch, but he says it will. The latch just keeps it from pulling out. What do you guys think is a good way to secure the ribbon cable? I'm thinking some sort of silicon glue that can also be removed. Would hot glue work just outside the connector? There's plenty of ribbon cable slack, so not worried out that.
That's a bummer right there! I'm with the dronenerds advice- just need a way to secure it.
I fell like silicone would work but be overkill. It would be fairly permanent however. Tape would be to little (one good drop and the ribbon could pop out). Maybe a putty to keep the contact and then some tape to keep the slack ribbon slightly in place? I'm kinda siding with the silicone.
I'm curious about the washer issue- I used one on the bottom inside of mine and the lock washer on the outside- and for sure the screen bezel had to be dremmeled down to fit. Course directions would have been good, but that's why I made the post in the first place. Had to figure it on my own with some YouTube videos.
Edit: just rewatched the video above. He definitely used the large washer on top. Couldn't see on either one if they used the lock washer on the bottom. But they for sure did not use it on the top. The lock washer was not on the second (right) antenna that was on the table in the first shot. Again- I had used the Facebook link on the FPVLR page to guide my first steps. Which included using the larger washer on the bottom inside the remote. I figured it needed to be there in order to have a proper surface area to tighten the nut against.
Please update with that when you find out!
Last edited:
Also @CyberNate - I'd make sure to test fit before doing a semi permanent solution for the ZIF connector. Because I was using the dremel it took several test fits before I actually connected the ZIF ribbon and locked it down.
Also- the little plastic bit by the left antenna board input is from the screen unit where the power button is. I totally lost that thing in one of my trips to the dremel. Went back together fine without it but I think it helps channel the led light to the power button. I thought it would stay in place on the screen bracket.
Still haven't found it!
That's a bummer right there! I'm with the dronenerds advice- just need a way to secure it.
I fell like silicone would work but be overkill. It would be fairly permanent however. Tape would be to little (one good drop and the ribbon could pop out). Maybe a putty to keep the contact and then some tape to keep the slack ribbon slightly in place? I'm kinda siding with the silicone.
I'm curious about the washer issue- I used one on the bottom inside of mine and the lock washer on the outside- and for sure the screen bezel had to be dremmeled down to fit. Course directions would have been good, but that's why I made the post in the first place. Had to figure it on my own with some YouTube videos.
Edit: just rewatched the video above. He definitely used the large washer on top. Couldn't see on either one if they used the lock washer on the bottom. But they for sure did not use it on the top. The lock washer was not on the second (right) antenna that was on the table in the first shot. Again- I had used the Facebook link on the FPVLR page to guide my first steps. Which included using the larger washer on the bottom inside the remote. I figured it needed to be there in order to have a proper surface area to tighten the nut against.
Please update with that when you find out!
My colleague gave me some super sticky, double sided gummy tape which should work great. It is originally for putting in Ipad screens. Should work well for that and cleaning up my wire routing in place of my temporary tape.
Also @CyberNate - I'd make sure to test fit before doing a semi permanent solution for the ZIF connector. Because I was using the dremel it took several test fits before I actually connected the ZIF ribbon and locked it down.
Yes, good idea. That's where I went wrong the first time. I'm going to use a file rather than a dremel and just take a little off.
Yes, good idea. That's where I went wrong the first time. I'm going to use a file rather than a dremel and just take a little off.
CuberNate, not all hope is lost.
Yes, the lever is for mostly holding the ribbon cables in place but it's also does put a little pressure on the contact pins.
When you push the black side down it pushes the pins down over a rocker, so the pics on the cable side lift up against the lever for a better connection.
I tried to zoom into the pictures, but I can't say for sure with the low quality pictures. I don't think it's broken, I think it just came pout of place. Can you pm me your email, I'll give you mine. And maybe email me some macro pics of the black part and white part on the PCB board?
Scott
kennedye
Active Member
Curious, how does the mod affect the weight/balance of the controller? I would imagine it's a different experience from adding the antenna to the heavier Phantom controller.
Careful you don't bump into this guy (unless that's you?)!
I do know one place I can test the new antenna. When I fly out to the Apple spaceship building I get a lot of interference. As you can see in this picture. I can get past it, but if I try to pan around it, connection is very bad.
By the way, that warning regarding zone is just at the edge of where I took the picture.
Careful you don't bump into this guy (unless that's you?)!
And, what the heck. I did the video so I might as well share it.
It's not a published video, just a private one for this thread.
I know is not exactly the same ribbon cable latch, but the general idea is the same so it still might help some people.
NOTE:
THIS IS NOT THE SAME LATCH THAT IS ON THE MAVIC, DO NOT BREAK OFF THE SIDES ON THE MAVIC/CONTROLLER OR THAT LATCH WILL NOT WORK.
And I know is has a fan noise in the background, I was using my surface to capture the video from my microscope camera. My normal video recording and audio equiptment is being re-wired for a different project. This is not my normal video
/audio quality so please don't judge
Thank you for all your efforts. I managed to get the mod finished and tested the antennae. The latch pins are broken, so I had no chance to re-fit it. Originally they weren't, but I had tried many times to put the latch back and mangled it. I ended up just using my double sided gummy tape in front of the socket to stick the ribbon down.
Anyway, the mod is done and I did some test flights. My experience is on par with the OP's. It's difficult to quantify the improvement, but I'd say around 20% improvement over stock. If you have issues with strong interference, the antennae mod likely won't make much difference. If you have lower to medium interference that makes your connection intermittent, it will help. Overall, I have feel that for most it is not worth doing the mod. Sure it will give you 30,000 plus feet range in a non-interference place, but in that scenario stock would get you to over 25,000. Is it really worth mangling your remote for that? I guess it depends. Places where my stock setup would completely cut out and I'd get return to home, the same happens with the FPVLR. Places where I'm fading in and out stock, the FPVLR was a bit more stable, but not perfect.
I'm planning to buy another remote to keep stock and use this one for playing around with mods. Anyway, I'll do some more testing. I only had a chance to get my first impressions with a couple flights in known areas.
Glad you got it all back together and functioning!!
I'm with you. Although I did see an improvement it wasn't drastic, and I do have issues in my area with interference. I guess I have to justify the price tag in my mind and call it 'worth it' (or have buyers remorse) but it's not $90 worth really. I feel like I had to defend my position in this thread due to that. If it was say $30 it would be no biggie.
My biggest gripe is having to disassemble/remove and replace the antennas in order to store them safely in my bag. That and I can't use my DJI sun hood at all anymore, which was an easy convenience for quick flights in the sun versus breaking out the mavmount and the hoodman.
I removed my stock antennas without damage and kept them, may some day revert back as buying another remote for $300 is out of budget for now. But oh well, sometimes you've got to be a Guinea pig for the cutting edge. The RP-SMA socket is rated for 500 mating cycles (as an industry standard) but the mini RP connectors are only rated for 30 or so. If/when I start noticing signal problems I'll revert back. Not like I'm going to take the remote apart 30 times.
@CyberNate - what ever came of the 8mm bolt clearance inside the unit? Did you remove the washers or did it all fit somehow?
Similar threads
- Replies
- 8
- Views
- 790
- Replies
- 2
- Views
- 437
- Replies
- 33
- Views
- 3K


DJI Drone Deals
New Threads
-

-
 2 Genuine DJI Mini 4 Pro, Mini 3 Series Plus Intelligent Flight Battery
- Started by Dogpilot
- Replies: 0
-

-
 Mini 4 Pro Istanbul where the East meets West - Eminönü
- Started by MPone
- Replies: 1
-
 Wanting to understand "Power Banks" and what I'll need....
- Started by MavicFlyer2
- Replies: 7
Members online
Total: 11,788 (members: 13, guests: 11,775)
Forum statistics
