DJI Mavic, Air and Mini Drones
Friendly, Helpful & Knowledgeable Community
Join Us Now

Panorama Control DJI?

Citizen Flier

Well-Known Member
Joined
Jun 27, 2019
Messages
344
Reactions
181
I still have the Mavic 2 Pro, which was/is perfectly adequate for my needs. One way to improve images with the small sensor is with Panoramas. I never used the DJI auto Panorama function. I just rotated the unit as needed, and stitched the images together in Adobe Raw Reader/Photoshop. I would always bracket the exposures resulting excellent HDR Panoramas. But I haven't flown much recently.
As I recall the DJI panorama feature was automated, and if I recall correctly would capture a series of designated, overlapping Pano images, which I believe resulted in a pre-assembled Pano Image-?
Does anyone here shoot Pano stills, perhaps with a Mavic 2 Pro, using the Maving controller app? Do you auto compose the Pano Images or capture manually?
I'm guessing Litchi has their version, but I prefer using a DJUI proprietary app to control my M2P.
Thanks!
 
I take 360° panos with a Mavic 2 Pro using the GO 4 built-in functionality. The aircraft automatically assembles an 8k-equivalent JPEG which is pretty good and about as large as you can display on any of the hosting websites I've found, but also saves the RAW files if requested that can be used to create a full-resolution image that is around 27000 x 13500 px. It doesn't do exposure bracketing so the images are not HDR. Obviously any subset of that 360° image can be cropped as needed, up to the full resolution of the sensor.
 
  • Like
Reactions: Fizzbang
I still have the Mavic 2 Pro, which was/is perfectly adequate for my needs. One way to improve images with the small sensor is with Panoramas. I never used the DJI auto Panorama function. I just rotated the unit as needed, and stitched the images together in Adobe Raw Reader/Photoshop. I would always bracket the exposures resulting excellent HDR Panoramas. But I haven't flown much recently.
As I recall the DJI panorama feature was automated, and if I recall correctly would capture a series of designated, overlapping Pano images, which I believe resulted in a pre-assembled Pano Image-?
Does anyone here shoot Pano stills, perhaps with a Mavic 2 Pro, using the Maving controller app? Do you auto compose the Pano Images or capture manually?
I'm guessing Litchi has their version, but I prefer using a DJUI proprietary app to control my M2P.
Thanks!
Yes, I use one of the Mavic 2 zoom Pano functions pretty much exclusively. It's the one labelled 'super-resolution' and it does exactly what it says on the tin... one standard shot (for reference, I imagine) followed by a 2X optical zoom to capture a 3X3 grid of 9 shots composited into a single 4X3 JPG that still makes my jaw drop every time I zoom in on the final image, which inherits the parallax effect for background landscape features because the lens physically pulls focus to a 48mm equivalent.
 
This is a huge topic, so I will try and restrain my reply, to answering your question, but even as I write this I realise that there is not enough detail in your request.

What type of pano do you want? (360degree spherical or small grid as mentioned above etc..)
What do you want the pano for? (Display on smartTV or monitor; publishg on the web etc..)
How do you want to display the final image.

I think the answer you want is:-
Use the Go 4 app 360 degree pano function, to take RAW+JPG images.
If its landscape take from a height above 40m (reduces the amount of blank sky) .
Try to use f4 if possible to give a sharp image.
Point towards the brightest area within your pano and lock the exposure (do not use auto exposure to take all the shots).
If there are moving objects in your pano they will probably ruin the resultant images, so avoid moving subjects.
Take the pano and the drone will take 26 images and stitch into a jpg file that it will store in the MEDIA folder.
If that image is good enough for your purpose then job done.

I view my pano files using FSPViewer on my monitor and/or display them on my TV.

For improved images, this is where to topic gets bigger.
Trying to keep things short and cheap(free software):-
I use DarkTable; RawTherapee; and Hugin.​
With Hugin set to use DarkTable or RawTherapee you can import the DNG files into Hugin.​
Hugin will use DarkTable or RawTherapee to convert the DNG files from the PANORAMA folder to tif images and stitch the converted files into a 360 degree pano but it may not produce an image with the required 2:1 ratio for a 360 pano.​
To resolve to size issue I open the pano in GIMP and alter the canvas size to be 2:1 (draging the image to the bottom of the frame, and exporting the result, the top being filled with transparent space. The result is exported as a tif file or as a high quality 90 jpg file.​
The resultant 2:1 file displays correctly as a 360 degree spherical panorama.

There are too many tweaks that can be made in the above process to list them all here but once you have the original dng and jpg files you can improve greatly on the pano that is created by the drone.
 
Last edited:
"If its landscape take from a height above 40m (reduces the amount of blank sky)".....

I can't remember if you tilt the camera down somewhat, will that also reduce the amount of sky using the 3x3 pano setting? TIA.
 
Another rule of thumb is to start with the horizon on the bottom of the top third line, but it all depends on the subject you are trying to capture.
 
This is a huge topic, so I will try and restrain my reply, to answering your question, but even as I write this I realise that there is not enough detail in your request.

What type of pano do you want? (360degree spherical or small grid as mentioned above etc..)
What do you want the pano for? (Display on smartTV or monitor; publishg on the web etc..)
How do you want to display the final image.

I think the answer you want is:-
Use the Go 4 app 360 degree pano function, to take RAW+JPG images.
If its landscape take from a height above 40m (reduces the amount of blank sky) .
Try to use f4 if possible to give a sharp image.
Point towards the brightest area within your pano and lock the exposure (do not use auto exposure to take all the shots).
If there are moving objects in your pano they will probably ruin the resultant images, so avoid moving subjects.
Take the pano and the drone will take 26 images and stitch into a jpg file that it will store in the MEDIA folder.
If that image is good enough for your purpose then job done.

I view my pano files using FSPViewer on my monitor and/or display them on my TV.

For improved images, this is where to topic gets bigger.
Trying to keep things short and cheap(free software):-
I use DarkTable; RawTherapee; and Hugin.​
With Hugin set to use DarkTable or RawTherapee you can import the DNG files into Hugin.​
Hugin will use DarkTable or RawTherapee to convert the DNG files from the PANORAMA folder to tif images and stitch the converted files into a 360 degree pano but it may not produce an image with the required 2:1 ratio for a 360 pano.​
To resolve to size issue I open the pano in GIMP and alter the canvas size to be 2:1 (draging the image to the bottom of the frame, and exporting the result, the top being filled with transparent space. The result is exported as a tif file or as a high quality 90 jpg file.​
The resultant 2:1 file displays correctly as a 360 degree spherical panorama.

There are too many tweaks that can be made in the above process to list them all here but once you have the original dng and jpg files you can improve greatly on the pano that is created by the drone.
Alternatively, you can just hand the RAW images to a program such as PanoVolo, which will automatically create a full-resolution, well stitched, properly formatted 360° pano file.
 
This is a huge topic, so I will try and restrain my reply, to answering your question, but even as I write this I realise that there is not enough detail in your request.

What type of pano do you want? (360degree spherical or small grid as mentioned above etc..)
What do you want the pano for? (Display on smartTV or monitor; publishg on the web etc..)
How do you want to display the final image.

I think the answer you want is:-
Use the Go 4 app 360 degree pano function, to take RAW+JPG images.
If its landscape take from a height above 40m (reduces the amount of blank sky) .
Try to use f4 if possible to give a sharp image.
Point towards the brightest area within your pano and lock the exposure (do not use auto exposure to take all the shots).
If there are moving objects in your pano they will probably ruin the resultant images, so avoid moving subjects.
Take the pano and the drone will take 26 images and stitch into a jpg file that it will store in the MEDIA folder.
If that image is good enough for your purpose then job done.

I view my pano files using FSPViewer on my monitor and/or display them on my TV.

For improved images, this is where to topic gets bigger.
Trying to keep things short and cheap(free software):-
I use DarkTable; RawTherapee; and Hugin.​
With Hugin set to use DarkTable or RawTherapee you can import the DNG files into Hugin.​
Hugin will use DarkTable or RawTherapee to convert the DNG files from the PANORAMA folder to tif images and stitch the converted files into a 360 degree pano but it may not produce an image with the required 2:1 ratio for a 360 pano.​
To resolve to size issue I open the pano in GIMP and alter the canvas size to be 2:1 (draging the image to the bottom of the frame, and exporting the result, the top being filled with transparent space. The result is exported as a tif file or as a high quality 90 jpg file.​
The resultant 2:1 file displays correctly as a 360 degree spherical panorama.

There are too many tweaks that can be made in the above process to list them all here but once you have the original dng and jpg files you can improve greatly on the pano that is created by the drone.
My use of Pano is to primarily compose high resolution landscape images, which would not normally be possible with the small sensor in the M2Pro in a single frame. I do the same with my Canon R5. The typical result I seek might be just slightly wider than the aspect ratio of a full sensor DSLR -definitely not 360º, or even 180º. I have printed an 8' wide very high res image of a wide mountain range. But thet 3:1 aspect ratio is not pleasing IMO. Too wide & not tall enough.
As stated above I have made "manual" panos where I simply rotated either the camera or the aircraft (with approx 20-25% image overlap) I also always bracket exposures (5x) I have gotten excellent results just using the Adobe Camera Raw HDR Pano merge feature.
My main issue is how to best avoid 3:1 (or wider) aspect ratios. With my land camera, I can capture in portrait mode which yields a taller image that simply requires more overlapping panned exposures. But of not possible with M2P.
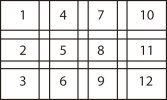
I inquired about the DJI auto Pano feature bc I didn't know how it would achieve expanding the VERTICAL area captured. I have attached a (very rough) sketch of an overlapped grid of captures. Each frame would overlap the next -horz & vert. The final composed image would be a fairly high res landscape image with a fairly normal aspect ratio -but not an ultra wide format pano.
My rough idea would be to start with the top row of frames. I prefer capturing landscapes with dramatic sky/clouds which solves part of the issue of what to capture above the horizon. So I would start at upper left capture, Rotate camera downward, then again. Then rotate the aircraft to capture column 2, etc. But this would be very difficult to achieve obviously (although Adobe does an excellent job of image stitching)
This is why I asked about the DJI auto Pano feature. But never having used it, I don't know if it can add vertical columns. And I don't know if it brackets exposures.
Please excuse the lengthy question, I tried to simplify.
Thanks.
 

Attachments

  • Pano_rough_grid.jpg
    Pano_rough_grid.jpg
    53.6 KB · Views: 3
My use of Pano is to primarily compose high resolution landscape images, which would not normally be possible with the small sensor in the M2Pro in a single frame. I do the same with my Canon R5. The typical result I seek might be just slightly wider than the aspect ratio of a full sensor DSLR -definitely not 360º, or even 180º. I have printed an 8' wide very high res image of a wide mountain range. But thet 3:1 aspect ratio is not pleasing IMO. Too wide & not tall enough.
As stated above I have made "manual" panos where I simply rotated either the camera or the aircraft (with approx 20-25% image overlap) I also always bracket exposures (5x) I have gotten excellent results just using the Adobe Camera Raw HDR Pano merge feature.
My main issue is how to best avoid 3:1 (or wider) aspect ratios. With my land camera, I can capture in portrait mode which yields a taller image that simply requires more overlapping panned exposures. But of not possible with M2P.
I inquired about the DJI auto Pano feature bc I didn't know how it would achieve expanding the VERTICAL area captured. I have attached a (very rough) sketch of an overlapped grid of captures. Each frame would overlap the next -horz & vert. The final composed image would be a fairly high res landscape image with a fairly normal aspect ratio -but not an ultra wide format pano.
My rough idea would be to start with the top row of frames. I prefer capturing landscapes with dramatic sky/clouds which solves part of the issue of what to capture above the horizon. So I would start at upper left capture, Rotate camera downward, then again. Then rotate the aircraft to capture column 2, etc. But this would be very difficult to achieve obviously (although Adobe does an excellent job of image stitching)
This is why I asked about the DJI auto Pano feature. But never having used it, I don't know if it can add vertical columns. And I don't know if it brackets exposures.
Please excuse the lengthy question, I tried to simplify.
Thanks.
I use the DJI autp pano with my M2P. I find it does a reasonable job, but I do cull through the auto-stitched images and then select those that are keepers and then use On1 Raw to process the raw files, edit, and then enlarge/crop to a 7680x2160 image for wallpapers for my side by side 4K monitors.

I also have a Canon R5 that I use in portrait mode to capture overlapped images to create 7680x2160 final images.
 
My use of Pano is to primarily compose high resolution landscape images, which would not normally be possible with the small sensor in the M2Pro in a single frame. I do the same with my Canon R5. The typical result I seek might be just slightly wider than the aspect ratio of a full sensor DSLR -definitely not 360º, or even 180º. I have printed an 8' wide very high res image of a wide mountain range. But thet 3:1 aspect ratio is not pleasing IMO. Too wide & not tall enough.
As stated above I have made "manual" panos where I simply rotated either the camera or the aircraft (with approx 20-25% image overlap) I also always bracket exposures (5x) I have gotten excellent results just using the Adobe Camera Raw HDR Pano merge feature.
My main issue is how to best avoid 3:1 (or wider) aspect ratios. With my land camera, I can capture in portrait mode which yields a taller image that simply requires more overlapping panned exposures. But of not possible with M2P.
I inquired about the DJI auto Pano feature bc I didn't know how it would achieve expanding the VERTICAL area captured. I have attached a (very rough) sketch of an overlapped grid of captures. Each frame would overlap the next -horz & vert. The final composed image would be a fairly high res landscape image with a fairly normal aspect ratio -but not an ultra wide format pano.
My rough idea would be to start with the top row of frames. I prefer capturing landscapes with dramatic sky/clouds which solves part of the issue of what to capture above the horizon. So I would start at upper left capture, Rotate camera downward, then again. Then rotate the aircraft to capture column 2, etc. But this would be very difficult to achieve obviously (although Adobe does an excellent job of image stitching)
This is why I asked about the DJI auto Pano feature. But never having used it, I don't know if it can add vertical columns. And I don't know if it brackets exposures.
Please excuse the lengthy question, I tried to simplify.
Thanks.
Well in that case:- See Stewart and Alina and his photo guidance videos.
 
Lycus Tech Mavic Air 3 Case

DJI Drone Deals

New Threads

Forum statistics

Threads
134,341
Messages
1,593,830
Members
162,922
Latest member
brenthconroy