DJI Mavic, Air and Mini Drones
Friendly, Helpful & Knowledgeable Community
Join Us Now

Questions About Panos and Global Images Mavic mini 2

Dale D

Well-Known Member
Joined
Sep 13, 2018
Messages
6,880
Reactions
7,730
Location
Miami
Site
vimeo.com
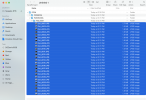
Still struggling with the pan mode of my new Mini 2. Just went outside the house to try it again. All I get are the 16 jpgs, and no RAW files. I can upload the globe view to Sky Pixel . Here is what my SD card shows- but no RAW image and no stitched image.

I did upload the orbital view to Skypixel but although I can see it on my MAC two people I sent the link to cannot get it. Here is the Skypixel link to the global view.


Screen Shot 2021-07-01 at 4.32.12 PM.png
 
Do you have it setup to take both jpg and raw photos? If so, both should be in the same folder on the SD card.
 
Do you have it setup to take both jpg and raw photos? If so, both should be in the same folder on the SD card.
Yes- the setting was Photo>jpg+RAW and the resultant SD card file is as shown in blue highlighted in the above window.
 
found this at:

Can't vouch for its validity but here is one response in the thread that may help with your situation.

I'm sure you have already set JPEG & RAW in your camera settings. However, the setting only works for single shot/AEB. To get the pano DNGs:

1) Take off
2) Select one of the pano photo modes
3) Open camera settings and discover it's only set to JPEG! Toggle to JPEG & RAW then exit settings
4) Take panos and you'll find the JPEG and GNG files in the PANORAMA subfolder on the SD card.

5) I think the setting 'sticks' for the future
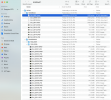
BINGO- your are absolutely right! I did what you said and indeed, did get both DNG and JPG files for all shots. I am attaching a view of the folder and files. But NO synthesized pano or globe. The key is to enter the JPEG+RAW setting AFTER setting the pano mode. Now, how do I process 26 DNG images????Screen Shot 2021-07-02 at 5.36.32 PM.png
 
BINGO- your are absolutely right! I did what you said and indeed, did get both DNG and JPG files for all shots. I am attaching a view of the folder and files. But NO synthesized pano or globe. The key is to enter the JPEG+RAW setting AFTER setting the pano mode. Now, how do I process 26 DNG images????View attachment 131504

I found this post:

Again...not sure of accuracy in the post but it seems that you need to use additional s/w to do the DNG stitching.

Exactly as the poster above has said. I think it boils down to the fact the Mini2 needs to harness the power of your smartphone to stitch the panos together. To do this is, it first makes 2000x1500 JPEGs from whatever JPEG or DNG was originally shot, then stitches those.

Trouble is, these are low res so look fantastic on the phone but less so on a PC monitor.

For the best results, you need to take the panos in JPEG & RAW (check that toggle switch in settings after selecting pano mode as it doesn't carry over from single image mode). Now the PANORAMA folder on the card will fill with subfolders of high quality DNGs that you can stitch in post. Microsoft ICE will do this for free but other software is avialable. Unfortunately, there is some problem with the metadata in the DNGs taken this way and, at present, Lightroom & Photoshop can't properly read the file leading to a colour issue where only a quarter of the image is OK - see https://forum.dji.com/forum.php?mod=viewthread&tid=228896&extra=page=1&filter=typeid&typeid=766&typeid=766 and look at the sky on the first image.

Toward the end of the pasted text there is a reference to a color issue. If you look towards the end of the earlier link I sent, it appears that problem was fixed in a later firmware release in early 2021.
So I have actually just started a new thread, dealing with this issue and it totally concurs with your statement above. I am going to copy/paste that post here:

So I have been trying to learn my new Mavic 2 Mini to reproduce what I was easily able to do with the Mavic 2 Pro, I have finally had success. Here are the steps Have used and the resultant image;
1) Put the drone into the air an position it for taking three images
2) settings on Photo
3) adjust exposure
4) activate JPG+RAW
5) grid on
6) take three images, overlapping by at least 30%, left, middle, and right
7) Book-end before the first and after the last image on the ground with two images you will not use or keep, used as markers
8) Open the SD card files on my iMAC. - Separate JPG from DNG so you have three DNG files
9) open Photoshop
10) open Bridge
11) highlight the three images in bridge
12) Select all (CTRL+A)
13) right click on any of the three images
14) hit Merge to Panorama
15) In dialogue window, play with the settings to your best judgement
16) in the final image, open into Photoshop for final editing
17) file>save as..... JPG of a small enough resolution for e0mailing- usually <1.5MB.

Here is the result of three RAW files stitched in Photoshop
 

Attachments

  • Royal Palm Tennis-stitched-3DNGs.jpg
    1.5 MB · Views: 14
  • Like
Reactions: 66427cobra
Lycus Tech Mavic Air 3 Case

DJI Drone Deals

New Threads

Forum statistics

Threads
130,983
Messages
1,558,542
Members
159,972
Latest member
valter123