

Very nice. Thanks for sharing.Quick search in forum shows this... for stacking video tutorial. Is this the one?
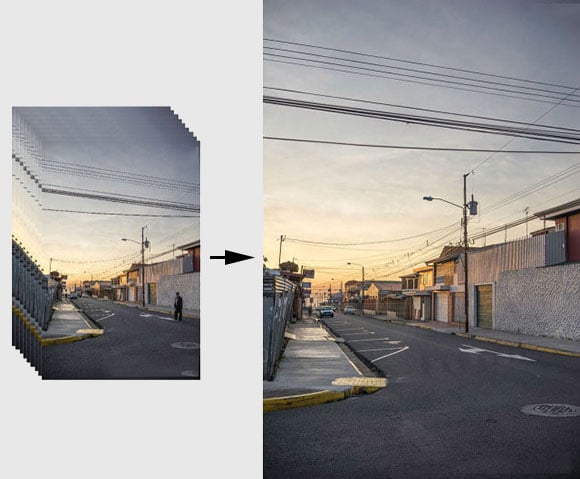
A Practical Guide to Creating Superresolution Photos with Photoshop
We’ve seen it in plenty of thriller/crime solver TV shows and movies: upon reviewing some grainy and very low-resolution surveillance footage, someonepetapixel.com

You are using an out of date browser. It may not display this or other websites correctly.
You should upgrade or use an alternative browser.
You should upgrade or use an alternative browser.

JoostGT3
Well-Known Member
- Joined
- Apr 11, 2017
- Messages
- 865
- Reactions
- 678
- Age
- 43
Scopdoc, you're dead-on with your observation, and I love how creative photographers are making use of this new tool they have in their camera bag. Age-old adagiums like "Horizon at 1/3 or 2/3" don't seem to cover it anymore, and there is many more of those rules of thumb that can go overboard when using a drone.
Your pictures clearly show making use of the new perspective, and I like them a lot. However, I would suggest going a bit less overboard with the post-processing, as they look very artificial at the moment.
Regarding your remark about image stacking; the easiest way is to import all pictures you want to stack into one picture as different layers. Then select all layers except the background layer and right-click. Select "blending mode" and go for something that says "lighten" or something alike. This the picture will consist of the background image, and the pixels of the layers above that are brighter than the same pixel of the layer below... typically the pixels depicting the lightning will be brighter than the surrounding and thus you end up with one image having all the photographed lightnings in one. Almost all lightning and fireworks pictures that you see online are made like that.
See examples of pictures I did that way (not with a drone tbh)

There is no doubt that drones allow us a different perspective, and revisit places we may have visited to death in the past....
Another take on “eat at Joe’s” in Daytona Beach, FL.
Thanks for sharing the info on stacking. I will give that a try. I have multiple frames of the lightning.Scopdoc, you're dead-on with your observation, and I love how creative photographers are making use of this new tool they have in their camera bag. Age-old adagiums like "Horizon at 1/3 or 2/3" don't seem to cover it anymore, and there is many more of those rules of thumb that can go overboard when using a drone.
Your pictures clearly show making use of the new perspective, and I like them a lot. However, I would suggest going a bit less overboard with the post-processing, as they look very artificial at the moment.
Regarding your remark about image stacking; the easiest way is to import all pictures you want to stack into one picture as different layers. Then select all layers except the background layer and right-click. Select "blending mode" and go for something that says "lighten" or something alike. This the picture will consist of the background image, and the pixels of the layers above that are brighter than the same pixel of the layer below... typically the pixels depicting the lightning will be brighter than the surrounding and thus you end up with one image having all the photographed lightnings in one. Almost all lightning and fireworks pictures that you see online are made like that.
See examples of pictures I did that way (not with a drone tbh)
View attachment 79219 View attachment 79220
I treat most of my photography as “art”. It is not designed to document any exactness in nature. Even Ansel Adams changed his photos “in post”. I love the dynamic range in modern cameras, especially the details in the shadows. I usually underexpose so as not to lose any details in the highlights (no blinkies allowed on my monitor!) then I bring up the shadows in post. I frequently shoot 5 image HDR shots with my mirrorless camera, just for this reason. HDR treatment of single shots frequently gives images a look that I prefer. I treat the images in post to make me and my viewers “happy”. If it is obvious that the images have been treated in post, I am good with that. I think of it as the same as liking to paint with bright colors.
I don’t think of it as different from your great lightning and fireworks shots. Not possible to get the images without treatment in post. Thanks again for sharing!
JoostGT3
Well-Known Member
- Joined
- Apr 11, 2017
- Messages
- 865
- Reactions
- 678
- Age
- 43
Thanks for sharing the info on stacking. I will give that a try. I have multiple frames of the lightning.
I treat most of my photography as “art”. It is not designed to document any exactness in nature. Even Ansel Adams changed his photos “in post”. I love the dynamic range in modern cameras, especially the details in the shadows. I usually underexpose so as not to lose any details in the highlights (no blinkies allowed on my monitor!) then I bring up the shadows in post. I frequently shoot 5 image HDR shots with my mirrorless camera, just for this reason. HDR treatment of single shots frequently gives images a look that I prefer. I treat the images in post to make me and my viewers “happy”. If it is obvious that the images have been treated in post, I am good with that. I think of it as the same as liking to paint with bright colors.
I don’t think of it as different from your great lightning and fireworks shots. Not possible to get the images without treatment in post. Thanks again for sharing!
You're welcome mate, happy to help! Let me know if you have any questions.
Regarding the post-processing; I feel you brother! All my photos have at least some sort of post-processing done to it, and just like with you, I consider my images to be "my art". I guess we all have our own tastes w.r.t. how we like an image to look. My remark was not meant as criticism.

W.r.t. bringing up the shadows in post, are you familiar with the philosophy of "EttR" (Expose to the Right)?
The idea is that when you overexpose an image slightly (without going as far as getting pure white), it is easier to get a better balanced and more colorful look in post-processing. I understand the philosophy, but in practice, it is very difficult not to overexpose the sky, and bracketing is often easier. Having said that, I have never reached satisfactory results with HDR and in practice often try to make one good shot and lift the shadows and reduce the highlights in post. Any tips for taking good HDR shots from your experience?
You're welcome mate, happy to help! Let me know if you have any questions.
Regarding the post-processing; I feel you brother! All my photos have at least some sort of post-processing done to it, and just like with you, I consider my images to be "my art". I guess we all have our own tastes w.r.t. how we like an image to look. My remark was not meant as criticism.
W.r.t. bringing up the shadows in post, are you familiar with the philosophy of "EttR" (Expose to the Right)?
The idea is that when you overexpose an image slightly (without going as far as getting pure white), it is easier to get a better balanced and more colorful look in post-processing. I understand the philosophy, but in practice, it is very difficult not to overexpose the sky, and bracketing is often easier. Having said that, I have never reached satisfactory results with HDR and in practice often try to make one good shot and lift the shadows and reduce the highlights in post. Any tips for taking good HDR shots from your experience?
I learned to use my first nice Nikon by reading Thom Hogan’s book on that camera. It taught me about the specific functions of my camera and photography basics like pushing histograms to the right. My first drone shots (Like many, I am sure.) were “Drone selfies”. I was focused on finding me in the image. I blew out the skies and clouds. I hate losing info in the brighter parts of the picture. You can’t get it back. After I saw that, I started shooting for the brightest image which didn’t bring up any, or only brought up a very small amount, of the “blinkies”. I brought the darker areas back in post.
I just got my Nikon Z7 and have only learned the most commonly used functions on it. The skies and snow are so bright in Colorado, I shot a bunch of bracketed shots for later HDR processing. I try to learn as much as I can about HDR when I read about photography. The gamut and dynamic range of the human eye are so great that even my best images of sunsets or scenes with very bright and very dark areas disappoint when compared to what I saw as I took the photos. Bracketing; HDR; stacking. All of these techniques are very cool and help get us closer to what we, as the photographer, experienced when we took the shot.
The first image is my first blown out selfie.
The panorama images I took with my Z7 were too big, even when transferred out of my Apple Photos app. I have tried inserting a link to the images. One pano was made without bracketing. I just set the exposure for the brightest image. The second pano is made from stitching together 12 or more HDR shots. Each HDR shot was created from 5 bracketed photos. I definitely like HDR. The skies were bright. It was early in the day so the shadows were dark. The sky is washed out without bracketed shots. HDR was a great solution. A fair amount of work in post, it worth it.

iCloud Photos - Apple iCloud
View, organize, and share photos and videos with iCloud Photos on the web. Changes will sync across your devices with iCloud.
 share.icloud.com
JoostGT3
Well-Known Member
- Joined
- Apr 11, 2017
- Messages
- 865
- Reactions
- 678
- Age
- 43
Obsidian Sereniti
Well-Known Member
- Joined
- Apr 28, 2019
- Messages
- 73
- Reactions
- 109
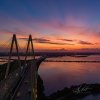
Beautiful images! I also agree with you on the perspective change. I am a seasoned photographer (translation, “old” ?). Initially I tried to follow same composition rules I’ve used for 30 years. Sometimes it works but other times it doesn’t make sense. I think I’m used to it now. Took this earlier this morning:Using a drone has caused me to totally rethink my photography when composing images. Sunsets are all “better” when the horizon line is visible due to the altitude. Waterfalls can be viewed face on or from overhead. Animals are easier to photograph, as well. I am having to relearn “perspectives” on how to look at the world.View attachment 78597View attachment 78598View attachment 78599View attachment 78600View attachment 78601View attachment 78602View attachment 78603View attachment 78604View attachment 78605
Attachments
@Obsidian Sereniti ... This is a stellar photo!Beautiful images! I also agree with you on the perspective change. I am a seasoned photographer (translation, “old” ?). Initially I tried to follow same composition rules I’ve used for 30 years. Sometimes it works but other times it doesn’t make sense. I think I’m used to it now. Took this earlier this morning:
Great shot. Great composition. I think you have it now!Beautiful images! I also agree with you on the perspective change. I am a seasoned photographer (translation, “old” ?). Initially I tried to follow same composition rules I’ve used for 30 years. Sometimes it works but other times it doesn’t make sense. I think I’m used to it now. Took this earlier this morning:
I love the dynamic range in modern cameras, especially the details in the shadows. I usually underexpose so as not to lose any details in the highlights
Just going to point something out here. Most drones have at best 12 bits which you can more or less equate to stops. The original Mavic Pro had 8 bits I think.
Think of it like Ansel did in terms of zones with 0 being absolute black and 10 being absolute white.
Zones 0-2 are black with no detail. 3-4 are shadow, 5 is middle grey (18% reflectance) 8 is white with detail and 9-10 is white with no detail.
If you shoot under exposed then you are moving everything down meaning you're reducing the bits to encode the shadows.
So in a zone 3 you have 3 bits or 12 levels of brightness possible. If you artificially boost it by dragging the shadows up then you expand the range but the original levels remains - just "stretched" resulting in visible banding (ignoring the noise).
This is why the general advice with digital is "shoot to the right" (histogram) since you have more bits to play with and it's actually easier to recover highlights and you have less banding since you're actually compressing range at the top.
Here's an article to that point with some good examplesJust going to point something out here. Most drones have at best 12 bits which you can more or less equate to stops. The original Mavic Pro had 8 bits I think.
Think of it like Ansel did in terms of zones with 0 being absolute black and 10 being absolute white.
Zones 0-2 are black with no detail. 3-4 are shadow, 5 is middle grey (18% reflectance) 8 is white with detail and 9-10 is white with no detail.
If you shoot under exposed then you are moving everything down meaning you're reducing the bits to encode the shadows.
So in a zone 3 you have 3 bits or 12 levels of brightness possible. If you artificially boost it by dragging the shadows up then you expand the range but the original levels remains - just "stretched" resulting in visible banding (ignoring the noise).
This is why the general advice with digital is "shoot to the right" (histogram) since you have more bits to play with and it's actually easier to recover highlights and you have less banding since you're actually compressing range at the top.
Exposing to the Right By: Elliot Hook
Crocket1158
Well-Known Member
Brojon, don’t get me wrong about the exposures. I understand about the amount of data in the low light areas versus the brighter areas. I push my histograms to the right until I get clipping. I then push the exposures/histogram to the left until I have only minimal or no blowout of the highlights. Once you “fill the light buckets” in the photodiode sensor, there is no detail information possible, as all of the photodiodes return the same light value. Once highlight clipping occurs, you can not recover those details. So, I push the histogram to the right until I get significant clipping (blinking diagonal lines on the Mavic Pro 2), then I pull back to the left until there are only a few areas of blinking or none at all. In my shots with full sun, snow, bright skies, and clouds, this meant the evergreen trees and some shadows were very dark. Those areas I raised back up in post, without blowing out the snow or clouds. In auto mode, the Mavic Pro 2 exposes for an overall bright image. This always blew out the snow and clouds due to clipping. Non-recoverable.Just going to point something out here. Most drones have at best 12 bits which you can more or less equate to stops. The original Mavic Pro had 8 bits I think.
Think of it like Ansel did in terms of zones with 0 being absolute black and 10 being absolute white.
Zones 0-2 are black with no detail. 3-4 are shadow, 5 is middle grey (18% reflectance) 8 is white with detail and 9-10 is white with no detail.
If you shoot under exposed then you are moving everything down meaning you're reducing the bits to encode the shadows.
So in a zone 3 you have 3 bits or 12 levels of brightness possible. If you artificially boost it by dragging the shadows up then you expand the range but the original levels remains - just "stretched" resulting in visible banding (ignoring the noise).
This is why the general advice with digital is "shoot to the right" (histogram) since you have more bits to play with and it's actually easier to recover highlights and you have less banding since you're actually compressing range at the top.
Similar threads
- Replies
- 8
- Views
- 827
- Replies
- 8
- Views
- 417
- Replies
- 2
- Views
- 698
- Replies
- 23
- Views
- 881


DJI Drone Deals
1. Mini 2
2. Mini 3 Pro
3. Mini 4 Pro
4. Air 2s
5. Air 3
6. Avata 2
7. Mavic 3 Pro
8. Mavic 3 Classic
2. Mini 3 Pro
3. Mini 4 Pro
4. Air 2s
5. Air 3
6. Avata 2
7. Mavic 3 Pro
8. Mavic 3 Classic
New Threads
-

-

-
 Air 3 Loch Kinardochy - Spring Highland Sunshine
- Started by AlbionDrones
- Replies: 0
-

-

Members online
Total: 835 (members: 10, guests: 825)
Forum statistics
