

You are using an out of date browser. It may not display this or other websites correctly.
You should upgrade or use an alternative browser.
You should upgrade or use an alternative browser.
Balance plug for Mavic pack
- Thread starter KDan
- Start date
Mavic752198
Member
Find it hard to believe the Mavic batteries aren’t wired from DJI’s BMS with balance leads. The Phantom 3 batteries are. The BMS takes raw power from the charger then manages all aspects of charging including balancing towards the end of the charge cycle. Again this is how it was on the P3 batteries. I highly doubt DJI would have abandoned that design. These are multi-cell LiPO batteries after all. Over time they must be balanced.
Hi, for your question the answer is no, you can not balance without taking it apart.Could you just find that connector off a old bad dji charger and find the right leds and charge it through that so you do not have to take the batt apart?
My other question is how do you do discharge balancing, i know about the charging but not about discharging
I tried with one battery and when i soldered i made short circuit between the pins and now when I try to balance charge it says "low voltage" and another one i just took of the balance plug from the board to the battery and now the battery won't start the mavic, the battery itself seems to start but no lights on the drone, is there a way to reset the board?
OK, second experiment ") ) i bought another defective battery opened it and I just disconnected the balance plug from the battery to see what happens, guess what, the battery does't work anymore, when i press the button it shows the lights and seems to power on but there is no voltage on the connector after some searching on internet i discovered that there that:" battery management chip wasn't enabling the battery pack to both provide power or accept a charge. The charge controller in the battery pack is a 30 pin Texas Instruments BQ30Z55 and it has a feature to permanently kill/disable the battery pack if it detects seriously abnormal parameters in the hope it prevents a fire or catastrophic battery failure"
) i bought another defective battery opened it and I just disconnected the balance plug from the battery to see what happens, guess what, the battery does't work anymore, when i press the button it shows the lights and seems to power on but there is no voltage on the connector after some searching on internet i discovered that there that:" battery management chip wasn't enabling the battery pack to both provide power or accept a charge. The charge controller in the battery pack is a 30 pin Texas Instruments BQ30Z55 and it has a feature to permanently kill/disable the battery pack if it detects seriously abnormal parameters in the hope it prevents a fire or catastrophic battery failure"
All fine till now, i decided to solder a wire from the positive lead from the battery to the + connector on the battery,off course after balance charging the battery, basically making the battery "always on", put it in the drone and the drone its powering on normally (it turns on when you put the battery in and there is no way to turn of unless removing the battery) i did hovering test and it is flying, the only thing is that the battery stays at 100%.
The voltage per cell does indicate correct values i can also see that they are discharging. probably i will use this battery as power bank in the future.
Main point here, if anybody else want to try to rebalance the battery:
When you solder the balance plug MAKE SURE THAT YOU DON'T SHORT-CIRCUIT BETWEEN THE PINS AND DON'T DISCONNECT THE BALANCE PLUG THAT IS CONNECTED TO THE CELLS!!!!!
I wish I knew this before)
Also if somebody knows a workaround for this just let me know!
) i bought another defective battery opened it and I just disconnected the balance plug from the battery to see what happens, guess what, the battery does't work anymore, when i press the button it shows the lights and seems to power on but there is no voltage on the connector after some searching on internet i discovered that there that:" battery management chip wasn't enabling the battery pack to both provide power or accept a charge. The charge controller in the battery pack is a 30 pin Texas Instruments BQ30Z55 and it has a feature to permanently kill/disable the battery pack if it detects seriously abnormal parameters in the hope it prevents a fire or catastrophic battery failure" All fine till now, i decided to solder a wire from the positive lead from the battery to the + connector on the battery,off course after balance charging the battery, basically making the battery "always on", put it in the drone and the drone its powering on normally (it turns on when you put the battery in and there is no way to turn of unless removing the battery) i did hovering test and it is flying, the only thing is that the battery stays at 100%.
The voltage per cell does indicate correct values i can also see that they are discharging. probably i will use this battery as power bank in the future.
Main point here, if anybody else want to try to rebalance the battery:
When you solder the balance plug MAKE SURE THAT YOU DON'T SHORT-CIRCUIT BETWEEN THE PINS AND DON'T DISCONNECT THE BALANCE PLUG THAT IS CONNECTED TO THE CELLS!!!!!
I wish I knew this before
)Also if somebody knows a workaround for this just let me know!
Looked for these a while ago. I have a Yuneec Typhoon also and wanted to use the same charger for both. Found it on New Egg forn$6 with a $59 shipping charge. Also saw this directly from HK but with a 1 month shipping. Hopefully the shipping cost was cheaper.
modellermark2
Member
Thanks to all involved in this thread!
I had a battery go bad a while back leaving me with just one.
I did open it up but never got anywhere with it and one of the fine black wires broke during the opening so it looks to have done the "permanent kill" on it.
When my final battery went last week i found this thread and i am making progress.
My batteries seem to be really bonded together - more like solvent cement than super glue but the plastic is totally bonded preventing any sort of reasonable seperation.
I got it opened up, pretty much destrying the case, added the balance lead but my B6 just said "over voltage" so i ran it right down on the Mavic. Then it said "connection break" so i assume i need the balance lead and main power leads connecting on the B6.
So i popped it on my unmanged cheap chinese balance charger at 2A and off it went doing its stuff - all beit at low voltage.
Once complete i checked and confirmed that it was very nicely balanced (all within 0.01V) but obviously a lower voltage. I put it in the Mavic and the battery error was cleared, just the low voltage warning so i charged it on the DJI charger and after an hour or so it was done.
Put it in the Mavic and all was happy - fully charged, perfectly balanced now and no errors.
I am now working (first prototype printing as i type) on a 3D printed battery container which i plan to use the original clips, power button and LED strip.
If successful i will publish it on Thingyverse.
So a big thankyou to everyone that has contributed on this thread and i will update when i have any more news.
Mark
Make sure you didn't break the thermal sensor connection. I accidentally broke it's wire at the board when I opened one of my M2 batteries. It would not power on, blinking one of the LEDs. When I resoldered the lead, it would turn on again.
modellermark2
Member
A small update .. getting ready to print V3 (or is it V4?) of the battery box.
I decided to remix a battery cover from Thingyverse but after printing realised it fits inside the frame so is too small for the battery. My print settings were all mixed up too so awful print!


So i edited it to make a wider case with just small lower parts that drop inside the frame. - much better but the arch at the back was still too deep to allow the full length of the battery and aa couple of the slopes on teh sides were wrong. I have edited these with a dremel and also now edited the model to get the button and LEDs in the right place on the top. Not sure i will bother with the retaining clips or even the bottom and may just fix the battery with double sided foam between the circuit board (which will be screwed to the print as per the original) and the cells. A battery strap around the Mavic would do the rest - it is a pretty tight fit anyway but not worth risking!
Some pictures of V2 here to give an idea - will post more when i get chance to print V3.


I decided to remix a battery cover from Thingyverse but after printing realised it fits inside the frame so is too small for the battery. My print settings were all mixed up too so awful print!
So i edited it to make a wider case with just small lower parts that drop inside the frame. - much better but the arch at the back was still too deep to allow the full length of the battery and aa couple of the slopes on teh sides were wrong. I have edited these with a dremel and also now edited the model to get the button and LEDs in the right place on the top. Not sure i will bother with the retaining clips or even the bottom and may just fix the battery with double sided foam between the circuit board (which will be screwed to the print as per the original) and the cells. A battery strap around the Mavic would do the rest - it is a pretty tight fit anyway but not worth risking!
Some pictures of V2 here to give an idea - will post more when i get chance to print V3.
Grand Mavic Villain/GMV
Active Member
Is it working? Allright? I'll try it, i was tried, battery protection board became locked.
Maybe, some user need to "unlock tool".
so this reason Maybe some user need "unlock tool".
mavic protection board use same as phantom's battery board chipset.
Part number : BQ30Z55.
PS: It's purely my guess, if the power is cut off, perhaps the BQ30Z55 chipset lock out the board.
and finally, BQ33 chip is Stack Up the error count, You will enter a permanent lock state until you return this count again.
Grand Mavic Villain/GMV
Active Member
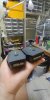
This is an experimental battery donated to me.
All boards are locked. and BQ33 chipset has stacked up error count due to over-discharge.
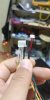
You can see my balance tool.
Image 2, DIY balance cable
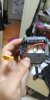
Image 3, force feed cable.
All boards are locked. and BQ33 chipset has stacked up error count due to over-discharge.
You can see my balance tool.
Image 2, DIY balance cable
Image 3, force feed cable.
Attachments
modellermark2
Member
An update on my completed battery replacement case...
There are a couple of tweaks left to do on the design but t is pretty much there now and as i only have one functional battery (one more than i started with) i probably won't do much more on this.
I did some more work on the design and button / LED positioning along with extra bits to get a neater fit.
Once printed i fixed the original switch and led strip using a 3D printing pen using the same PLA used for the print.

Then popped the rubber cover back on the LED strip

Fitted the circuit board to the posts, again using the 3D pen.


Added a couple of layers of double sided foam strip to secure the battery to the curcut board - very strong stuff used!

So thatgave me a battery back together with a balance lead available.

Fitted nicely and powers up as per the original case.

I used a velcro strap to retain in position to test it.

Flew fine without any issues.
I was concerned that the velocro could move, possibly touching the power switch or covering a sensor or camera underneath so i designed this retainer.

Added bobbles to the sides of the battery case so that it cannot move laterally to touch the power button and of course now no where near the sensors or camera underneath. Fits easily and gives a nice firm fix so that the battery can't go anywhere now - job done and designs updated so that everything is built in. Also kept the balance lead short so that it cannot get near the props.
So there it is - a DIY Mavic battery case that has got me flying again.


If interested i will post the stl files on here or Thingyverse.
There are a couple of tweaks left to do on the design but t is pretty much there now and as i only have one functional battery (one more than i started with
) i probably won't do much more on this.I did some more work on the design and button / LED positioning along with extra bits to get a neater fit.
Once printed i fixed the original switch and led strip using a 3D printing pen using the same PLA used for the print.
Then popped the rubber cover back on the LED strip
Fitted the circuit board to the posts, again using the 3D pen.
Added a couple of layers of double sided foam strip to secure the battery to the curcut board - very strong stuff used!
So thatgave me a battery back together with a balance lead available.
Fitted nicely and powers up as per the original case.
I used a velcro strap to retain in position to test it.
Flew fine without any issues.
I was concerned that the velocro could move, possibly touching the power switch or covering a sensor or camera underneath so i designed this retainer.
Added bobbles to the sides of the battery case so that it cannot move laterally to touch the power button and of course now no where near the sensors or camera underneath. Fits easily and gives a nice firm fix so that the battery can't go anywhere now - job done and designs updated so that everything is built in. Also kept the balance lead short so that it cannot get near the props.
So there it is - a DIY Mavic battery case that has got me flying again.
If interested i will post the stl files on here or Thingyverse.
In image 2 the cable that is on the right. The stock one. Is it possible to charge it through this one? And if so whould it be therew the wire or the plig?This is an experimental battery donated to me.
All boards are locked. and BQ33 chipset has stacked up error count due to over-discharge.
You can see my balance tool.
Image 2, DIY balance cable
Image 3, force feed cable.
modellermark2
Member
Earlier in the thread it says unplugging that now sends a fault signal to the board and it will immediately brick it.
I didn't want to take that risk so added the balance lead as suggested previously to my version of the revived battery pack. It has worked perfectly since I did it.
I didn't want to take that risk so added the balance lead as suggested previously to my version of the revived battery pack. It has worked perfectly since I did it.
Sharaaznm
New Member
Hi, I know this thread is old, but I needed some help. Bought a Mavic pro fly more combo at release. Came with 3 batteries. Flew about 5 times. Then the batteries started to come up with errors. Always thought it was a firmware issue and someday they would release an update and that would fix it. 3 years later pulled out my almost brand new Mavic pro batteries and said stuff it. Opened all 3 battery cases and found the outer facing cell in all 3 batteries where dead but the other 2 in the pack where at 3.8 vdc. Now I work with electronics but have never worked lipo batteries. So I sacrified 1 battery pack and replaced the dead cells in the other 2 packs, now I have 2 pack but they need to balance charged or the dji charger won't recognize them. What would I need to get this done. ( please detail as I still haven't fully understood the difference between a 2s and 3s as yet )
Grand Mavic Villain/GMV
Active Member
Yes. It can be charge! But "end of Fully charge status", Not unlocked BQ33 Protection IC chipIn image 2 the cable that is on the right. The stock one. Is it possible to charge it through this one? And if so whould it be therew the wire or the plig?

Danny-B-
Member
- Joined
- Oct 13, 2016
- Messages
- 17
- Reactions
- 10
- Age
- 44
Hi folks, thread revive !
A couple of my batteries are now showing cell issue so I want to cut the front and balance them but I read that you cannot disconnect the balance lead? Is this the case, and is so ... I assume you need to carefully splice into them while still connected?
A couple of my batteries are now showing cell issue so I want to cut the front and balance them but I read that you cannot disconnect the balance lead? Is this the case, and is so ... I assume you need to carefully splice into them while still connected?
Me normally balancing the cells "in-system" without disconnecting the balance plug. Have found faster way to use Lab PSU to just precharge lagging cell to the level of another then to equalize all using external balance charger.
Similar threads
- Replies
- 6
- Views
- 501
- Replies
- 10
- Views
- 945
- Replies
- 11
- Views
- 1K


DJI Drone Deals
New Threads
-
-
-
RC 2 Controller Firmware: v08.00.0000 Mini 4 or v08.01.0100 Mini 5
- Started by Calson
- Replies: 0
-
-
Forum statistics
