DJI Mavic, Air and Mini Drones
Friendly, Helpful & Knowledgeable Community
Join Us Now

3 Fall in the Columbia River Gorge - One more Panorama with Peak Color

AlanL

Well-Known Member
Premium Pilot
Joined
Dec 26, 2021
Messages
627
Reactions
1,186
Age
74
Location
Vancouver, Washington
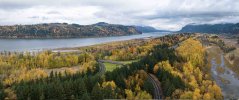
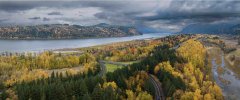
According to the old timers who have been in the area since dirt was invented this year's fall colors have been off the scale and the best since 1978. No idea what variables made this year's colors so spectacular but I'm sure glad I got to see and shoot them. This is a 3 shot panorama at 24mm with a viewpoint just above Mirror Lake in Rooster Rock State Park on the Oregon side of the Columbia River. This was taken about 2 weeks after the previous panorama I recently posted. Click through for a more detailed view.
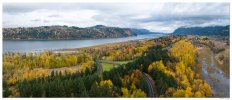
DJI_M3P_24P_RRSPFallPano111023.jpg

Comments and critiques always welcome.
 
Super nice! I’ve really enjoyed your Columbia River Gorge coverage and nearby explorations. You’re providing lots of encouragement to get out and fly!
 
  • Like
Reactions: Joeblow and AlanL
Super nice! I’ve really enjoyed your Columbia River Gorge coverage and nearby explorations. You’re providing lots of encouragement to get out and fly!
Thanks - With weather like we have today its a great time to get out and send your drone up :)
 
  • Like
Reactions: SethB
Beautiful Photo
 
  • Like
Reactions: AlanL
According to the old timers who have been in the area since dirt was invented this year's fall colors have been off the scale and the best since 1978. No idea what variables made this year's colors so spectacular but I'm sure glad I got to see and shoot them. This is a 3 shot panorama at 24mm with a viewpoint just above Mirror Lake in Rooster Rock State Park on the Oregon side of the Columbia River. This was taken about 2 weeks after the previous panorama I recently posted. Click through for a more detailed view.

View attachment 170491

Comments and critiques always welcome.
Alan:

That's a really spectacular image! I am sure that you did it manually, right? If you're looking for a comment, I'd like to see a little more definition in the clouds. I would use the masking tool for the sky. Here is an example before and after.I didn't touch the foreground.

Dale
Screen shot unedited.jpgImage edited using masking toold for the sky.jpg
 
  • Like
Reactions: Hermey and AlanL
Alan:

That's a really spectacular image! I am sure that you did it manually, right? If you're looking for a comment, I'd like to see a little more definition in the clouds. I would use the masking tool for the sky. Here is an example before and after.I didn't touch the foreground.

Dale

Thanks for the feedback. Your take is a bit more aggressive than I usually present but does add some drama to the skies. The light balance across the image was done using DxO PhotoLab's Spot Weighting tool which does an amazing job reconciling wide dynamic light ranges.
 
Thanks for the feedback. Your take is a bit more aggressive than I usually present but does add some drama to the skies. The light balance across the image was done using DxO PhotoLab's Spot Weighting tool which does an amazing job reconciling wide dynamic light ranges.
Perhaps aggressive but in your image the sky on the left side was a bit blown out. You made a wise choice in properly processing the foreground, but then you have to sacrifice a blown out sky. With Adobe Masking tool, it gives me the ability to process any single part of the image, and in the masking tool, I just click on sky and it outlines the sky with the mountains perfectly in the mask and avoids the foreground. It also has "invert" which allows me to mask the inverse, or the foreground. Regular software only does "global" changes. Here is an example video of the masking tool which now exists in Photoshop and Lightroom. (same engine). I use masking in nearly 70=80 per cent of my images now. It has sky, foreground, linear, brush, object, people, etc. E.G.: you can ISOLATE any part of your image for editing.
Dale
 
  • Like
Reactions: AlanL
Here is an edited version that I made a quick pass on using Photoshop Camera RAW to flag any pixels that made it into clipping status. There were none in the original Lightroom file I handed off to Photoshop but there were a handful of pixels in the brighter portions of the sky. I used a brush mask with exposure set to -0.25 and a light touch with the density and flow to eliminate the clipped pixels.

DJI_M3P_24P_RRSPFallPano111023.jpg

I am not in need of lessons on using masks as I have been using Photoshop for over 22 years and Lightroom since 2007. I rarely use the built in sky mask since it tends to be fairly imprecise along the edges as can easily be seen when you examine the distant mountains that line the gorge in your edit.

I always expose to the right and strive to make sure I don't overexpose. Recovery in the shadows is easy with our current software but you can never recover from overexposure. More often than not I will select the sky first in LR and then invert the mask and adjust the ground layers up to blend with the sky. It's easy to add/subtract from the mask at the edges using a brush tool after that. Lightroom's new Point Color tool can be used in selections these days which leads to some fun twists with scenes like this since you can use the eyedropper to isolate tree colors and then adjust the luminance of that color value and keep it confined to the selected areas within the mask.
 
Here is an edited version that I made a quick pass on using Photoshop Camera RAW to flag any pixels that made it into clipping status. There were none in the original Lightroom file I handed off to Photoshop but there were a handful of pixels in the brighter portions of the sky. I used a brush mask with exposure set to -0.25 and a light touch with the density and flow to eliminate the clipped pixels.

View attachment 170516

I am not in need of lessons on using masks as I have been using Photoshop for over 22 years and Lightroom since 2007. I rarely use the built in sky mask since it tends to be fairly imprecise along the edges as can easily be seen when you examine the distant mountains that line the gorge in your edit.

I always expose to the right and strive to make sure I don't overexpose. Recovery in the shadows is easy with our current software but you can never recover from overexposure. More often than not I will select the sky first in LR and then invert the mask and adjust the ground layers up to blend with the sky. It's easy to add/subtract from the mask at the edges using a brush tool after that. Lightroom's new Point Color tool can be used in selections these days which leads to some fun twists with scenes like this since you can use the eyedropper to isolate tree colors and then adjust the luminance of that color value and keep it confined to the selected areas within the mask.
I'm sure, from reading this, that you know your stuff, and I agree, that I often lose the detail in the interface between the sky and the foreground. I, too, start with masking the sky first, then invert the sky mask, to process the foreground. But even when I follow that path, I lose my mountains details. I would love a way to get those mountain details back. It does not matter if I use Lightroom or Photoshop since they both use the same engine for masking, so as long as I am in Photoshop, I start my image in ACR (Adobe Camera RAW), start on the sky (mask) and progress to the foreground. In my edit of your very nice image, I was able to get more details in the upper left corner of sky.

This stuff is a looong way from the first Photoshop which I acquired in the 1970's (I am 85).
What in heavens name were you using as a computer that could run Photoshop in the 1970's? I was doing an early version of digital image processing in the 1980's that required just over $50,000 worth of hardware and software I was modifying from NASA to make images:

Before There Was Photoshop
 
What in heavens name were you using as a computer that could run Photoshop in the 1970's? I was doing an early version of digital image processing in the 1980's that required just over $50,000 worth of hardware and software I was modifying from NASA to make images:

Before There Was Photoshop
I misspoke- I must be thinking of Photoshop 1 and Apple Macintosh- both 1990 . We use to purchase software on a disc way before it was by subscription. I think the first subscription was Creative suite CS5 .My first digital camera was the Nikon F. Stayed with film (Velvia-Fuji) as long as possible and caved into digital longer than everyone else and fought off mirrorless until this year.
 
I misspoke- I must be thinking of Photoshop 1 and Apple Macintosh- both 1990 . We use to purchase software on a disc way before it was by subscription. I think the first subscription was Creative suite CS5 .My first digital camera was the Nikon F. Stayed with film (Velvia-Fuji) as long as possible and caved into digital longer than everyone else and fought off mirrorless until this year.
I was a Velvia fan after decades of Kodachrome but in the end resented being dependent on labs for developing and a full home color lab was serious $$$. I had a Nikon Super Cool Scan 4000 and was using SilverScan to import the files into Photoshop 6. I jumped ship from film when Canon came out with the D60 (6MP) and never looked back. I had a buddy who worked for Adobe and got me software at Adobe employee prices to keep me up to date. You don't want to know how little they really paid for this stuff.

I have set up a lot of systems for lots of different people/groups and as soon as it was working my job was to leave so they could play with it while I moved on to the next task. I love just being a computer user in retirement and not installing and fixing them all of the time. Its lots more fun :)
 
  • Like
Reactions: beroe
I was a Velvia fan after decades of Kodachrome but in the end resented being dependent on labs for developing and a full home color lab was serious $$$. I had a Nikon Super Cool Scan 4000 and was using SilverScan to import the files into Photoshop 6. I jumped ship from film when Canon came out with the D60 (6MP) and never looked back. I had a buddy who worked for Adobe and got me software at Adobe employee prices to keep me up to date. You don't want to know how little they really paid for this stuff.

I have set up a lot of systems for lots of different people/groups and as soon as it was working my job was to leave so they could play with it while I moved on to the next task. I love just being a computer user in retirement and not installing and fixing them all of the time. Its lots more fun :)
Alan- looks we are following the same arc. I also had a Nikon Super Cool Scan and scanned slide vacation slides but each one took 10 minutes an I had 3 x 140 carousels. I still have 3 of 6 carousels from when I gave 6 projector, 3 screen slide shows! God! Then the scanner broke.
I am really getting tired of chasing the technology but I must admit loving the mirrorless Z8 with its 30 frames of RAW per second that allowed me to capture the leaping impala and birds in flight.

Good night from Miami (9 PM).
Dale
 
  • Like
Reactions: beroe and AlanL
Lycus Tech Mavic Air 3 Case

DJI Drone Deals

New Threads

Forum statistics

Threads
131,131
Messages
1,560,132
Members
160,100
Latest member
PilotOne