DJI Mavic, Air and Mini Drones
Friendly, Helpful & Knowledgeable Community
Join Us Now

Hand-made Yagi Uda adapter antenna

It depends what version you have. If the CE or FCC.
Made yagi on the version that you have and test.
Then let know how the test went.
If this signal is much stronger, it will be good to have a link to the files for 3D printing and what you used metal parts.
Thanks

I’m with the CE version and I’ll try with the models showed in this post.
 
These are my results I already made several test to be able to build dispersion analysis . All tests are made same type fly same area same altitude 100 mt rural area CE version default no fake gps same as with Yagi . For te moment all my test to avoid confusion are with 2 antenna same type example 2. Antenna 5,8 ghz left and right or 2,4 left and right just to avoid all discussion about left and right witch one is used and also because in any case you must to decide fq before fly7E5FDB52-049B-4E6F-9A14-6780FEA15082.png2BA855A1-3B0E-4699-BA71-742959ED9C34.png. The are are made until signal lost and rth activation automatic
 
My yagi antenna are base on Russian project , with just some small improvment , on 2,4 antenna I already use 2,5 mm diameter instead of 3 mm like 5,8 ghz
 
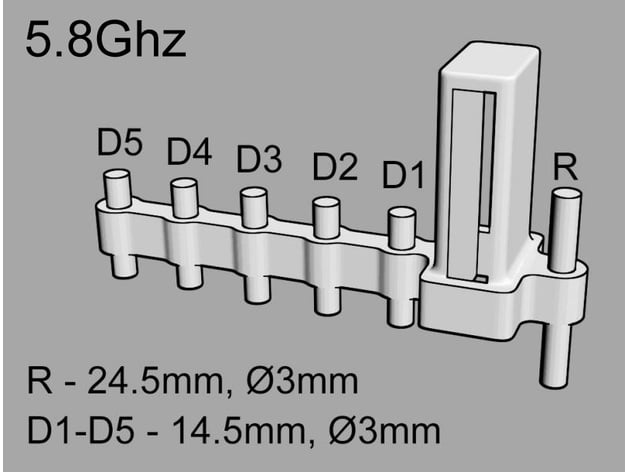
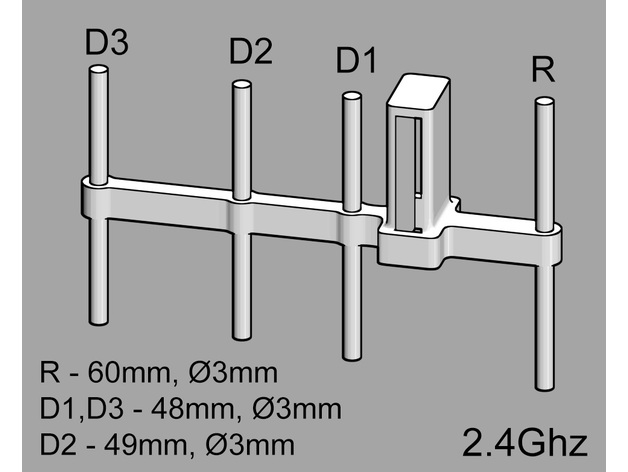
Hello Guys, yesterday I thought to myself I'm gonna make me one of those Yagi Uda antenna adapters for my Mavic Mini controller even though I don;t have a 3D printer! And I did, and it actually works! I used an online Yagi Uda calculator, and I just chose my options, I made a 11.8 dBd gain directional Antenna an Yagi Uda one. It has one reflector at the base, and then it has a place where the antenna would be(the active element) and lastly I have 8 directors!!! So it is very directional, but I only need it for long distances, and so the "beam" of radio energy waves will be spread up far enough so aiming will not be an issue. It is a Yagi Uda adapter antenna for 5.8ghz band and it looks pretty good actually.

I'll post pictures of it when I gets home from work, so you guys can see that I took real real good care to get all the measurements to be correct, the spacing and everything to be really well measured! I used paper clips as my metal, those thin ones! and I used a wooden coffee-mixer stick as the boom base. It took me about 45 minutes to make and I did really take super great care to get all the dimensions correct! I tried it through a few walls, and it WORKED!!! I was totally BLOWN AWAY! I mean some paper clip pieces on a tiny piece of wood all spaced out in a special pattern with special sizes & that gives my CE version Mini the ability to have connection through my whole residential building! I first tried taking my Mini to another room in my apartment. I disabled the FCC Hack, so my Mini was all stock transmission for my region. The crazy thing is that without the Yagi Uda adapter antenna I could control my Mini throughout my whole apartment, from any room to any room! I had to go out of the building downstairs and go all the way to the opposite side to lose connection! Yagi Uda adapter antenna actually made it possible for my Mini to get connection, and a very good one also! So I'm completely blown away by what some small pieces of metal, paper-clips can do when arranged correctly!

I will make a video tonight, to demonstrate how effective this Yagi Uda adapter antenna really is, especially the one I made, 11.8dBd gain, according to the Yagi Uda online calculators! I will do some more testing but I think that I may have finally found the cheap, simple, elegant solution to extending my range and improving m signal quality in the city!

Edit: attached are the pictures of my home, handmade 5.8ghz Yagi Uda antenna adapter!!!View attachment 94548View attachment 94549View attachment 94550

cool cool
Very interesting if you can give me dimension I can made a 3d model for 3d printer and than try to compare with Russian version , that is also publish on tingiverse
 
The 'bars' or 'elements' of a Yagi antenna are precisely cut, with their length based on the wavelength of the RF frequency being transmitted and received. The transmission element is usually a half-wave dipole i.e. it's 50% of the wavelength of the frequency. Therefore, the elements of a Yagi designed to work with the 2.4 GHz band are a bit more than twice as long as the elements on a 5.8GHz Yagi antenna. There is also an 'ideal' for the spacing between the radiating element, and the bar behind (the 'reflector') and the bars in front ('directors'). That spacing is usually about 0.4 of the wavelength being Tx'd/Rx'd.
2.4GHz wavelength is 124.91 mm
5.8 GHz wavelength is 51.69 mm
The bottom line is that a 2.4 GHz Yagi is a bit more than twice the dimensions of a 5.8GHz antenna.
 
He wrote that he has a CE version. So he has to make 2x yagi. The first 2.4ghz yagi on first antenna and the other 5.8ghz yagi on the second antenna. CE model has 2 frequencies.
Sorry No I wrote that every test was made with single fq yagi = i put 2 yagi for 2,4 on both antenna controller ....this is to avoid any discussion on : did you put the right yagi on te right controller antenna . And remember doesn’t make sense put one 2,4 and one 5,8 because in any case you need on mini to select fq before fly.
 
  • Like
Reactions: Moixixon
I have also the fcc usa version code ss5 , and I already start test yagi on this version but I don’t have until now enough test to elaborate. And I am also testing ce with / without yagi but making fake gps in order to increase power on 5,8 up to 0,115 watt instead of 0,015 of ce version , but even in this case non enough test to elaborate as I post for the CE default version. And just for info reading my test using yagi the 5,8 ghz arrive quite as average same distance of 2,4 ghz
 
  • Like
Reactions: Moixixon
So, I have to print one of each model and attach them in the right place?
Probably should just start with the version that you typically use...i.e. if you typically fly using 2.4 then print out that version and try out. From earlier in this note its recommended to print out a yagi uda for each RC antenna, as the yagi helps with both transmission and reception...so print out two of the 2.4 (or 5.8 if you use that more often) holders.

The picture that is attached earlier in this thread shows how the yagi slips onto the antenna and is held securely...so connecting the yagi to your RC is simple.

Then you also need to obtain the metal insert rods...I ordered some copper rods off Amazon, and then discovered another company (links in an earlier post) that I could order cut versions from a silver 3mm rod...so for my FCC version, 5.8GHz I've also got silver versions of the rods 14.5mm and 24.5mm sections on the way...

From RogerDH's post I learned that the conductivity of the metal can influence the effectiveness of the antenna...with silver being better, then copper, then aluminum/steel/brass...and that influenced my decision to try out the silver...but I don't expect any 'major' difference between the various metals...so best to get what fits your budget and whats available in your area...
 
Last edited:
  • Like
Reactions: Moixixon
The 'bars' or 'elements' of a Yagi antenna are precisely cut, with their length based on the wavelength of the RF frequency being transmitted and received. The transmission element is usually a half-wave dipole i.e. it's 50% of the wavelength of the frequency. Therefore, the elements of a Yagi designed to work with the 2.4 GHz band are a bit more than twice as long as the elements on a 5.8GHz Yagi antenna. There is also an 'ideal' for the spacing between the radiating element, and the bar behind (the 'reflector') and the bars in front ('directors'). That spacing is usually about 0.4 of the wavelength being Tx'd/Rx'd.
2.4GHz wavelength is 124.91 mm
5.8 GHz wavelength is 51.69 mm
The bottom line is that a 2.4 GHz Yagi is a bit more than twice the dimensions of a 5.8GHz antenna.


So, which is the leng and diameter of the elements in both models: 2.4 and 5.8 yagui?
 
So, which is the leng and diameter of the elements in both models: 2.4 and 5.8 yagui?

I am making this version (Mavic Mini Yagi antenna adapters (range booster) 2.4 & 5.8Ghz by cylllka) which specifies five 3mm rods of 14.5mm, and one 24.5mm for each 5.8GHz antenna.
featured_preview_58ghz.jpg

And for the 2.4GHz version, it uses a 60mm, two 48mm and one 49mm:
featured_preview_24ghz.jpg


However, I see alternate versions (remix) for the mavic mini RC showing up on Thingverse, that has a different design/rod lengths:
Remix Mavic Mini Yagi,Uda antenna adapters 2.4GHz and Accessories by keizi666
 
So, which is the leng and diameter of the elements in both models: 2.4 and 5.8 yagui?
Post #33 above is spot on to answer that question, but those diagrams don't give you the spacing between the 'Element' (which is the actual antenna on the RC Controller), the 'reflector' (R), and the 'directors' (D1 - D5). Spacing of the 'bars' doesn't seem logical at first glance, because the Yagi antenna is an extension of a 'transmission line' and uses the interference between radiated and induced energy on the bars, to build energy in the forward direction, but almost eliminate it off to the sides and back. Mr Yagi was a very clever man!
 
Probably should just start with the version that you typically use...i.e. if you typically fly using 2.4 then print out that version and try out. From earlier in this note its recommended to print out a yagi uda for each RC antenna, as the yagi helps with both transmission and reception...so print out two of the 2.4 (or 5.8 if you use that more often) holders.

The picture that is attached earlier in this thread shows how the yagi slips onto the antenna and is held securely...so connecting the yagi to your RC is simple.

Then you also need to obtain the metal insert rods...I ordered some copper rods off Amazon, and then discovered another company (links in an earlier post) that I could order cut versions from a silver 3mm rod...so for my FCC version, 5.8GHz I've also got silver versions of the rods 14.5mm and 24.5mm sections on the way...

From RogerDH's post I learned that the conductivity of the metal can influence the effectiveness of the antenna...with silver being better, then copper, then aluminum/steel/brass...and that influenced my decision to try out the silver...but I don't expect any 'major' difference between the various metals...so best to get what fits your budget and whats available in your area...
Here's a guy who made a silver dipole to compare it to a copper one, not expecting it to actually make much difference, but was surprised to find that it was noticeably better:

Will an antenna made from silver be better than copper?

He does point out that one problem with silver is that it tarnishes relatively quickly, which reduces surface conductivity. (I once saw an ad for an antenna made with silver wire but it was encased in plastic to prevent oxidation.) He suggests that maybe a gold-plated silver antenna would be optimal, but I question the logic: You'd be saving it from oxidation and degraded conductivity on the surface by putting a metal on the surface that's already lower conductivity. I think you'll be fine just giving your silver elements an occasional polish.
 
I am making this version (Mavic Mini Yagi antenna adapters (range booster) 2.4 & 5.8Ghz by cylllka) which specifies five 3mm rods of 14.5mm, and one 24.5mm for each 5.8GHz antenna.
featured_preview_58ghz.jpg

And for the 2.4GHz version, it uses a 60mm, two 48mm and one 49mm:
featured_preview_24ghz.jpg


However, I see alternate versions (remix) for the mavic mini RC showing up on Thingverse, that has a different design/rod lengths:
Remix Mavic Mini Yagi,Uda antenna adapters 2.4GHz and Accessories by keizi666
Be careful latest info from Russian designer is that maybe for 2,4 is better 2,5 mm dia
 
Be careful latest info from Russian designer is that maybe for 2,4 is better 2,5 mm dia
Yes, I have NO knowledge of antenna design, I was strictly passing along the design from the author on Thingverse… that is the design that I am following for my own purchase and assembly...

Its up to each person to read these design discussions before making a purchase...!

I was looking for a reasonable way to enhance wi-fi communications between the RC and the Mavic Mini...I would love to have a 4Hawks SR antenna, but the cost for the mod to the RC as well as the antenna itself was beyond my cost/benefit analysis.

I realize that these designs have not been rigorously tested...so I realize that I am taking a risk with the purchase and install. There are some reports that the antenna design does provide benefit...and that is encouraging...but there is no guarantee in this 3D printed world.
Did you read my test result before ? Personally I am really satisfy considering the cost and easy way to install , better than similar passive add-on like parabolic extension
 
Did you read my test result before ? Personally I am really satisfy considering the cost and easy way to install , better than similar passive add-on like parabolic extension
I did, and was very encouraged when I saw your results (although I am not an expert at interpreting your graphs)...I'd already made my purchase of the 3D item and rods were already on the way before I saw your testing, ...I was willing to take the chance that it might not make much difference...but I was very happy to see what you documented...

Like you say, this is cost effective, easy to install, and another advantage to me is that it does not take up much room in the carrying case (4Hawks is fairly bulky, as well as expensive). So I'm looking forward to testing my own setup. I appreciate all the work that folks have done to design and, like you, test for results.
 
Lycus Tech Mavic Air 3 Case

DJI Drone Deals

New Threads

Forum statistics

Threads
131,245
Messages
1,561,235
Members
160,198
Latest member
Whitehammer661