DJI Mavic, Air and Mini Drones
Friendly, Helpful & Knowledgeable Community
Join Us Now

I am always confused about ND filters

Just thought I'd throw in my 2-cents worth. I was somewhat of an amateur photographer 40 years ago when 35mm SLR cameras where the "thing", back before the digital-age when you shot photos on film and had to pay for photo processing and pick up your prints.

This was one of the ways I was explained the effect of ND filters: The old SLR cameras had "f-stops" by which the "aperture" was manually adjusted. "Aperture" controlled how "big" or how "small" the lens opened when you snapped a picture. You wanted the lens to open "big" in low-light situations, and "small" in bright light situations. The lower the "f-stop" the bigger the lens opened when you snapped a picture.

Common "f-stops" where 1.4, 2.8, 5.6, 8, 11, and 16 (I think). So, if I was shooting indoors or in low-light, I'd use somewhere between 1.4 and 5.6. If I was in sunny snow or a day at the beach in bright sun, I'd use 16.

The Mavic Pro has a fixed "aperture" camera and it is 2.2 (I believe).

ND filters serve to "fool" the camera. When you use the ND 4, it makes the Mavic camera "think" it's aperture is "f-stop" 4. When you use the ND 8, the Mavic camera "thinks" its aperture is 8. And if you use the ND 16, the Mavic camera "thinks" its aperture is 16.

So, I fly and shoot a lot of "beach" and "water" stuff because I live in northeast Florida. I find that during summer mid-day, I use my ND 16 almost 100% of the time unless its cloudy. During the winter months the sun is a little lower on the horizon and less intense, so winter mid-day shoots I use ND 4.

When shooting "golden-hour" (the hour beginning at sunrise or the hour up to sunset), I then use various ND depending on what I'm shooting.

This is the explanation of an amateur. I'm a long way away from being a pro photographer.
Thanks for the explanation, it helped me alot
 
For starters, unless you want some motion blur or need to cut reflections, ND or NDPL filters are only needed for video to induce a bit of motion blur. Without this motion blur your video may appear choppy, especially when panning. The goal is to make the shutter speed denominator no faster than twice the frame rate as in frame rate 30 fps then shutter speed 1/60. You also need to keep your ISO setting as low as possible for better overall quality.

Generial rules:
Sunrise/sunset - ND4
Cloudy day - ND8
Sunny day - ND16
Bright sun on sand or snow - ND32 or 64

More opinions on the matter may be found here: Search results for query: filter rule
So your advice, use ND Filters for video and for photos is not requried,
 
So your advice, use ND Filters for video and for photos is not requried,
Despite what some folks believe, it's not required for a lot of video either.
For stills, unless you have a particular reason to slow the shutter speed, there's no reason at all to use them.
 
  • Like
Reactions: MoNoAd
So your advice, use ND Filters for video and for photos is not requried,
Correct. As @Meta4 posted, they are not required for video either. I have found I needed them for my MP to slow down the shutter speed. I would not get smooth video if the shutter speed is too high.
 
My questions pertains to the CP filter. I bought a set of the Sandmarc ND filters that included the CP (circular polarized) filter.

I've always been a bit confused about how to use the CP filter on my Mavic Pro. Somewhere I read on this forum to put a dot at the "top" of the CP filter then, either set the dot at the "top" of the MP camera lens as a "general purpose" setting; or angle the dot on the CP filter according to the angle of the sun.

Two questions:
1. How do you determine what is the "top" of the CP filter in order to put a "dot" on it?
2. What determines the "angle" of the sun and how does that effect where the "dot" on the CP filter gets located relative to the top of the MP camera lens?
 
...Two questions:
1. How do you determine what is the "top" of the CP filter in order to put a "dot" on it?
2. What determines the "angle" of the sun and how does that effect where the "dot" on the CP filter gets located relative to the top of the MP camera lens?
  1. The easy way is to look through the filter while wearing polarized sunglasses. Turn the filter until it cuts out the most light passing through it and place a mark at either the 3 or 9 o'clock position.
  2. You have to make a best guess for positioning. Point your camera in the direction you estimate it will be pointed at while taking the picture and attach the filter with the dot pointed toward the sun. If pointed toward the sun then the dot will be straight up. If sideways to the sun the dot will be on the side.
    1. Because I do not trust my ham-hands to screw up the gimbal, I always have the gimbal lock on when changing filters on my MP.
It might be better to not use the CP filter unless you think it is worth the effort to get it right. While it will deepen a blue sky, improve color saturation, and of course help cut reflections, it also will lose those benefits if you get the angle wrong. This problem is really apparent while recording video and can make it difficult to edit when the sky keeps changing from light to dark and back when you pan through a shot.
 
I agree a quick hand held test with CP in fingers is a good start.

While it will deepen a blue sky, improve color saturation, and of course help cut reflections, it also will lose those benefits if you get the angle wrong.

Is this a major issue ?
If you get half or even a third of shots in better colour / less reflection, then the other is just normal footage (or close to it), is it not ?
eg. I haven't found a wrong orientation of a CP makes footage worse.

Edit out what you like in both better and other footage, leave the rest.
Yes, contrast and varying footage may present a problem in editing, long transitions can help (if a lot of post time in grading isn't desirable).
 
I've always been a bit confused about how to use the CP filter on my Mavic Pro. Somewhere I read on this forum to put a dot at the "top" of the CP filter then, either set the dot at the "top" of the MP camera lens as a "general purpose" setting; or angle the dot on the CP filter according to the angle of the sun.
Despite the popularity of polarisers in the forum, they are not simple tools to use all the time on your drone.
The polariser filter is easy to use on your regular camera because you can adjust the alignment whenever you move the camera.
Not so with your drone.
The idea is that you line up the dot to point to where the sun is in the sky to get the polarised effect.
That's fine when the drone is pointing in that direction but if you steer the drone in another direction, you lose the effect you were aiming for and can get a blotchy sky and still have the glare.

This article explains polarisers well: How to Use a Polarizing Filter
Note the section on disadvantages.
 
  • Like
Reactions: Thomas B
Is this a major issue ?
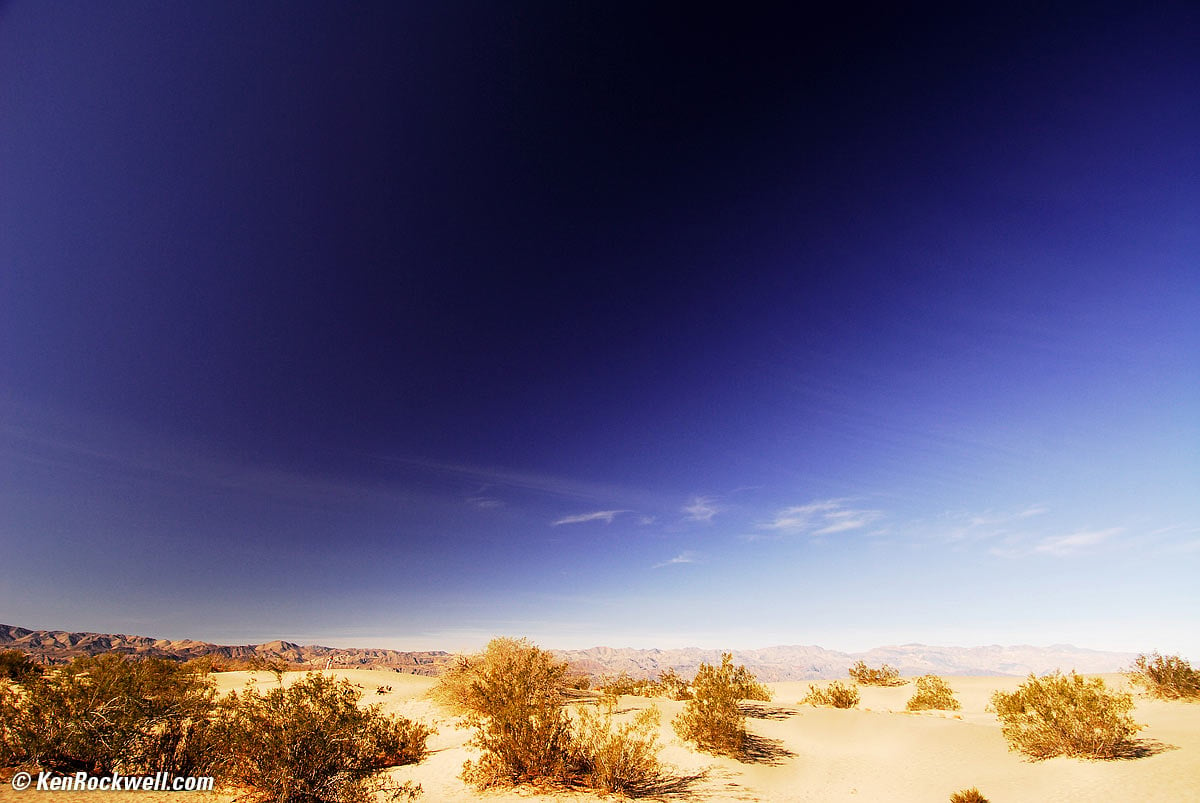
Only if you don't like having a sky that's dark on one side of the frame and light on the other
Uneven-Sky-Polarization.jpg

KEN_6031-polarizer.jpg

If you get half or even a third of shots in better colour / less reflection, then the other is just normal footage (or close to it), is it not ?
eg. I haven't found a wrong orientation of a CP makes footage worse.
You either set the polariser and never turn the drone to face any other direction, or you don't look at your skies very much
 
Thanks to Meta and Mossi BOTH!! I'd gotten to leaving the CP filter on all the time as a lens-protection. And I really liked the saturation effect! But, as you've pointed out, and I noticed it...the saturation effect was inconsistent in my videos. I didn't connect that issue with the CP filter.

So, I can lose the CP filter, kick up saturation to +1 or +2, and maybe find a simple "clear" filter to use as a lens protector, no? Or maybe use a low-number ND filter? I'm not that high an amateur to be concerned with motion-blur LOL!

Is there an alternate way to cut glare other than CP filter? Being in St Augustine, FL, more than 50% of my flying is near and over water.
 
You either set the polariser and never turn the drone to face any other direction, or you don't look at your skies very much

No, just hardly ever use my C-PL . . . if not using an ND, I general leave a plain NC-UV filter on.
The few times I've put the C-PL on, it's usually over the ocean and generally filming down, so that could be it.
 
Thanks Meta for the article link How to Use a Polarizing Filter . Very helpful! So, my final question is, do you happen to know if anybody makes an adjustable CP filter that works on the Mavic Pro without interfering with gimbal movement?
 
Thanks Meta for the article link How to Use a Polarizing Filter . Very helpful! So, my final question is, do you happen to know if anybody makes an adjustable CP filter that works on the Mavic Pro without interfering with gimbal movement?

Not that I know of.
At this stage in the M1P production cycle, I'd say it's unlikely one will be developed if not already out there.

My NISI filter supplier doesn't list the good set for the MP/MPP an longer, only for later drones.
On that, I noticed they are now making hugely rated ND filters (ND256), and NDPL for the M2P, makes me want to upgrade even more now to get into different photography.
 
Is there an alternate way to cut glare other than CP filter? Being in St Augustine, FL, more than 50% of my flying is near and over water.
Just being careful with your camera angles goes a long way to dealing with glare on the water.
Try to shoot with the sun behind the camera.
Here's an example of what changing the camera angle can do:
DJI_0299a-XL.jpg

DJI_0308a-XL.jpg
 
  • Like
Reactions: Mossiback and PAW
I see! Nice. You brought the drone a bit more over the subject, then angled the gimbal to point more "downward".

BTW, here's one of my own "pier" shots taken low tide, sunrise at St. Augustine, FL.Pier 2.JPG
 
Lycus Tech Mavic Air 3 Case

DJI Drone Deals

New Threads

Forum statistics

Threads
131,086
Messages
1,559,710
Members
160,070
Latest member
Minicopters