DJI Mavic, Air and Mini Drones
Friendly, Helpful & Knowledgeable Community
Join Us Now

I can make 10bit export in DaVinci Resolve 15

Michal_DKK

Member
Joined
Sep 18, 2018
Messages
8
Reactions
1
Age
55
Just tried the same file from Mavic 2 pro and render it in 3 different ways in (Free) DaVinci Resolve 15
I attach picture files so you can see it.

The first image is the original file from Mavic 2 Pro codec.
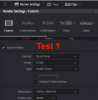
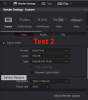
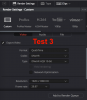
Then there are 3 pictures that show Render Settings
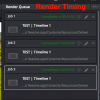
And then a picture with Render time
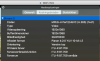
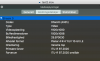
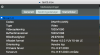
And 3 pictures showing codec in vlc
The last shows the file size original file from Mavic 2 Pro to the 3 file sizes after render

++ Here is a link to the 4 video files I made. One is the Mavic 2 Pro file and the 3 others are from Davinci ++

from mavic 2.png
 

Attachments

  • Render Settings 1.png
    Render Settings 1.png
    128 KB · Views: 87
  • Render Settings 2.png
    Render Settings 2.png
    153.3 KB · Views: 85
  • Render Settings 3.png
    Render Settings 3.png
    148 KB · Views: 81
  • Render Timing.png
    Render Timing.png
    121.6 KB · Views: 84
  • Test 1 in VLC.png
    Test 1 in VLC.png
    178.9 KB · Views: 80
  • Test 2 in VLC.png
    Test 2 in VLC.png
    143.8 KB · Views: 71
  • Test 3 in VLC.png
    Test 3 in VLC.png
    148.3 KB · Views: 59
  • File size.png
    File size.png
    70.1 KB · Views: 68
Last edited:
Yes, you can use DNxHR codec for 10-bit output from Resolve... It is not the same as a 10-bit H.256 file, though. To get back to H.265 you'll need to encode that DNxHR MOV with an encoder that supports H.265.

H.265 is a delivery codec for streaming and sharing - it is highly compressed to allow for delivery of 4K & HDR in a small file size. DNxHR 4:4:4 is an "intermediate" codec meant for editing and color grading, not distribution. It is high-bitrate and uses 4:4:4 color sampling (I don't believe the M2P records in 4:4:4, btw, so that is overkill), which is why the files are so much larger - they are not as heavily compressed.
 
Edit: I see what you mean...apparently you can use H.265 within a Quicktime export from Resolve... Good to know, although it would still be helpful to be able to export an MP4 in H.265, which is still unavailable...
 
Edit: I see what you mean...apparently you can use H.265 within a Quicktime export from Resolve... Good to know, although it would still be helpful to be able to export an MP4 in H.265, which is still unavailable...

MOV and MP4 are almost identical. Simply rename the xxx.mov file to xxx.mp4. For the most part, players are oblivious to the difference.
 
MOV and MP4 are almost identical. Simply rename the xxx.mov file to xxx.mp4. For the most part, players are oblivious to the difference.

That is only true if you are encoding in an MP4-friendly codec like H.264 (and apparently H.265)... If you have a ProRes MOV, you can't just tag ".mp4" on the end of it and have it be an MP4....
 
Yes, you can use DNxHR codec for 10-bit output from Resolve... It is not the same as a 10-bit H.256 file, though. To get back to H.265 you'll need to encode that DNxHR MOV with an encoder that supports H.265.

H.265 is a delivery codec for streaming and sharing - it is highly compressed to allow for delivery of 4K & HDR in a small file size. DNxHR 4:4:4 is an "intermediate" codec meant for editing and color grading, not distribution. It is high-bitrate and uses 4:4:4 color sampling (I don't believe the M2P records in 4:4:4, btw, so that is overkill), which is why the files are so much larger - they are not as heavily compressed.

I'm a beginner and I do not understand it as well as all of you professional.
Had read that it was not possible to render 10bit in DaVinci Resolve

All I have done with the file is to add a LUTs
 
Well, keep at it, and let us see some video when you have some to show!

Since you are working with LUTs, I'll also add that they aren't really needed for grading, but they do help kickstart the process. Depending on the software you are using and how it is set up, they could also end up throw away color data before you even begin your color grading (clipped areas, like shadows and highlights). If you are mixing footage from multiple cameras, using LUTs will NOT be accurate from camera to camera.

In Resolve, it is best to use the Resolve Color Managed workflow... Resolve will read what it was shot in (eg. dLog) and automatically convert the footage into the timeline colorspace (eg. Rec.709) - sort of like applying a LUT, but without throwing away the extra range in the file.

Here is an EXCELLENT video on how to setup RCM in Resolve:
Here is a great video on how to understand the video scopes and such:

My only suggestion when it comes to following this tutorial is that when you get to the "Max Timeline Luminance" setting, leave it at 100, or set it to the luminance value for the specific monitor you are viewing the footage on - you will have to research those specs on your own depending on the model of monitor you are using.
 
Thanks.
The LUT I used is called xxxMavicPopJarrodBoord_2.DJI_0040.cube
and come from DJI Forum post 30#

The time is 10pm here in Denmark and I have just some other things to do

I'm looking at those videos tomorrow and returning.
 
Well, keep at it, and let us see some video when you have some to show!

Since you are working with LUTs, I'll also add that they aren't really needed for grading, but they do help kickstart the process. Depending on the software you are using and how it is set up, they could also end up throw away color data before you even begin your color grading (clipped areas, like shadows and highlights). If you are mixing footage from multiple cameras, using LUTs will NOT be accurate from camera to camera.

In Resolve, it is best to use the Resolve Color Managed workflow... Resolve will read what it was shot in (eg. dLog) and automatically convert the footage into the timeline colorspace (eg. Rec.709) - sort of like applying a LUT, but without throwing away the extra range in the file.

Here is an EXCELLENT video on how to setup RCM in Resolve:
Here is a great video on how to understand the video scopes and such:

My only suggestion when it comes to following this tutorial is that when you get to the "Max Timeline Luminance" setting, leave it at 100, or set it to the luminance value for the specific monitor you are viewing the footage on - you will have to research those specs on your own depending on the model of monitor you are using.

Sorry but I have not had time to look at the 2 videos. Have bought me a new MacBook Pro "Core i7" 2.9 15 "Touch / Mid-2017 for video editing

Here is a link to the 4 video files I made. One is the Mavic 2 Pro file and the 3 others are from Davinci
 
iDealshare VideoGo can convert DaVinci Resolve exported files to MP4, AVI, Webm, FLV, WMV, MOV, ProRes etc.

It also can convert AVCHD, MTS, MXF, AVCHD, MP4, RMVB, H.265, FLV, MKV etc to DaVinci Resolve more supported video format.
 
Lycus Tech Mavic Air 3 Case

DJI Drone Deals

New Threads

Forum statistics

Threads
131,277
Messages
1,561,597
Members
160,232
Latest member
ryanhafeman