I understand that night video is little bit more demanding given a limited capability of small sensors so people who rely on automatic setting are unlikely to get a great result. Firstly when shooting in natural frame rates your image is created from two exposures per feram there, there is a lot of processing involved. This "hq" mode is also has a lot more noise reduction done in the camera. Noise reduction is always best to be left until post production. So knowing that we go for Dcinelike profile and 48/50/60 fps. Next the iso. In blue hour you will need to go higher every now and then as the light fades. I would suggest to use the whole range from 100 to 1600 as needed only avoiding 400 as M3P has a second native iso at 500 you will get better noise performance at 800 then 400 and possibly even 200. If you have to lower the shutter speed to minimum to get as much light in as possible, do it. Enable histogram and observe if a peek isn't forming on the right hand side of the graph. That would signify something is getting over exposed. At the same time aim to expose as high as you can without this peek forming. In post you can correct and adjust exposure by working on colour correction sliders, wheels or curves. Just use fine adjustments and see how they affect the image. Hope that helps!I already commented on youtube 6 days ago!. This is one of the best low light videos of the mini 3 that i have seen, maybe the best!, so I am very happy that you can achieve this with this drone!, because the other 95% of night videos out there look terrible, they are in auto/normal mode, and it looks all blurry because of the in-drone noise reduction, and make me doubt if I should buy it or not, because I am especially interested in making blue hour city videos. Also I like how you managed to make the very dark areas look not pitch-black like in most other videos, but to have a bit of color.
You are using an out of date browser. It may not display this or other websites correctly.
You should upgrade or use an alternative browser.
You should upgrade or use an alternative browser.
Low light video from Mini 3 Pro is that good! Watch my teaser shot at blue hour.
- Thread starter Derlisz
- Start date
I do have the studio versionI can tell you exactly how to do it in Davinci provided that you have the paid Studio version. It's possible to do in a free version but more complicated and time consuming. If that's the case for you there are good YT tutorials on the subject.
Excellent instructions, I will save your message for when I buy this drone, thank you so much!I understand that night video is little bit more demanding given a limited capability of small sensors so people who rely on automatic setting are unlikely to get a great result. Firstly when shooting in natural frame rates your image is created from two exposures per feram there, there is a lot of processing involved. This "hq" mode is also has a lot more noise reduction done in the camera. Noise reduction is always best to be left until post production. So knowing that we go for Dcinelike profile and 48/50/60 fps. Next the iso. In blue hour you will need to go higher every now and then as the light fades. I would suggest to use the whole range from 100 to 1600 as needed only avoiding 400 as M3P has a second native iso at 500 you will get better noise performance at 800 then 400 and possibly even 200. If you have to lower the shutter speed to minimum to get as much light in as possible, do it. Enable histogram and observe if a peek isn't forming on the right hand side of the graph. That would signify something is getting over exposed. At the same time aim to expose as high as you can without this peek forming. In post you can correct and adjust exposure by working on colour correction sliders, wheels or curves. Just use fine adjustments and see how they affect the image. Hope that helps!
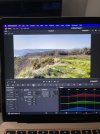
In color tab look for motion efdectsI do have the studio version

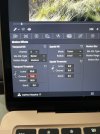
Then on the left you want to apply Temporal NR
Set frames to 5 and motion estimation to Better. Motion range you can mostly leave at medium unless the scene is still or very dynamic.
Now ounder Temporal threshold you actually apply how much noise reduction to apply and of what kind. The chain link ikon keeps you luma (gray) noise and Chroma (colour) noise together. In case of m3p the colour noise is well controlled do I would unlik the two. Set chrom at 10 and luma depending on noise level. Experiment what works best for a particular scene. I usually would use 10-50. It's good to add some sharpening to the scene afterwards.
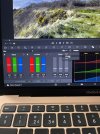
 For sharpness select blur tab within color. Change blur to sharpen as in the picture below
 now on the radius slider you want to lower the sliders to sharpen. 0.48-0.47 is mostly sufficient and the lower you get the more artificially sharp the image becomes. I suppose in night video even0.46 could look ok.
astroprojector
Well-Known Member
- Joined
- Jul 22, 2019
- Messages
- 58
- Reactions
- 23
- Age
- 54
Thanks so much man. You’ve gone above and beyond. I appreciate it.In color tab look for motion efdects
View attachment 149442
Then on the left you want to apply Temporal NR
Set frames to 5 and motion estimation to Better. Motion range you can mostly leave at medium unless the scene is still or very dynamic.
Now ounder Temporal threshold you actually apply how much noise reduction to apply and of what kind. The chain link ikon keeps you luma (gray) noise and Chroma (colour) noise together. In case of m3p the colour noise is well controlled do I would unlik the two. Set chrom at 10 and luma depending on noise level. Experiment what works best for a particular scene. I usually would use 10-50. It's good to add some sharpening to the scene afterwards. View attachment 149443For sharpness select blur tab within color. Change blur to sharpen as in the picture belowView attachment 149444now on the radius slider you want to lower the sliders to sharpen. 0.48-0.47 is mostly sufficient and the lower you get the more artificially sharp the image becomes. I suppose in night video even0.46 could look ok.
No problem!Thanks so much man. You’ve gone above and beyond. I appreciate it.
davedrone 178
Well-Known Member
Similar threads
- Replies
- 0
- Views
- 752
- Replies
- 7
- Views
- 2K
- Replies
- 34
- Views
- 16K
- Replies
- 0
- Views
- 585
- Replies
- 32
- Views
- 10K
DJI Drone Deals
New Threads
-
-
-
RC 2 Controller Firmware: v08.00.0000 Mini 4 or v08.01.0100 Mini 5
- Started by Calson
- Replies: 0
-
-
Members online
Total: 4,690 (members: 9, guests: 4,681)


