DJI Mavic, Air and Mini Drones
Friendly, Helpful & Knowledgeable Community
Join Us Now

Mavic 2 Pro limp gimbal after initial calibration

I've got news.

So it occured to me that I could test the different parts in the cold.

I first made sure gimbal worked in a warm environment.
  1. Put the drone body outside for 15 minuts, assembled, gimbal works.
  2. Put the gimbal ribbon cable outside for 15 minutes, assembled, gimbal works.
  3. Put the gimbal assembly ouside for 15 minutes, assembled, gimbal doesn't work.
So it's not the ribbon cable, it's some component in the gimbal assembly... great.

My next guess is that is some component of this circuit board that is failing...

Do you guys think it's better to procure this circuitboard myself or send it to DJI and pay $$$?
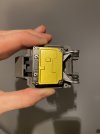
IMG_1531.jpgIMG_1530.jpg
 
I've got news.

So it occured to me that I could test the different parts in the cold.

I first made sure gimbal worked in a warm environment.
  1. Put the drone body outside for 15 minuts, assembled, gimbal works.
  2. Put the gimbal ribbon cable outside for 15 minutes, assembled, gimbal works.
  3. Put the gimbal assembly ouside for 15 minutes, assembled, gimbal doesn't work.
So it's not the ribbon cable, it's some component in the gimbal assembly... great.

My next guess is that is some component of this circuit board that is failing...

Do you guys think it's better to procure this circuitboard myself or send it to DJI and pay $$$?
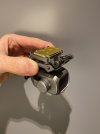
View attachment 123797View attachment 123796
The advantage to sending it to DJI is that it should be a "Sure Fix", regardless of what the actual problem is. Personally, I don't think I would do it myself unless I was 100% sure what the problem was and knew I could carry out the repair myself.
 
One more update:

A colleague of mine suggested the perfect test. Grab an air-spray can (one of those to dust off computers:
TOLSTO1040__1.jpg
Invert it so it sprays liquid air, which comes out at reaaally cold temps, and spray it on different parts of the gimbal.

Discovered that the problem appears when I spray it on the back of the camera enclosure, where the heat sink is.

I've decided to dissasemble the whole thing this weekend and try to find the bad contact, will update then.
 
Best of luck with that.
The connector on the back of the camera is the PTZ cable for the camera. The back plate does have thermal paste between it and components on the back of the camera.

The next connectors are in the roll arms. The pitch motor ribbon cable and the PTZ interim connector.

To get to those you have to remove the camera front filter. Pull off the black shroud using a plastic tool. Undo the three hidden cross head 00 screws covered by white silicon.
Remove the back plate and disconnect the PTZ connector.
Remove the camera out the back. With a sharp thin blade pry the circular side covers off the pitch motor and the spacer side.
Or you can push the spacer side cover off from the inside with the aid of a small short dowel or bent wire pushed through the centre hole that the cable passes through.

With the cover removed from the spacer side fold the PTZ connector back on itself and thread the connector and cable out through the centre hole in the camera box wall.

On the spacer side remove the three outer cross head screws holding the pitch movement stop in place. There is not enough slack in the cable to remove the limiter completely. Undo and remove the three inner screws holding the spacer to the camera box. With these screws removed the spacer should come out and there will probably be enough slack to remove the movement stop.

Remove the inner cover to the roll arms by releasing the plastic hooks/pins at the arm ends. The cover should with lots of jiggling and levering come out.

You should now be able to see the ribbon cable connector and the PTZ intermediate connector.

Are you really sure that you want to disassemble the gimbal completely?
 
You guys want to see this.
As the problem appeared to be on the circuitry around the back of the camera assembly I decided to get that backplate off (really easy stuff, 4 screws) and take a look with the microscope:

See anything in this image?

mavic2_00005.jpg

A bit closer?
mavic2_00003.jpg

Microscope maybe?
mavic2_00006.jpg
WOW!

Yeah... that guy has been barely held in place just by the pressure of the backplate.
If I try to click it back in:

ezgif.com-gif-maker.gif

So yeah, quick fix, just get something behind that metal tab on the connector and bring it a bit out so it can click.
mavic2_00010.jpg


And there my friends concludes my story with the Mavic 2 Pro.
Drone works perfectly fine now, no issues at all, left it outside at 0degC for a while, works perfectly fine.

Thank you all for your help and suggestions, they did help a lot.

Again the drone has not been hit with anything nor crashed, always treated with care. That little tab gave in and the connector has been out since who nows when...

Cheers everybody!
 
Last edited:
I am glad that you found that out for yourself and we’re able to fix it.

One I opened up also had a poor connection on the back of the camera but no symptoms like you found.
In my case I used a small tool to apply extra pressure to the ends of the connector which seemed to do the trick.

Warning: On another I thought I had aligned the pitch motor ribbon connector and pushed, only to find I had destroyed half of the connector pins. had to purchase a new camera box and pitch motor.
 
  • Like
Reactions: dontic

DJI Drone Deals

New Threads

Forum statistics

Threads
130,585
Messages
1,554,095
Members
159,586
Latest member
DoubleBarS