

I don't know if I'm doing something wrong or is it the mavic air. I'm getting really noisy photos even when shooting raw and trying to post edit it. When I zoom in it seems very noisy. I've tried auto mode as well as manual mode but nothing seems to help. Videos are extremely sharp but photos are horrible. My Samsung S10 phone takes photos thousand times more sharper. I've got the ISO set to 100 too

You are using an out of date browser. It may not display this or other websites correctly.
You should upgrade or use an alternative browser.
You should upgrade or use an alternative browser.
Noisy photo quality
- Thread starter john2k
- Start date
CanadaDrone
Well-Known Member
- Joined
- May 9, 2018
- Messages
- 2,182
- Reactions
- 2,069
We need to see samples but there are a few things that come to mind...
- If you are looking at RAW files, depending on the viewer, you will only see the embedded JPEG which is garbage and not intended for anything other than a preview
- Again if you are looking at RAW files, depending on the program, they have ZERO default adjustments and that includes sharpening, noise reduction, etc. RAW images themselves are usually not very pleasing to look at, the purpose of a RAW file is to give you the most malleable file possible for post-production work. If you don't do that post-production work, you will probably be disappointed in the result.
- The Air uses a tiny 1/2.3" sensor and honestly the photo quality is quite bad in general. It does not have the same benefit from a computational photography standpoint as your Samsung S10 has - do not expect pictures as good as your S10 from the Air without careful processing of one or more RAW files, because that's what your S10 is doing but in a split second.
- Hows your exposure? Anything other than a perfect exposure on such a small sensor is going to leave you with noisy shadows
If you post some samples though it'll be easier to help you out - you will need to convert the files to JPEG first as you cannot post a DNG unless you link to it.

We need to see samples but there are a few things that come to mind...
- If you are looking at RAW files, depending on the viewer, you will only see the embedded JPEG which is garbage and not intended for anything other than a preview
- Again if you are looking at RAW files, depending on the program, they have ZERO default adjustments and that includes sharpening, noise reduction, etc. RAW images themselves are usually not very pleasing to look at, the purpose of a RAW file is to give you the most malleable file possible for post-production work. If you don't do that post-production work, you will probably be disappointed in the result.
- The Air uses a tiny 1/2.3" sensor and honestly the photo quality is quite bad in general. It does not have the same benefit from a computational photography standpoint as your Samsung S10 has - do not expect pictures as good as your S10 from the Air without careful processing of one or more RAW files, because that's what your S10 is doing but in a split second.
- Hows your exposure? Anything other than a perfect exposure on such a small sensor is going to leave you with noisy shadows
If you post some samples though it'll be easier to help you out - you will need to convert the files to JPEG first as you cannot post a DNG unless you link to it.
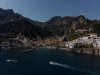
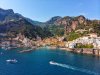
I am downloading the raw files from the drone using usb-c cable straight onto my Samsung S10 and using Snapseed app for viewing and editing. I think the exposures might have been a bit under exposed. I pumped up the exposure a bit on Snapseed app and did some tweaks. Attached are two files. One is the edited in Snapseed and the other is the raw exported as jpg
Attachments
CanadaDrone
Well-Known Member
- Joined
- May 9, 2018
- Messages
- 2,182
- Reactions
- 2,069
I am downloading the raw files from the drone using usb-c cable straight onto my Samsung S10 and using Snapseed app for viewing and editing. I think the exposures might have been a bit under exposed. I pumped up the exposure a bit on Snapseed app and did some tweaks. Attached are two files. One is the edited in Snapseed and the other is the raw exported as jpg
I think there is 2 main things going on there:
1) Your original image is very underexposed (looks like the bright sun is barely out of the frame and combined with the bright white housing, the camera's meter is going to overcompensate for that). When you lift the shadows and/or correct the exposure, the sensor in the Mavic Air simply has no real leeway and what you end up with is a ridiculous amount of noise (as seen in your edited example). Due to the tiny, low resolution sensor the Air uses, you really need to nail the exposure as you can't do hardly anything in post without the image degrading very quickly. If the sensor isn't getting enough light, you get noise, mushy shadows, etc.
2) The softness in the image is likely from heat haze, especially looking at your subject matter (looks like a hot Italian coastline or something like that - very nice). The further you are away from your subject, the more likely you are to encounter it. It's a very common problem for traditional photography when using longer reach lenses, it doesn't take much to start affecting the image quality.
Though it seems counter-intuitive, we often need to add positive exposure compensation when shooting bright scenes, and negative exposure compensation when shooting very dark scenes, because even the best camera meters overcompensate when they try to average the brightness level of a more extreme scene. I don't remember if the Air lets you display a live histogram on the display (I think it does), but if it does, that will be a huge help and if you know how to read it, will virtually eliminate the chances of an improper exposure in the future.
Thank you @CanadaDrone. The mavic air does have a live histogram as far as I remember. But I have no idea how to read and understand a histogram. I will watch some videos and read up on histogram. So basically if you want very limited noise then the air has no room for underexposed or overexposed photos right? The exposure has to be spot on from the beginning and no amount of post editing will fix this?
I'm assuming taking photos in auto mode is just as bad? I took a auto mode photo once before and it was horrible. Actually worse than this one.
I'm assuming taking photos in auto mode is just as bad? I took a auto mode photo once before and it was horrible. Actually worse than this one.
CanadaDrone
Well-Known Member
- Joined
- May 9, 2018
- Messages
- 2,182
- Reactions
- 2,069
Thank you @CanadaDrone. The mavic air does have a live histogram as far as I remember. But I have no idea how to read and understand a histogram. I will watch some videos and read up on histogram. So basically if you want very limited noise then the air has no room for underexposed or overexposed photos right? The exposure has to be spot on from the beginning and no amount of post editing will fix this?
I'm assuming taking photos in auto mode is just as bad? I took a auto mode photo once before and it was horrible. Actually worse than this one.
Overexposed photos won't have noise in them (photo-sites on the sensor will be properly saturated with light and can deliver the lowest noise result), but there are other problems like clipped/blown highlights which are even harder to recover than shadows. It's a balancing act. Exposing to the right (bright side of the histogram) will improve shadow noise but increases chance of blown highlights, exposing to the left (darker side of the histogram) preserves highlights but at the expense of shadows, and shadow recovery on these tiny sensors is almost non-existent without introducing a lot of noise. You do have a tiny bit of leeway for exposure correction with the RAW file, but if you need to make a significant correction either way (like in your above example) you probably aren't going to like the results. Any time you have to increase the brightness value of a shadow, you are going to introduce noise. Going the other way (reducing a bright image) doesn't introduce noise but you have hardly any leeway there before highlights are clipped when shooting, so it's riskier to shoot that way on the Air.
Histograms are very simple, just google "understanding exposure histogram" or something to that effect and you will figure it out quickly. Basically, the left side of the X axis is the shadows/blacks, the right side is the highlights/whites. The Y axis is the luminosity of all the pixels in the image as they correspond to the X axis position. Any values off the charts left or right indicates either a blown highlight or a crushed shadow respectively. A normal scene with equal bright/dark components and no blown highlights or crushed shadows will look similar to a uniform bell curve, but that is just one example and not a magical shape that means your photo is perfectly exposed.
Any photo mode is fine as long as you are getting a proper exposure - if you use Auto just keep an eye on the exposure and adjust the exposure compensation if necessary based on the histogram. It's no different than Manual mode in terms of the photo possibilities, it is just picking the settings for you. The exposure meter on the Air is actually not bad, but it will always try and pick an exposure that averages the entire scene's brightness, so if it's a very high contrast or high dynamic range scene (Like the one in your example, which is difficult for any camera), manual intervention may be needed to make sure the areas you want are properly exposed. On the Air especially you will want to stay at ISO 100 as image quality degrades dramatically with the higher values. Also, no matter what camera you're using, if the scene has extremely high dynamic range (i.e. a mixture of dark shadows and bright highlights), that is virtually impossible to capture properly in a single exposure, hence why HDR images are sometimes needed
There's nothing magic or special about manually setting your exposure.I'm assuming taking photos in auto mode is just as bad? I took a auto mode photo once before and it was horrible. Actually worse than this one.
A properly exposed image is a properly exposed image whether the exposure was set by you manually or by the camera's automatic metering.
The image you've posted was underexposed because the exposure settings you selected were wrong for that scene in those lighting conditions.
If you don't know what you are doing when it comes to exp[osure settings, you are probably better off letting the camera do it for you.
The issue with that photo come to think of it is that if let more light into the sensor to expose it more then the clouds will become overexposed. Even in day where it's not too sunny, the clouds and skies tend to always get overexposed if I try and get the rest of the shot right.
Bofman51
Active Member
- Joined
- Mar 14, 2019
- Messages
- 31
- Reactions
- 20
Hi John, I agree with CanadaDrome regarding histograms. They are really quite simple to read and the beauty is that you've got instant information about the exposure. If the graph is pushed over to the left, your image is underexposed, if to the right it's overexposed. It's one of those things you learn quickly when using DSLR cameras in bright daylight and you can't really tell by looking at the LCD. You look at the histogram, make the adjustment and shoot again. Hope this helps coz it will improve your images perhaps more than anything else. I only wish the size of the histogram was adjustable on the Go4 app. It's a bit small but better than nothing. Good luck.
Geani66
Active Member
- Joined
- Aug 2, 2019
- Messages
- 31
- Reactions
- 11
- Age
- 57
I am downloading the raw files from the drone using usb-c cable straight onto my Samsung S10 and using Snapseed app for viewing and editing. I think the exposures might have been a bit under exposed. I pumped up the exposure a bit on Snapseed app and did some tweaks. Attached are two files. One is the edited in Snapseed and the other is the raw exported as jpg
Beautiful photo...
Apply some denoise and it will be okay
Similar threads
- Replies
- 20
- Views
- 2K
- Replies
- 13
- Views
- 3K
- Replies
- 1
- Views
- 305
- Replies
- 6
- Views
- 2K


DJI Drone Deals
1. Mini 2
2. Mini 3 Pro
3. Mini 4 Pro
4. Air 2s
5. Air 3
6. Avata 2
7. Mavic 3 Pro
8. Mavic 3 Classic
2. Mini 3 Pro
3. Mini 4 Pro
4. Air 2s
5. Air 3
6. Avata 2
7. Mavic 3 Pro
8. Mavic 3 Classic
New Threads
-
-
 Air 3 Bleak Mountain Burn, A93, Glen Shee...
- Started by AlbionDrones
- Replies: 2
-

-

-
Forum statistics
