DJI Mavic, Air and Mini Drones
Friendly, Helpful & Knowledgeable Community
Join Us Now

Noisy picture in darker areas ?

crucx

Well-Known Member
Joined
Aug 8, 2019
Messages
71
Reactions
11
Age
32
Hey just a quick question: When i do photos with my air at about 11 AM, everything is always sharp, perfect. Usually i fly my drone at between 10 and 11 AM. But on the last time i went out at about 5 PM when the sun was going down. Everything was a bit darker and i think that explains why my last pictures at 5 PM were a bit noisy. Specially in shadows, trees etc.

Any tips ?

When should i increase or decrease the ISO btw (and what is it ?) or when should i touch ISO at all cuz i never touch it but i see pros using it always and get the best result out with it.
 
The higher the ISO, the greater the noise. That's true with any camera.

If light is low then you either need slower shutter speed or higher ISO. Too slow of a shutter may cause excessive blur. But that could give you an interesting effect.
 
5pm is usually going to be a better time of day for photography.

Increasing ISO increases the sensitivity of your camera sensor. This increases how much light it captures for a given amount of time, but also how much noise it registers too. As a general rule, you want your ISO as low as possible.

As DanMan32 said, this will slow your shutter speed, possibly introducing blur. For this reason, you would be best served doing this work in calm conditions if possible.

I'd also suggest looking into HDR and bracketing -- taking a series of shots at different exposures. Overexposed helps you get details out of shadows, underexposed helps prevent blowing out bright spots.

Good luck, and share some photos.
 
Weeeeird. So i went out at 5 PM again today and i figured out finally how shutter etc. work. I got really the right shutter and iso settings. But the picture was still noisy. A bit less but still noisy. Then i started doing a video capture and now i am home and also did a snapshot of the video with vlc player and compared it to the picture that i made (and both, the video and picture were shot at the same spot. I didn't move or changed any setting so...) and guess what. The videos Quality was PERFECT. Even if the pixels / resolution are lower. There was no NOISE at all.

Can someone help me out with this ? what am i doing wrong ;(. I dont use the normal photo mode by the way. I use this mode where you can set 3,5 or 7 pictures to shoot and save. I dont remember what it was called but i got the most good results out from that feature and i have set the amount of pictures to 3. But still its noisy and if i look at the video, there is no pixel / noise at all. Even not in dark areas. It's so PERFECT.

Original.jpg
This is just a example picture that i made. Not edited dng / raw.

Edited.jpg

And this is edited with adobe light room. The quality is better but still i feel like there is some noise. Also this is the first time i am using any photo tool. I have no clue from settings, presets etc. I just let lightroom auto adjust my photo and got this result which is still better than the original pic.

Ps. You know whats sad ? if i upload all of my photos that i made overall with the mavic air (and that was like 300+ photos) at adobe shutterstock, the pictures ALL get denied and the reason is "too noisy". But if i do a snapshot of a footage and upload it there, it gets allowed because the quality is so perfect, even if the resolution is lower LOL.
 
Someone might have better answers... I've been mostly on a videography learning curve. I use D-Cinelike, and I've begun experiments with clarity, contrast, and saturation settings. For now I'm using 0, -3, 0.

But the key, I think, for your photo is to go manual. That looks bright enough to turn your ISO down to 100 (the minimum). Turn on your histogram. Then play with your settings (don't forget EV) so that your histogram is not clipping either high or low. That's not always achievable, so which you accept to lose (shadows or highlights) depends on what you are focused on capturing.

You might want to consider a polarizing filter, or perhaps an ND/PL (Neutral density/polarizing filter). It'll cut down on glare, and can make your skies look way better -- more saturation and detail.

Again, I'm not an expert, but looking at your first photo (and the second, frankly), I'd suggest you try turning your contrast down, and maybe the clarity, too, then add that back in in post to your taste. How the image looks when you take it is not necessarily about what looks best on your controller, it's more about capturing as much information as possible. You then have more to work with in post to make it pretty.
 
What resolution did you take the photos and what for the video? A higher resolution may get more noise for the same ISO.
 
I dont think i can chose any resolution for the photo mode. For the video i use 4K and the photos are anyways 4k too.

I used for all the pictures 100 iso and the highest shutter as possible. I have learned a lot from it but still its noisy and i dont really want jpg. So i guess its normal that the pictures are noisy when shooting raw and they need to get edited in order to remove the noise ?

Edit: Here another picture with a very very high shutter and still there is noise (and i tried to edit it or use the auto optimization in lightroom but the picture got brighter and more noisy..)
 

Attachments

  • DJI_0088.jpg
    DJI_0088.jpg
    519.4 KB · Views: 21
Last edited:
Is the photo quality of the mavic air really so bad ? i tried even jpg and almost same result. It was a bit better than the raw / dng files but still you see some noise. Even when i set the iso / shutter to automatically you see a lot of noise in the dng file. When i capture videos, there is really no noise at all. Even in dark areas i cant see any noise. It's perfect.
But the photo quality is so horrible ...
I also just checked samples from other people of many other forums etc. and also on their pictures i noticed a lot of noise on their photos. But their video looks perfect like mine. I looked also for edited dng files by pros with the mavic air and even they have noise in their images...

Edit: look at these 2 pictures.

On the first picture, i just used the auto settings of lightroom to adjust my picture.
On the second picture i did the same, but also i added like 54 luminance to the picture. The noise is almost gone but the quality suffers from it if you ask me. The tree details etc. look cartoony ... i dont know what to do ;(. Only solution i see is to do video captures and then a snapshot out of the video.

Edit 2: Okay i dont know how i did this but FINALLY i got the perfect image. Check the third picture. I was keep shooting photos till the noise disappeared SUDDENLY. I had nothing to change at all in lightroom. Weird. Is it possible that the drone causes noise when there is a lot of wind and the drone unstable ? maybe i just got a perfect timing where my drone was super stable in the air so it caused no noise at all which explains this perfect shot.
 

Attachments

  • without luminance.jpg
    without luminance.jpg
    1.1 MB · Views: 23
  • 54 luminance.jpg
    54 luminance.jpg
    709.3 KB · Views: 24
  • Perfect.jpg
    Perfect.jpg
    1.1 MB · Views: 23
Last edited:
See my replies in this thread - lots of info on why image sensors behave the way they do:


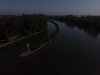
The still photo quality of the Mavic Air is unfortunately quite poor, even compared to today's smartphone standards. The biggest reason for this is a 1/2.3" sensor is just so tiny, and it lacks all the benefits of computational photography (Image stacking, instant HDRs, etc.) that you also find in today's smartphones. You can get some acceptable results though if you expose properly and are willing to process the RAW file a little bit, just keep your expectations in check.

Here is the important bit from my posts re: shadow noise or high contrast scenes:

The reason for this is how image sensors work - they achieve best image quality when they have been saturated with light to the point that they can reach their full well capacity (where the ADC reaches maximum value, which is at base ISO). If the bright/highlight areas are properly exposed, that typically means far less light has been collected by the photosites responsible for the dark areas, and as a result they are going to be full of noise. When you raise the ISO, the ADC is told to reach maximum value much earlier, hence the dynamic range reduction at higher ISO levels, because it is working with far fewer electrons before it reports a maximum value. This is also why you see grain/noise at higher ISO levels, because the ADC is reporting maximum value with only a tiny fraction of the light collected compared to base ISO FWC, and light is collected randomly (noise also occurs randomly, which is why stacking multiple high ISO images is an effective form of noise reduction).

This is not a problem unique to DJI or the sensor in the Air - no camera can expose all areas of a scene like that with such high dynamic range. There will always be more noise in the shadows, and the 1/2.3" sensor isn't giving you a ton of flexibility - it's essentially the same sensor in many modern smartphones today, minus all the computational photography goodies. Shooting high contrast scenes like that is simply not ideal because you can only expose for the shadows or the highlights - not both. Choosing the light that you fly in has one of the biggest effects on how good your footage will look, and that goes for 'standard' photography as well. Any time you have ultra high contrast and strong shadows, the result just isn't going to be good. What you usually want is for your subjects to be very evenly lit, and then you can pick a single exposure for the whole scene and everything will look great.
 
  • Like
Reactions: crucx
If sensor being 1/2.3 is the main culprit, then most of the DJI phantom/mavics would be the same. Only some have 1" sensor.

I'll have to look at those on my PC as they look good on my phone, though last ones are dark.
 
Thanks that explains a lot. I wish i would know this earlier before buying the air. I checked a lot of videos on YT before buying and nobody warned about that but i am still happy with the drone. Maybe i should just capture videos and then take a snapshot ouf of the video. I don't really know how to perfectly edit raw.
 
Hi @crucx what software are you using to take snapshots out of the videos please? I was just out taking a few pics and also thought they were quite noisy - I shoot a lot of landscape with dslr, I understand the whole noise thing but like you am quite disappointed so far with the quality of the pics with my MA. Still enjoy it tho!
 
  • Like
Reactions: crucx
You have to right click on the vlc window and then under "view" enable the "advanced control". When you open your video then (in windowed mode), you see at the bottom more options like skip one frame, take snapshot etc.

If you turn on fullscreen, the menu disappears. Just that you know :)
 
Oh my GOD guys ! i found the solution for the annoying noisy pictures. Also this increases the image quality INSANEEEE.
I checked over 50 different YT channels about tips for shooting and editing photos, and one of the videos showed something that nobody else had ever talked about or showed it.

Go to your photo settings and make first of all sure that you shoot in 4:3 (You can crop your photo in any photo software like lightroom later).
And then (this is the MOST important part) chose "AEB" in the photo mode settings and set the number to 3 or 5 (i recommend highly 5).

Now you can shoot a picture and you get 2 x 3 pictures or 2 x 5 (depending on what you chosed for AEB). Now put all pictures that you got there to lightroom and MARK the 2 best and similar looking pictures that you find (and make sure its not to bright or to dark. That means, dont look for the lowest or highest exposed photo) with the almost same lightning (shutter) amount (for example, my 2 best photos had a shutter of 1/100 and the second pic had 1/120).
Now right click and chose "merge - panorama" and make sure you select in the next window "perspective" and also make sure you set the number / box below perspective (dont know what it was called but there is only one bar / number anyways that you can change) to 100 (max) to remove the white bars around the picture (you might loose a few milimeters of the picture at the edges but this is absolutely not important or any deal at all. And once you saw the quality / difference, you will see what i am talking about. You will love it).

Thats it. Now press merge and make sure to select and view the NEW picture that lightroom created..

Here is a exmaple of my pictures.
So the first 2 pictures are not edited (that are the 2 pictures that i used to merge together and the third picture is the result of the merged pictures).

See what i am talking about ? BOOM. First picture has not much detail, sharpnes etc. and also it looks a bit foggy (grayish). The Second picture is a bit darker and thats the only difference.
But the last picture (which we merged) looks PERFECT. Also there is A LOT of detail to see. There is A LOT more sand and texture in every single sand "corn" to see. If you zoom in, you know what i am talking about. This footage even looks like i would shoot it with a 3.000$ Camera to be honest even if i never had or saw one. Even my iphone 6S cant shoot pictures that good while it has 12MP like the mavic air.

Edit: If you look at the first 2 pictures and compare, you might think that my drone moved a bit or i changed the position but no ! if you shoot in AEB, this is normal. You still can and SHOULD merge the pictures. I thought since my image looked so "moved", it will have a negative effect when merging. Like the image would be blurry or something. But i was wrong. Also this increases as i said your image quality a lot.

Bonus tip: Set your contrast for photos and videos in the DJI app to -2 or -3 (i have set it to -2). This removes some noise and when you merge your photos, you wont see any noise at all anymore. It will be perfect.
 

Attachments

  • 1.jpg
    1.jpg
    1.4 MB · Views: 17
  • 2.jpg
    2.jpg
    1.4 MB · Views: 18
  • Final.jpg
    Final.jpg
    1.7 MB · Views: 18
Last edited:
  • Like
Reactions: Dan C and Thomas B
Shooting "Bracketed" is a great way to get better images. We shoot almost all stills in AEB-5 but we merge all 5 in order to get true High Dynamic Range (HDR).
 
  • Like
Reactions: Thomas B and crucx
I didn't know a lot of people know this already. Maybe someone should post a complete well explained enough guide (which is probably maded already somewhere in this forum xD) and the topic / guide should get pinned in the forums. I did never know about this "feature" or way, so by pinning it, more newbies like me who never used lightroom before or any other photo software, can take a look what it is and they will love it for sure and always use that way instead keep making topics or searching and reading all the old solutions which aren't that effective as this way <3. This also increases as many times i said already, the overall image QUALITY.
 
Lycus Tech Mavic Air 3 Case

DJI Drone Deals

New Threads

Members online

Forum statistics

Threads
131,229
Messages
1,561,063
Members
160,182
Latest member
Saikiran Villa