DJI Mavic, Air and Mini Drones
Friendly, Helpful & Knowledgeable Community
Join Us Now

12mp 12 bit raw or 48mp 10 bit raw

yes you got it, but you will need to experiment and see what works best. Panoramas can be tricky, they are not the same as static images, so some practice will be needed. But the general idea is correct. Watch out for moving things, and don't get too close to subject as panoramas work best with near-infinity focus distances.
Ahhhh.... So like all lenses, there's a minimum distance the lens can focus... Too close and it's not going to be able to focus???

And yeah... Fast moving clouds etc... Clearly the mini 3 Pro has some serious limitations when it comes to taking stills, some of which can be worked around... I get the impression that it was meant to be a video camera primarily.

But yeah I'm going to see if I can get some shots that look like something taken with a much longer focal length with a much narrower aperture...

Thanks for your help it's much appreciated

And I'll definitely try your pano software
 
Something else to keep in mind is the visual plane for the L/R captures of the panorama will be rotated compared to the single, straight-ahead image further out.

This results in seeing more of the sides of buildings and other features than in the distant capture. This is there despite top-notch stitching and distortion correction.

It's subtle, but the net impact of this is to leave a slight "wraparound" feel to the image. This is a problem when your purpose is to simply take a higher resolution version of the single-frame capture.

The solution is to take the set via a small waypoint mission using Litchi, DJI Waypoints, etc. Then use a good stitching app to combine the images.
DJI mini 3 Pro actually tilts the camera (horizontally) and lightroom allows you to compensate for that when stitching.. Barral, cilinder or perspective.
 
DJI mini 3 Pro actually tilts the camera (horizontally) and lightroom allows you to compensate for that when stitching.. Barral, cilinder or perspective.

You didn't understand (or I explained it poorly).

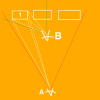
Consider this diagram:

Picsart_23-08-26_17-30-18-725.png

You are photographing 3 buildings. At location A, they all fit in a single frame. The red lines are your FOV. Look at the 3 white lines from A, showing how the front and side of building 1 project toward that point. Note that at this location, you will capture some background between those buildings, most of the image of that building will be the front, with a narrow, skewed view of the side.

Now, in an attempt to take the same image but with higher resolution, you move to B, and shoot a three-image pano from a single location to stitch together. The green lines represent the same FOV as before, now turned to the left for the first image.

The three white lines from B represent the same front and side projection of building 1, but from this closer location. This portion of the future composite image is not only distorted by the wide-angle lens, which can be corrected, but the image content is different, which can't be corrected. In the distant capture, the back corner of 1 and some background between buildings is visible. In the image captured up close, the portion of the image subtended by the side is much wider and almost as much as the front. Also the back corner of building 1 and background between the buildings is obscured by the middle building.

A set of 3 images taken at the right 3 locations across the front of the buildings and then stitched together will reproduce the single-frame distant image more faithfully, and reduce the content looking like a projection on the inside of a cylinder.

For a real situation you can diagram this out, do the math, and figure out the correct locations to take the 3 pictures. A lot of work but can be more than worth it for some applications.

Less work is to eyeball it. For this scene you know what it looks like between the buildings from the single frame shot, so from the near distance slide (roll) side to side until it looks about like that, shoot the first shot, move to the middle, shoot the second, repeat for the third, each time trying to position side to side so the frame looks similar to that third of the distant image.

Or, use the pano feature. Or any amount in between. Really depends on what you need.
 
Last edited:
  • Like
Reactions: Felix le Chat
You didn't understand (or I explained it poorly).

Consider this diagram:

View attachment 167521

You are photographing 3 buildings. At location A, they all fit in a single frame. The red lines are your FOV. Look at the 3 white lines from A, showing how the front and side of building 1 project toward that point. Note that at this location, you will capture some background between those buildings, most of the image of that building will be the front, with a narrow, skewed view of the side.

Now, in an attempt to take the same image but with higher resolution, you move to B, and shoot a three-image pano from a single location to stitch together. The green lines represent the same FOV as before, now turned to the left for the first image.

The three white lines from B represent the same front and side projection of building 1, but from this closer location. This portion of the future composite image is not only distorted by the wide-angle lens, which can be corrected, but the image content is different, which can't be corrected. In the distant capture, the back corner of 1 and some background between buildings is visible. In the image captured up close, the portion of the image subtended by the side is much wider and almost as much as the front. Also the back corner of building 1 and background between the buildings is obscured by the middle building.

A set of 3 images taken at the right 3 locations across the front of the buildings and then stitched together will reproduce the single-frame distant image more faithfully, and reduce the content looking like a projection on the inside of a cylinder.

For a real situation you can diagram this out, do the math, and figure out the correct locations to take the 3 pictures. A lot of work but can be more than worth it for some applications.

Less work is to eyeball it. For this scene you know what it looks like between the buildings from the single frame shot, so from the near distance slide (roll) side to side until it looks about like that, shoot the first shot, move to the middle, shoot the second, repeat for the third, each time trying to position side to side so the frame looks similar to that third of the distant image.

Or, use the pano feature. Or any amount in between. Really depends on what you need.
Well explained.
Another cause of distortion with panoramic shots occurs as a result of the parallax effect. The camera lens with any drone is way in front of the centre of the yaw axis. It is impossible to get the lens to the NPP (No Parallax Point) so you will always end up with a composite shot that looks like it should be printed on the inside of a tin. Flattening this shot out will keep the centre area relatively distortion-free, but will introduce progressively greater distortion to the outer edges of the composite frame. The best way to capture a series of single shots of one central feature that can be composited into a single large image is to set the drone close and parallel to the feature, engage exposure lock, then use the on-screen "rule of thirds" grid to visually calculate your overlap points. Take your first shot with the top left of the building centre-frame then using right stick, roll right 30%, take 2nd shot, roll right 30%.... etc until the top right of the building occupies centre-frame. Then drop the altitude 30% to capture your second row in the reverse direction. Continue until you have the bottom right of the building centre-frame. Use compositing software (Photoshop/Hugin/ICE v.2). The results when you learn how to use Hugin are stunning.
 
You didn't understand (or I explained it poorly).

Consider this diagram:

View attachment 167521

You are photographing 3 buildings. At location A, they all fit in a single frame. The red lines are your FOV. Look at the 3 white lines from A, showing how the front and side of building 1 project toward that point. Note that at this location, you will capture some background between those buildings, most of the image of that building will be the front, with a narrow, skewed view of the side.

Now, in an attempt to take the same image but with higher resolution, you move to B, and shoot a three-image pano from a single location to stitch together. The green lines represent the same FOV as before, now turned to the left for the first image.

The three white lines from B represent the same front and side projection of building 1, but from this closer location. This portion of the future composite image is not only distorted by the wide-angle lens, which can be corrected, but the image content is different, which can't be corrected. In the distant capture, the back corner of 1 and some background between buildings is visible. In the image captured up close, the portion of the image subtended by the side is much wider and almost as much as the front. Also the back corner of building 1 and background between the buildings is obscured by the middle building.

A set of 3 images taken at the right 3 locations across the front of the buildings and then stitched together will reproduce the single-frame distant image more faithfully, and reduce the content looking like a projection on the inside of a cylinder.

For a real situation you can diagram this out, do the math, and figure out the correct locations to take the 3 pictures. A lot of work but can be more than worth it for some applications.

Less work is to eyeball it. For this scene you know what it looks like between the buildings from the single frame shot, so from the near distance slide (roll) side to side until it looks about like that, shoot the first shot, move to the middle, shoot the second, repeat for the third, each time trying to position side to side so the frame looks similar to that third of the distant image.

Or, use the pano feature. Or any amount in between. Really depends on what you need.
Yeah I was thinking about that last night and I definitely misunderstood you... I tried to do a massive pano of a cliff and it came out like to perspectives of the cliff (L/R) stitched together... That's why. So yeah something like the litch app to actually move the drone left and right is a better option.

Problem with that is, moving clouds.

It's going to take a bit of trial and error to figure when to use the pano (gimbal) and when to use something like litch.

I think with the pano....

Get the shot framed with gridlines enable.

Move the drone closer using just the sticks, keeping the centre of the shot in the centre, so that it stays on that line, and keeps the same perspective. If that makes sense?

Then, when the centre box of the grid takes up the full frame, take the pano. I think that will probably be the closest I can get. It'll give me the ability to crop down to about 24mp or so but at least I can get a decent sized print from that.

Obnoxiously there's a limit to how much lightroom can correct, or adjust the perspective before things get noticeable to the average person so I'm going to have to figure that out.

I've not long had my mini 3 Pro, and I bought it for the freedom from regulations but that's set to change so I think I may as well sell it and get a air 2s for cheap.

Thanks for the advice by the way it's very much appreciated
 
The other option is AEB 12mp and upsample in Lr but I'm not convinced it's any good... If I knew for certain that actual professionals use it with professional results then I would just do that, but I can't seem to get a straight answer, just a load of reviews etc.
 
Well explained.
Another cause of distortion with panoramic shots occurs as a result of the parallax effect. The camera lens with any drone is way in front of the centre of the yaw axis. It is impossible to get the lens to the NPP (No Parallax Point) so you will always end up with a composite shot that looks like it should be printed on the inside of a tin. Flattening this shot out will keep the centre area relatively distortion-free, but will introduce progressively greater distortion to the outer edges of the composite frame. The best way to capture a series of single shots of one central feature that can be composited into a single large image is to set the drone close and parallel to the feature, engage exposure lock, then use the on-screen "rule of thirds" grid to visually calculate your overlap points. Take your first shot with the top left of the building centre-frame then using right stick, roll right 30%, take 2nd shot, roll right 30%.... etc until the top right of the building occupies centre-frame. Then drop the altitude 30% to capture your second row in the reverse direction. Continue until you have the bottom right of the building centre-frame. Use compositing software (Photoshop/Hugin/ICE v.2). The results when you learn how to use Hugin are stunning.

After thinking about it some more, your method is definitely better.

My way will just produce a image that looks like a it's been taken close up with a wide angle lens.

Your way will look like a shot taken from farther away with a long lens.
 
Lycus Tech Mavic Air 3 Case

DJI Drone Deals

New Threads

Forum statistics

Threads
131,233
Messages
1,561,078
Members
160,185
Latest member
Tarizzman