DJI Mavic, Air and Mini Drones
Friendly, Helpful & Knowledgeable Community
Join Us Now

Any advice to improve this?

nikkolaa

Well-Known Member
Joined
Dec 8, 2017
Messages
103
Reactions
32
Age
40
Hi,
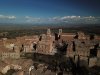
Does anyone have any thoughts to get the sky more colorful, I mean capturing better the blue in it?

1522701937627.jpg

1522701951258.jpg

These ones are taken in automatic,

Modifying shutter and iso did not result in something better. well I did not know exactly what to do, but it looked just "too much" for a typical sunny day with clouds..

I was equipped with a cpl filter btw.
And flying with high wind velocity, the least to say..

1522702000990.png

Looking forward to hear some news,
Cheers
Nicolas

(Pictures taken at porto Ercole, Italy)
 
Get yourself a set of filters. At least an ND8, 16 and 32. It will make the blues really pop.

I wouldn't necessary agree with this, quality ND filters should have no impact whatsoever of colour, in fact this is one of the many tests for quality: do they create a colour cast?

Definitely agree that it looks like you CPL filter wasn't adjusted optimally. CPL filters, when oriented optimally, essentially reduce reflected light (which is partially polarised) allowing relatively more incident light through to the sensor. In your scene above you'd be getting both incident light from the general illumination of the scene (actually emitted by electrons in matter after absorbing a photon from the sun) and reflected light off, for example, the dust and water vapour particles (haze), air molecules (washes out blue skies), the surface of the sea etc. It's this reflected light you hope to reduce in order to reduce haze, make blue skies 'pop' and increase colour saturation, generally giving you a higher contrast image.

I can't remember all the maths (Brewsters angle and such like) but it doesn't matter because the polarisation of reflected light will change depending on sun angle and camera angle - you just have to adjust optimally for the scene (and be prepared to change it as the day draws on or your viewing angle changes).
 
  • Like
Reactions: Yoda007
Very good comments, thank you all!
It's clear now I completely forgot to care about the polarity of the filter.

I have some general comments/ questions in addition :

ND filters do not have polarity.
If yes, I agree with tictag that it won't solve the question of absorbing reflecting light in the scene.
From what I've seen, they're used when your optics cannot match the conditions in iso and obturation so you "cheat" with ND filters right?

Tricky question : what is the max altitude range you can have, in fact the max angle with sun , without messing again with the setup of polarization?
Does it have any effect or negligible in this case? You set it up at on ground and that's good, just to be modified along the day?
 
Here's the pictures I've taken the day before in Tuscany as matter of comparison

The filter was in the same position,
the second one taken in manual
 
An interesting opportunity for comparison! :)

But first your questions ...

Yes, ND filters should have no 'variable' impact on the image, only the overall light levels i.e. making the image darker e.g. ND2 = 1 stop = 1/2 light, ND4 = 2 stops = 1/4 light, ND8 = 3 stops = 1/8 light and so on.

Not sure, tbh. I think altitude will have some kind of impact (because the angle of reflected light will change) but I honestly don't know. Personally, I usually set my drone toward my subject and try to include a view of the sky, then I adjust the CPL to maximise the polarising effect whilst also trying to make the effect consistent left-to-right, I then take her up and check on screen, if all is well, take my shot/video. If I move location or fly a battery (around 25 mins), I'll repeat. When I look at the effect, I am looking for maximum blues in the skies, contrast with clouds, maximum saturation in, for example, foliage, reduction in haze and generally the most impactful image possible as I rotate the filter.

Aside from the obvious exposure difference, you can see that the most contrasting part of the sky is off to the far right. Now this is puzzling because from the shadows, the sun appears to be somewhere behind and to the right of your bird, concluding that with this orientation of your bird, that is perpendicular (at right angles to) to the sun, you getting towards maximum effect. But in the first two shots, again according to the shadows, the sun is directly off the left meaning that you should be getting some effect - but the image is dull and washed out. Altitude difference? Honestly don't know, chap. Bit of a 'dark art'!! But I do think your CPL orientation is what's giving you that washed out look - keep trying! :)
 
  • Like
Reactions: Yoda007
Screw-on polarization filters for cameras normally have a mark on them that allows you to orient correctly. At whatever angle to the sun you are shooting, you just turn the filter to point toward the sun. My Polar Pro filters did not have a mark on them so I had to make one. Wearing polarized sunglasses, I looked through my polarizing filter and rotated it until the light coming through was the darkest. Then I marked the filter rim at the 3 or 9 o'clock position.

I then estimate the Mavic/sun angle when flying for the picture I want and position the filter accordingly. If I do not have a specific picture in mind, I just position the filter with the mark pointing up.
 
  • Like
Reactions: Yoda007
these images could easily be fixed in post also, a gradient on the top over blown area would tone the image down lots, and u could pull the shadows from the buildings too, its nice to get things right in flight but some post processig goes a lonng ways to fix errors especially if u only got one chance to get the image
 
Have you tried AEB or HDR shooting modes? AEB in particular would allow you to blend a nice blue sky with nicely exposed landscape. This is an AEB-5 (below). You do have to merge the AEB images in Photoshop (or other program) before you see the finished image. But you don't have to fumble around with a CPL filter to get excellent results.
ceea6f789957d5d825ed216a29cdcf55.jpg
 
  • Like
Reactions: genesimmons
An interesting opportunity for comparison! :)

But first your questions ...

Yes, ND filters should have no 'variable' impact on the image, only the overall light levels i.e. making the image darker e.g. ND2 = 1 stop = 1/2 light, ND4 = 2 stops = 1/4 light, ND8 = 3 stops = 1/8 light and so on.

Not sure, tbh. I think altitude will have some kind of impact (because the angle of reflected light will change) but I honestly don't know. Personally, I usually set my drone toward my subject and try to include a view of the sky, then I adjust the CPL to maximise the polarising effect whilst also trying to make the effect consistent left-to-right, I then take her up and check on screen, if all is well, take my shot/video. If I move location or fly a battery (around 25 mins), I'll repeat. When I look at the effect, I am looking for maximum blues in the skies, contrast with clouds, maximum saturation in, for example, foliage, reduction in haze and generally the most impactful image possible as I rotate the filter.

Aside from the obvious exposure difference, you can see that the most contrasting part of the sky is off to the far right. Now this is puzzling because from the shadows, the sun appears to be somewhere behind and to the right of your bird, concluding that with this orientation of your bird, that is perpendicular (at right angles to) to the sun, you getting towards maximum effect. But in the first two shots, again according to the shadows, the sun is directly off the left meaning that you should be getting some effect - but the image is dull and washed out. Altitude difference? Honestly don't know, chap. Bit of a 'dark art'!! But I do think your CPL orientation is what's giving you that washed out look - keep trying! :)

Thank you for all these good explanations, I'll have a look at the filter to see if there isn't a marking and try to move it for next flight.

But wait! It shouldn't be so easy to setup your filter as you described, quite long procedure i guess if you need to land each time, switch off, rotate, switch on, take off, etc, how do you manage this?

I mean it's not just a 15 min flight including checklist! Last times, not on my own, it was already "too long" and not so easy justifying "losing" so much time during a weekend trip over the coast to fly..

Well, I guess now I have to demonstrate the benefit of it by mounting some video footage! [emoji3]
 
... if you need to land each time, switch off, rotate, switch on, take off, etc, how do you manage this?...
I just estimate the angle of the sun to the shot and mount accordingly. For general flying I have the mark straight up. You can always make some corrections in post.
 
Have you tried AEB or HDR shooting modes? AEB in particular would allow you to blend a nice blue sky with nicely exposed landscape. This is an AEB-5 (below). You do have to merge the AEB images in Photoshop (or other program) before you see the finished image. But you don't have to fumble around with a CPL filter to get excellent results.
ceea6f789957d5d825ed216a29cdcf55.jpg
I've got the raw file I guess, I switched on this option (but still have no software to open them..!)

But yes, this would be the post processing solution thanks!

Don't know about aeb files, is the mavic able to do that? Is it just another extension or the method to merge pictures?
 
I just estimate the angle of the sun to the shot and mount accordingly. For general flying I have the mark straight up. You can always make some corrections in post.
I need to check if already marked on it, that would definitely help finding the "zero".

I have also ND but never tried them, would be worth trying too and see the difference
 
1522791894803.jpg

I think on this one it's even worth, the wrong polarization therefore explains this curved line of contrast?

I'm a bit more oriented on the right now, so if before the strong contrast only appeared on the far up right, now it's spreading
 

Attachments

  • 1522791722869.jpg
    1522791722869.jpg
    105.9 KB · Views: 12
I've got the raw file I guess, I switched on this option (but still have no software to open them..!)

But yes, this would be the post processing solution thanks!

Don't know about aeb files, is the mavic able to do that? Is it just another extension or the method to merge pictures?
AEB is "Automatic Exposure Bracketing". The Mavic will shoot three or five (you choose) photos in rapid succession, going from 1) way overexposed to 2) just overexposed to 3) perfect (normal exposure) to 4) just underexposed to 5) way underexposed. In this case, all five photos must be merged into an HDR image using Photoshop (or similar). The merging process takes the best lighting/exposure for each element. So if the sky was blown out (over exposed) in the properly exposed image, it will merge the sky from one (or both) of the underexposed images into the final image. I hope that makes sense. While the casual photographer will probably never use AEB, once you start using it - it's addicting.
 
AEB is "Automatic Exposure Bracketing". The Mavic will shoot three or five (you choose) photos in rapid succession, going from 1) way overexposed to 2) just overexposed to 3) perfect (normal exposure) to 4) just underexposed to 5) way underexposed. In this case, all five photos must be merged into an HDR image using Photoshop (or similar). The merging process takes the best lighting/exposure for each element. So if the sky was blown out (over exposed) in the properly exposed image, it will merge the sky from one (or both) of the underexposed images into the final image. I hope that makes sense. While the casual photographer will probably never use AEB, once you start using it - it's addicting.
Thanks, you just named the thing I was looking for, great!

It won't solve my wrong filter setting though, but that should be a good way to pull something good from pictures taken without filters I guess, even ND?

Let's talk about video now... What's the solution, just manual setting of shutter and iso,?

ISO for either photos or video needs to be the lowest possible. Usually, that means 100. But if its dark out, you'll need to crank that up. The only other variable is the shutter speed (as the aperture is fixed and cannot be changed). A lot of people spend a lot of time trying to get the shutter speed to 2X the frame rate, through the use of ND filters. Personally, I'll get it close, but won't scrub a flight if the shutter has to be bumped up - even way up. I generally keep an ND32 mounted at all times (sunny California), and will change it out as needed. Definitely set your white balance to one of the manual options. I generally just keep mine in "sunny", and color correct in post. When set to auto - white balance changes during a shoot are very noticeable.
 
Lycus Tech Mavic Air 3 Case

DJI Drone Deals

New Threads

Members online

Forum statistics

Threads
131,989
Messages
1,568,415
Members
160,789
Latest member
HermanKrebbers