DJI Mavic, Air and Mini Drones
Friendly, Helpful & Knowledgeable Community
Join Us Now

Am I The Only One Who Knows This???

Thanks for sharing
 
This should work for anyone trying to do a manual 360 pano.
I wrote this years ago for the X-Star. It should work for any drone. This was before auto pano came standard in most drones.
You want photos with Exif information. This can help line up your stitching on your software.
Using the free software ICE is good but not great. I use PanoramaStudio 3 Pro, not free but works as advertised. There are others, google is your friend.
When taking your photos use the grid lines option in camera settings. This helps line up your next shot. Remember you need over lap for best results.
When taking your photos think about a clock, start at 12 oclock and work your way around taking 8 over lapping photos at 0°
Then adjust your camera down to 45° and take another 8 photos in the same spots you did at 0°.
Some DJI drones allow you to point the camera up a fare amount. Do the same with the camera pointing up as high as it will go.
You then have to take two photos looking straight down but opposite each other.
So now you have 26 photos to import into your panorama program of choice.
Using any 360 Pano software (free or paid) stitch the photos together and save it.

You can upload your photo to facebook or to Kuula
 
For everyone interested in how to do this step by step:

1. Get your drone up in the air
2. Fly it to the location you want to take a 360 panorama
3. On DJI App go to the Panorama Mode (it is in the same selection as switching between video, photo, quickshots...)
4. In the submenu that appears, select Sphere (a globe icon)
5. Click the Shutter ('take photo') button in the app, or on the remote. The drone will take many photos, will spin around
6. Very Important: when the progress circle (around the shutter button) reaches 50% the drone stops taking photos, but do not touch the screen or try to move the drone because any stick movements will cancel the photo stitching. Yes, from 50% to 100% it is stitching the photo, if you don't wait that last part, it will not save your panorama
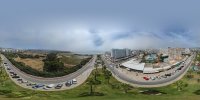
7. Copy the JPEG file to your computer. Beware: the JPEG will look very distorted/strange, but it is normal, as it needs to fit the 360 info into a regular file (refer to JPEG File Example below to see an example)
8. Get on Kuula.co, on the top navigation go to Upload --> Single Image, drag n' drop the JPEG in the window (create account if you don't have one already if it prompts you)
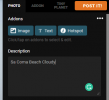
9. Set the name/description in the box on the right (refer Description Screenshot to see an example)
10. Rotate the panorama with your mouse, find a starting position you like (the way it will face when opened), and then click the Current button under the Heading parameters on the right (refer Heading Screenshot)
11. Apply a filter (if you like), my personal favorite is Bloom, additionally you can adjust the intensity of the filter with the slider below
12. You can also mess around with other settings like Sun Flares (Under Sun Effect) and other options
13. Set the privacy option in the same right side menu accordingly: Private - Only your will be a able to access the Panorama, or Public - Everyone will be able to find the Panorama on your account/with the link.
14. If you want for others to be able to identify where the photo has been taken, scroll down to the bottom of the menu, and enable the Make Location Public Option (refer Location Screenshot)
15. Lastly Click the POST IT! button on the top! Then you can copy and paste the link from the URL bar to share it with others.

The controls:
Click and drag the mouse to look around, same as google street view. Use the mouse wheel to zoom in/out.
On mobile devices you can also rotate the device to look around.

Here is an example of a Panorama I made with my DJI Mavic Air 2, uploaded to Kuula, so you can see the page format and quality when you share your photos with someone: Example Panorama (Nus the Sa Corbata, Mallorca)

If you have stitching problems at horizon level, re-calibrating your Drone's IMU on a flat surface might help, however during strong winds, imperfections may still appear, especially with smaller/lighter drones.

Also, to mention: I'm not sure how this process works with drones that use DJI Go app, this is a guide for all drones that use DJI Fly, but I wouldn't be surprised if DJI Go drones had similar menus/features.

Hope this helps to anyone interested in making and publishing your own panoramas.


Image References/Screenshots:
JPEG File Example:
DJI_0848 (Custom).JPG

Description Screenshot:
1652723367631.png

Heading Screenshot:
1652723542404.png

Screenshot Location:
1652723824549.png
 
Last edited:
Because sphere = 360.
Yeah, I get that, but I tried a few of the pano options (and I thought sphere as well) last week and they came out looking like a typical pano , not the 360 or like the image above. I’ll try again, I must not have selected sphere.
 
Yeah, I get that, but I tried a few of the pano options (and I thought sphere as well) last week and they came out looking like a typical pano , not the 360 or like the image above. I’ll try again, I must not have selected sphere.
Did you upload it to a site that hosts 360 photos?
 
I did not because the images never captured all over. I think there were 21 images and I just stitched them using CaptureOne. Looked pretty good, but I’ll try again and pay more attention. I think There were more than just two options if I remember correctly. I read the article you posted as well. Plenty of options it seems
 
No, you're not the only one that knows this. I use the same feature on Air 2 and Air 2S, works great!

I looked up "Kuula.co" it looks interesting and I checked out some of your 360 degree Photospheres and they are Impressive. Did you use this editor to create them? There seems to be a greater degree of zoom on yours than what I am proposing.

But what I am proposing, Photospheres shot from your Drone, can be up and running on Google Earth in under 5-minutes, no editing necessary. This site is probably the perfect solution for folks who want to Photosphere professionally, for example a Realtor…
 
Here is a interesting programme to stitch 360 together pano2vr it's an old program but the best I've used.

Thank you for the heads up on that software, but what I am proposing, Photospheres shot from your Drone, can be up and running on Google Earth in under 5-minutes, no editing necessary.
 
Why not just use Litchi, its built into the program.

First, I would have to buy the Litchi App in order to use it… I already have it in my DJI Fly App, for Free…
 
OK, let's stop the speculation, I am not using some exotic stitching editor, I am using the DJI Fly App. It does all the stitching and I can get the photosphere published up on Goggle Earth, Google Street View in under 5-minutes, really under...

This feature is what I would call the Robert Oppenheimer moment. Like when he spoke to his folks and said, "in front of you is the Device, there is a Red Button on it..." and then he left the room.

This is what DJI did, they have a Pano feature in Quick Shot and said little else...

So, Who pressed the "Red Button"? Not many I guess, especially from the response I've received here and on the other Web Sites I've posted this... But never fear, I am writing up my process and it will be one of those "slap in the forehead moments, it's so simple,

In case you did not guess, I would Press the Red Button...
 
You can still download Microsofts Image Composite Editor (ICE) here:
Its not supported by Mircosoft anymore but it is a free stitching program and works well for being free.
May be worth noting that ICE will also stitch from video.
1. send drone up
2. start recording
3. slowly spin 1 full turn
4. pan camera down 2/3rds of a scene

repeat 3 & 4 until the camera is pointing straight down
land and shove the video into ICE
end up with something like the attached image.

1652771917118.png
 
OK, let's stop the speculation, I am not using some exotic stitching editor, I am using the DJI Fly App. It does all the stitching and I can get the photosphere published up on Goggle Earth, Google Street View in under 5-minutes, really under...
AFAIK Street View is explicitly supposed to be at eye level and not aerial, there are guidelines for submission of street view content. Yours may get removed as inappropriate.

The red button takes a pretty low res image, you can typically do way better by doing your own stitching from originals if you care about the output.
 
AFAIK Street View is explicitly supposed to be at eye level and not aerial, there are guidelines for submission of street view content. Yours may get removed as inappropriate.
I have seen a lot of drone panoramas on Street View, and I post too.
I don't know if some get removed, but mine aren't getting removed.
 
Loud Thunder, I would love to hear more about how I can do this. I am experimenting with creating 3D images with my Mavic Air 2. Please post the steps that you have discovered to make the images. Thank you so much for making us aware of this ability.
 
I did a few with my old Mavic and air. It has been around for quit some time
 
As "mobilehomer" pointed out "In the manual. Page 36, point 7". However it only mentions a "Pano 180".
I am interested in learning the Pano 360 process myself as well.
 
Spherical pano has been a feature of DJI drones like any other for multiple generations now, nothing secret or "unknown" about it. There are regularly questions about manually merging them to do a better job than the app/built-in processing, I've mentioned my method in answer to those several times.
Just not a thing that interests everyone obviously.
Well, I'm interested now!

What menu sequence do I need to use to do this with my Mini-2s?

Thx.
 
Lycus Tech Mavic Air 3 Case

DJI Drone Deals

New Threads

Forum statistics

Threads
131,123
Messages
1,560,066
Members
160,099
Latest member
tflys78