DJI Mavic, Air and Mini Drones
Friendly, Helpful & Knowledgeable Community
Join Us Now

Toddvg

Member
Joined
Jul 9, 2019
Messages
16
Reactions
5
Age
60
Location
East Lansing, Michigan
I am looking for some good old Camera Cheat Sheets for the Mavic 2 PRO.

What would be great, is to find Cheat Sheet for different types of photography. Maybe by time of day or type of shot, I really dont know what the best way to index the cheat sheets. I do know that for us NewBee's or less frequent hobbyist.

I just don't fly enough to remember all the things I did or should do in different situations. Like I am trying to take some Long Exposure photos on sunny days and at night, some have snow some don't. A real good example might be: Taking a long exposure shot at night in the city= what filter should be used, what iso, what shutter speed, front led off, and what ever else you can think of??????? Then a Cheat sheet for that exact same situation but on a sunny day???? Or cloudy day, photo of trees changing colors???

I know there can be 100's if not 1000's of situations, BUT maybe there are cheat sheets that can be changed? And these cheat sheets need to be Mavic 2 Pro.

IF ANYONE HAS IDEAS WHERE I CAN GET SUCH CHEAT SHEETS OR IF ANYONE CAN CREAT THESE I WOUD BE MORE THAN WILLING TO COMPENSATE

We don’t need compensation from friends and cousins......... you ask, we help ??‍♂️???‍♂️
 
There are also a good number of apps for cell phones both Android and IOS. Everything from neutral filter calculations to depth of field, to white balance. They are generic so you will have to know the specs of your camera on the drone to use them but they are are a great tool that takes no room to carry.
 
There are also a good number of apps for cell phones both Android and IOS. Everything from neutral filter calculations to depth of field, to white balance. They are generic so you will have to know the specs of your camera on the drone to use them but they are are a great tool that takes no room to carry.
Could you post a few of these that you use? I am new to all this.
 
A "cheat sheet" will not work - it'd be thousands of pages to cover every situation. Best thing to do is buy a very good book on beginner photography that deals with lighting conditions as it's premise and use that as a start. Just too many variables you have to learn thru trial and error.

Use your ND filters if you got them or buy some very good ones (not cheapo's) - ranging from 8 to 128. That would be about 6-8 filters or some you can adjust to darked to a higher ND range. The ND reduces the light enough to capture "white" water flows and such - even on bright days. If you are using MANUAL settings - ISO 100 is as low as you can get, which is great for bright days, as it slows everything down (works at night too to slow everything down). Add a good 16-128 ND filter and just go up - shoot some pics changing the f/stop (shutter speed) from like 1/60 down to 1-2 seconds. The slower the f/stop the longer the exposure to get more effects - day or night.

Creating outstanding photo's takes time and a lot of effort to do it right. Also takes many shots to get it where YOU want it to be - thus changing f/stops to see the effect. Like flying the drone - taking pics / video's takes a lot of time / practice / effort. It won't happen overnight.
 
  • Like
Reactions: Cirdan
Learn and understand "The Exposure Triangle": Aperture, Shutter Speed and ISO.

That's all the knowledge of photography you need.

The rest is just practice, practice, practice....

... practice.
 
  • Like
Reactions: Cirdan
Could you post a few of these that you use? I am new to all this.
On my Iphone I have evov lightspectrum pro and LUX. That covers exposure settings and white balance.
 
I bought the M2P because it has a great camera. An even greater camera because it came with an (almost) infinitely tall tripod. To make good use of a camera requires study, practice and the ability to see the picture in your mind before you click the shutter. My best mentor always said: "Remember it NOT the camera that takes the picture."
 
I am looking for some good old Camera Cheat Sheets for the Mavic 2 PRO.

What would be great, is to find Cheat Sheet for different types of photography. Maybe by time of day or type of shot, I really dont know what the best way to index the cheat sheets. I do know that for us NewBee's or less frequent hobbyist.

I just don't fly enough to remember all the things I did or should do in different situations. Like I am trying to take some Long Exposure photos on sunny days and at night, some have snow some don't. A real good example might be: Taking a long exposure shot at night in the city= what filter should be used, what iso, what shutter speed, front led off, and what ever else you can think of??????? Then a Cheat sheet for that exact same situation but on a sunny day???? Or cloudy day, photo of trees changing colors???

I know there can be 100's if not 1000's of situations, BUT maybe there are cheat sheets that can be changed? And these cheat sheets need to be Mavic 2 Pro.

IF ANYONE HAS IDEAS WHERE I CAN GET SUCH CHEAT SHEETS OR IF ANYONE CAN CREAT THESE I WOUD BE MORE THAN WILLING TO COMPENSATE
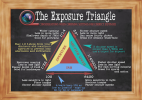
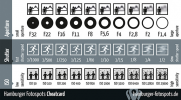
1615734620587.png
1615734638151.png
 
I think the advice above on learning the exposure triangle is great advice. In the end, it's just going to take some basic knowledge along with practice and experimentation trying different things out.

It helps to understand the camera modes - read the manual.

I'll throw out a couple of general rules of thumb (RoT) I use to get you started. At the end of the day, a lot of this comes down to personal preferences and there are many ways to skin the cat.

I always shoot in full manual for video:

White Balance: Set, not auto. I personally use cloudy for everything.
ISO = As low as possible, but probably a max 800 (maybe a little lower) on M2P
Shutter: Double the frame rate; 24fps = 1/50th, 30fps = 1/60th, etc
ND Filter: Depends on the conditions

Aperture: Adjust for exposure (<=5.6 optimum IMHO on my M2P)

With the exception of aperture, the above are essentially constants for me. If needed, I'll tweak the ISO to fix exposure a little more airborne, but typically better to just land and change ND filters if you're making big changes.

ND filters. Frankly, I haven't needed anything above a 16 on ND filters. But I haven't been shooting in places with snow covered ground on a sunny day. I do shoot a lot of stuff on and near the water. ND 16 has been fine and I controlled the exposure via aperture with no problem. Basically I use the ND filters keep the aperture below f5.6. You could dig another hole to China on optimum aperture setting for each camera. I purchased Polar Pro's set of 6 ND filters with 4,8,16 and polarized versions of 4,8,16. I haven't touched the polarized versions and thought I may want them for the water shooting.

I probably shoot with the 16 90% of the time.

Make sure your histogram is displayed and launch your drone and frame your area. How's the histogram look? You are trying to avoid blown out whites and blacked out blacks. Make sure the curve fits on the histogram and isn't pushed against one side or the the other. That equates to "missing data" that can't be recovered in post.

Adjust aperture and/or ISO to adjust the exposure.

You are not looking for the best looking shot in the capture. You can adjust colors, white balance, exposure, etc. in post as long as you didn't lose data in shadows or blown out whites.

What about photo's?

Basically the same and shutter speed is based on the conditions and what you are shooting.

Sometimes I might shoot in aperture or shutter priority mode to make it a little easier for me. But, generally I want full control of the exposure and shoot full manual.

This is merely a simplified RoT to get you started. I am sure folks will disagree with the above. This isn't the "right" way, just a starting point to deviate from. As you progress, you will come up with your own likes/dislikes and ways to setup the camera.

Cheers.
 
  • Like
Reactions: Cirdan and GKomar
Heed gave great advice above, great post!

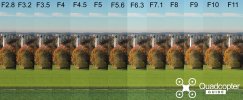
Aperture sharpness tests.jpgJust a couple of thoughts. Based on the attached sharpness test, which was posted sometime in October 2019 the Mavic 2 Pro sharpest setting is at f4.0. I don't know who posted it, but I'm grateful that he(?) did, as my tests on the subject were not at useful has his(?). This is counter-intuitive to a Nikon sort of guy that I am, that the sharpest aperture should be about midway on the range of setting.

Another point is in Camera / Settings (gear icon) turn on the "overexposure" setting. This will display black and white diagonal stripes on areas on the photo that too bright to show any detail. I use this all the time to manually adjust my exposure. If you have a feature less white object, it should have these stripes in the display. Darken the exposure until the stripes appropriately go away.

The third (of a couple) thing I do almost always in the Camera // Photo settings choose AEB, "automatic exposure bracketing" that will make 3 or 5 exposures lighter and darker than what you manually set for the exposure. Can't miss that way. If you use photoshop, you'll find there is a great amount of image in the darker areas than you'd expect, so slightly under exposing, can allow you a great deal of latitude when post-processing.

Happy shooting to you, and to all!
 
Lycus Tech Mavic Air 3 Case

DJI Drone Deals

New Threads

Members online

Forum statistics

Threads
130,599
Messages
1,554,244
Members
159,603
Latest member
refrigasketscanada