


I'm experimenting with the D-Log M format in the new Mini 4 Pro. I'm pretty new to log formats. I have tried a couple of different techniques in Davinci Resolve Studio.
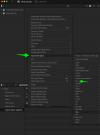
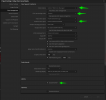
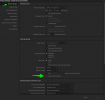
The first was to apply the D-Log M to REC.709 LUT from DJI's site. The second was to use a color space transform as shown in the Casey Faris video below. Using each of these techniques, and after doing some further adjustments with the color wheels and window functions, I was able to get a result I was happy enough with. I felt like the D-Log M format allowed me to recover quite a bit of detail that was underexposed from the Mini 4's auto exposure choosing to expose for the sky, compared to the normal 8-bit format.
But my question is: would either of these techniques (LUT vs. color space transform) be the preferred workflow for D-Log M? I'm not even really sure the DJI D-Gamut and DJI D-Log choices in the CST input drop-downs are intended for D-Log M, since it isn't a true log format.
Any thoughts?


")


