DJI Mavic, Air and Mini Drones
Friendly, Helpful & Knowledgeable Community
Join Us Now

How to swap engine/motor on rear arms?

Joined
Jan 15, 2024
Messages
8
Reactions
4
Age
32
Location
Cincinnati, OH
I was swapping motherboards between two of my Mini 3 Pros, and noticed that one of the 4x arm antenna connectors was damaged and would not reattach to the new motherboard. I cut it off thinking I could re-solder an undamaged connector on it, but the wire was far too intricate and delicate to be soldered. My costly mistake. So now, I need to replace the entire arm or wiring harness.

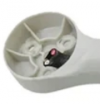
I ordered this part below, but noticed it doesn't include the motor/engine. Can I take my existing (functional) propellor engine and put it onto this part? Is the engine/motor glued in? I tried to wedge it out but couldn't do it easily, so wanted to check with others before I try and force it out.
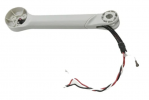
1705331843567.png
 
the new arm comes complete with a motor attached you just need to solder the wires to the correct connections and of course also attach the antenna wire to the motherboard
 
  • Like
Reactions: Cafguy
Screws- CAREFULL removing the caps
EDIT: theres a reason they sell them with the motors pre-attached you will most likely trash the arms getting the screw cover off.
 
Last edited:
3 screws in the base of the motor, behind a plastic cap (as @Cafguy mentions).

You can see the screw holes in the picture you provided:

1705335386942.png
 
  • Like
Reactions: Yorkshire_Pud
Should I just forget this one and order a new arm with the motor included instead?
The motors are easy to get without the arms, Its a bit of a pain to thread everything through But if you have spent the money on those I say use them! Its just a little more work. I would do it rather than slap down the money for more arms. my opinion.
 
The motors are easy to get without the arms, Its a bit of a pain to thread everything through But if you have spent the money on those I say use them! Its just a little more work. I would do it rather than slap down the money for more arms. my opinion.
Thanks, me too. So heat gun the cap and then pry it off? I couldn't find youtube videos of anyone doing something similar.
 
Should I just forget this one and order a new arm with the motor included instead?
I would get an arm and motor.
The following assumes the pivot works in the same way as the FRONT pivot of the mini 1 & 2 and Mavic 2 etc..

When you are ready to re-insert the actual spring pivot into the drone's air frame I would suggest you grip the base plate of the pivot with a pair of pliers then slip the spare arm over the pivot and slowly rotate the arm until you find the tipping point between the pivots desire to spring to the flying position and its desire to spring to the storage position. Carefully remove the arm from tha pivot so that you do not disturb the pivot then, and with the arm correctly aligned in the drone, I think you will find the pivot more or less drops into the done/arm combination.
 
Last edited:
I would get an arm and motor.
The following assumes the pivot works in the same way as the FRONT pivot of the mini 1 & 2 and Mavic 2 etc..

When you are ready to re-insert the actual spring pivot into the drone's air frame I would suggest you grip the base plate of the pivot with a pair of pliers then slip the spare arm over the pivot and slowly rotate the arm until you find the tipping point between the pivots desire to spring to the flying position and its desire to spring to the storage position. Carefully remove the arm from tha pivot so that you do not disturb the pivot then, and with the arm correctly aligned in the drone, I think you will find the pivot more or less drops into the done/arm combination.
I'm having a hard time visualizing what you're saying. It seems that the spring pivot only fits in a certain way, I figured as long as it's flush and installed so that the screws align, it should be sufficient. No?
 
I'm having a hard time visualizing what you're saying. It seems that the spring pivot only fits in a certain way, I figured as long as it's flush and installed so that the screws align, it should be sufficient. No?
Watch this
from 2:07 to 4:21
It is the idea of twisting the pivot to the tipping point that I am trying to get across, it makes refitting the pivot easier.
If the pivot is in the fully open or closed position you may have a fight on your hands.
When it is at the tipping point it does not fight you.
I am not in favour of gripping the silver bit of the pivot with wire strippers, henc my suggestiuon of using the spare arm.
Nor am I in favour of using needle point or circlip pliers to twist/grip the base, hence my suggestion of pliers (ordinary) to grip the base.

The mini 3 pro's pivots are of a similar desgin.
Ah, understood. Appreciate that, thank you!
 
  • Like
Reactions: Yorkshire_Pud
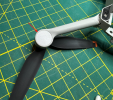
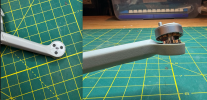
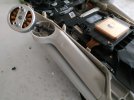
Update: I got it off. It was not that hard. The three screws were very hard to fully remove. I heated them up but the screw heads are all partially stripped and wouldn't be good candidates for reuse. The red/white/black wires are soldered or molded into the motor at several locations. Still not a super easy swap.

Screen2024-01-15_22-18-27.png
 
If you are fitting an arm with a motor attached all you need worry about is the de-soldering and soldering at the ESC board and that is most likely quite easy.
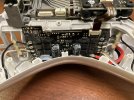
One suggestion, photograph the layout of the connections BEFORE you disconnect the 'old' wiring from the ESC board and make sure the photo shows where the wire go, I believe it is possible to reverse the direction of rotation of the motor is you get the connections the wrong way around.
 
the photo
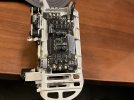
The best option. The boards should be indicated in some fashion. The motor wires will be white, black and gray with a corresponding indicator at each location. The other purpose for a photo will be location of where all the wires are routed to fit in all those tiny little spaces. Here‘s a picture of a old Phantom esc board that shows how DJI labeled the locations. What you’re working on should be similar.IMG_4863.jpeg
 
The best option. The boards should be indicated in some fashion. The motor wires will be white, black and gray with a corresponding indicator at each location. The other purpose for a photo will be location of where all the wires are routed to fit in all those tiny little spaces. Here‘s a picture of a old Phantom esc board that shows how DJI labeled the locations. What you’re working on should be similar.View attachment 171921
Agreed but I recollect it was pretty difficult to spot the markings on the ESC board of either the M2Z I repaired or the mini 2 I rebuilt.
Good point about the routing but I think routings would require their own photos lol.
 
Possibly a better picture. Again, old P4 Phantom. I’ve not torn down any of the “mini” products, so they could be different from the other DJI products I’ve opened.
IMG_4864.jpeg
 
  • Like
Reactions: Yorkshire_Pud
Update: I got it off. It was not that hard. The three screws were very hard to fully remove. I heated them up but the screw heads are all partially stripped and wouldn't be good candidates for reuse. The red/white/black wires are soldered or molded into the motor at several locations. Still not a super easy swap.

View attachment 171920
I have similar problem. Both of my rear motors are damaged and I need to replace them. I did the same thing like on the pictures, but I closed arm to have more wire available and pulled the wire. It wasn't easy, I felt resistance, and I don't know if I didn't damaged antenna or it's wire, because it could be glued together etc. Do anyone know how it looks inside? It's glued together etc.?


IMG_20240307_085942.jpg
 
Lycus Tech Mavic Air 3 Case

DJI Drone Deals

New Threads

Forum statistics

Threads
131,132
Messages
1,560,143
Members
160,104
Latest member
Roger-N