DJI Mavic, Air and Mini Drones
Friendly, Helpful & Knowledgeable Community
Join Us Now

Mavis Air 2S Camera Question

bmoore1118

Well-Known Member
Joined
Apr 1, 2019
Messages
148
Reactions
35
I have had the air 2s for a few months and love it.

I am coming from mirrorless cmos canon cameras at 20mp.

I know this camera is not a comparison to a variable aperture DSLR but i do have some questions.

I have noticed that many of my photos have blurry edges not horrible but noticeable from the middle of the frame. This drone does have autofocus?

I think my grip might be with the fixed f2.8. Has anyone went to pro photo lab and tried to print any of these? What size is best?

If you are looking at this drone for mostly video dont look anywhere else. I just shot this a few weeks ago in CA and edited it in Adobe rush (amazing $10 a month for a simple video editor)

 
For your photo question how do you have it set up in the App? 16:9 or 4:3?
I know very little about camera settings but I remember someone saying using 4:3 the camera uses the whole sensor. Perhaps that will fix the soft, blurry edges.
 
  • Like
Reactions: bmoore1118
For your photo question how do you have it set up in the App? 16:9 or 4:3?
I know very little about camera settings but I remember someone saying using 4:3 the camera uses the whole sensor. Perhaps that will fix the soft, blurry edges.
I have it at 4:3
 
  • Like
Reactions: Jagerbomb52
I have had the air 2s for a few months and love it.

I am coming from mirrorless cmos canon cameras at 20mp.

I know this camera is not a comparison to a variable aperture DSLR but i do have some questions.

I have noticed that many of my photos have blurry edges not horrible but noticeable from the middle of the frame. This drone does have autofocus?

I think my grip might be with the fixed f2.8. Has anyone went to pro photo lab and tried to print any of these? What size is best?

If you are looking at this drone for mostly video dont look anywhere else. I just shot this a few weeks ago in CA and edited it in Adobe rush (amazing $10 a month for a simple video editor)

I have a few Canon cameras myself, and my A2S does not hold up to those, and you can't expect it to, mainly because of the large lenses on dedicated cameras.

That said, I have done some big prints from my A2S and even sold a few. If you pixel peep, yes they are not tack-sharp in the edges, but you should select your subject accordingly. Architectural shots, for example, people tend to want razor sharp.

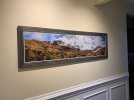
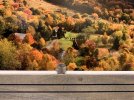
Be sure to try out AEB (auto exposure bracketing). Save the RAWs and merge them in post (Lightroom or whatever). Also, I recommend making panoramas. I personally don't use the "pano" function on the drone because I like the control in post processing. Just take 5 AEB shots, pan one direction, take 5 more, etc. Attached is a picture of a very large pano print from last fall (this is 72" X 18"). Obviously this is a picture of a picture so you won't see the detail. but you can get an idea of what is possible. I get a lot of compliments on this one and have sold a couple to local folks. The 2nd pic is a close-up with a US quarter for scale and to see detail.

IMG_2320.JPGIMG_2321.JPG
 
I have a few Canon cameras myself, and my A2S does not hold up to those, and you can't expect it to, mainly because of the large lenses on dedicated cameras.

That said, I have done some big prints from my A2S and even sold a few. If you pixel peep, yes they are not tack-sharp in the edges, but you should select your subject accordingly. Architectural shots, for example, people tend to want razor sharp.

Be sure to try out AEB (auto exposure bracketing). Save the RAWs and merge them in post (Lightroom or whatever). Also, I recommend making panoramas. I personally don't use the "pano" function on the drone because I like the control in post processing. Just take 5 AEB shots, pan one direction, take 5 more, etc. Attached is a picture of a very large pano print from last fall (this is 72" X 18"). Obviously this is a picture of a picture so you won't see the detail. but you can get an idea of what is possible. I get a lot of compliments on this one and have sold a couple to local folks. The 2nd pic is a close-up with a US quarter for scale and to see detail.

View attachment 134263View attachment 134264
I'm assuming you sent this panorama to an online printing company? If my assumption is correct, do you have a recommendation for printing oversized photographs?
 
I have a few Canon cameras myself, and my A2S does not hold up to those, and you can't expect it to, mainly because of the large lenses on dedicated cameras.

That said, I have done some big prints from my A2S and even sold a few. If you pixel peep, yes they are not tack-sharp in the edges, but you should select your subject accordingly. Architectural shots, for example, people tend to want razor sharp.

Be sure to try out AEB (auto exposure bracketing). Save the RAWs and merge them in post (Lightroom or whatever). Also, I recommend making panoramas. I personally don't use the "pano" function on the drone because I like the control in post processing. Just take 5 AEB shots, pan one direction, take 5 more, etc. Attached is a picture of a very large pano print from last fall (this is 72" X 18"). Obviously this is a picture of a picture so you won't see the detail. but you can get an idea of what is possible. I get a lot of compliments on this one and have sold a couple to local folks. The 2nd pic is a close-up with a US quarter for scale and to see detail.

View attachment 134263View attachment 134264
What drone was that photo taken with?

Do you have any examples of printed air 2s photos?
 
I'm assuming you sent this panorama to an online printing company? If my assumption is correct, do you have a recommendation for printing oversized photographs?
Actually no. I do a lot of printing and currently use an Epson P800:

 
What drone was that photo taken with?

Do you have any examples of printed air 2s photos?

That pano was taken with Air 2 S

OOPS: Edit... that pano was taken with the Air 2. I have since sold the Air 2 and have the Air 2 S so I got a little confused. But the Air 2 S gives even better still photo results from my experience.
 
Last edited:
I have had the air 2s for a few months and love it.

I am coming from mirrorless cmos canon cameras at 20mp.

I know this camera is not a comparison to a variable aperture DSLR but i do have some questions.

I have noticed that many of my photos have blurry edges not horrible but noticeable from the middle of the frame. This drone does have autofocus?

I think my grip might be with the fixed f2.8. Has anyone went to pro photo lab and tried to print any of these? What size is best?
A few questions:

Are you shooting in Manual mode for photos and video or auto?
What shutter speed are you using for your photos?
Are you using the AEB (bracketing) for your photos?
" " " the d-cinelike color profile?
" " " Adobe Lightroom for editing your photos?
Did you previously shoot a lot of video with your Canon Mirrorless or mostly a still photographer?

Your photos look contrasty and over-saturated. Crushed blacks, blown highlights.

What's apparent from your video starting at 00:09 is... if you're shooting video at 24 or 30fps, the shutter speed is not set properly to 1/50 or 1/60 respectively. That's why your video looks jittery, particularly noticeable when you added the speed ramping. Get some variable ND filters and set your frame rate and shutter speed properly for natural motion. ND filters are critical when shooting video with a fixed aperture camera, but of course I need them on my M2P as well (with aperture control). When you've set it properly, you'll notice the bottom of the frame will have a natural motion blur, not a jittery fast shutter video look.

You were smart to mostly fly straight and use POI's in the beginning, but I was waiting for the inevitable, where you start to use the gimbal at 1:30. No control. You need to go into the advanced settings and greatly reduce your yaw speed and gimbal pitch speed and smoothness for both. Reduce yaw speed to the lowest to start out. I've found no need to turn fast and even at low yaw speed, it requires a very light touch to achieve a gentle turn. The gimbal speed should be pretty slow as well for the MA2, smoothness is dependent on your ability to do manage 3-input control for complicated combination cinematic moves.

Spotlight and POI provides some of the best and easiest moves with visual parallax and allows you to control elevation changes, pull away and boomerang type shots while maintaining your focal point.

The gimbal is your key to dramatic shots with less effort, but you'll need to manage multiple inputs. Your opening shot traveling low over the water starts out good, but as you descend, you need to tilt gimbal up maintaining the axis from the center point of rotation. Same applies to the gimbal tilt down... progressively slow your forward/backward speed and increase elevation as you tilt gimbal down over a feature, both of which help to maintain the axial relationship. You'll need to slow your forward movement to a crawl as you come over your feature or you'll pass over it while it's still in motion blur. Then descend as you tilt gimbal back up to continue your travel. You can do this a couple/few times in a long segment over a rocky shoreline or mountain ridge, but don't overdo the move.

My last point is that you really have to decide before launching whether you're shooting photos or video. Realistically, you can't have it both ways. 1/50 shutter speed is not good for shooting still images from a flying object that's unstable even with a gimbal. Just like DSLR/Mirrorless photography, slower shutter speeds will result in unsharp images even on a tripod. If your intention is to shoot photos, use a polarizing filter or clear and shoot the lowest ISO, fastest shutter speed you can using AEB so you have 3-5 images from which to choose or mask for the final image.
Wow. That’s brilliant ??
 
A few questions:

Are you shooting in Manual mode for photos and video or auto?
What shutter speed are you using for your photos?
Are you using the AEB (bracketing) for your photos?
" " " the d-cinelike color profile?
" " " Adobe Lightroom for editing your photos?
Did you previously shoot a lot of video with your Canon Mirrorless or mostly a still photographer?

Your photos look contrasty and over-saturated. Crushed blacks, blown highlights.

What's apparent from your video starting at 00:09 is... if you're shooting video at 24 or 30fps, the shutter speed is not set properly to 1/50 or 1/60 respectively. That's why your video looks jittery, particularly noticeable when you added the speed ramping. Get some variable ND filters and set your frame rate and shutter speed properly for natural motion. ND filters are critical when shooting video with a fixed aperture camera, but of course I need them on my M2P as well (with aperture control). When you've set it properly, you'll notice the bottom of the frame will have a natural motion blur, not a jittery fast shutter video look.

You were smart to mostly fly straight and use POI's in the beginning, but I was waiting for the inevitable, where you start to use the gimbal at 1:30. No control. You need to go into the advanced settings and greatly reduce your yaw speed and gimbal pitch speed and smoothness for both. Reduce yaw speed to the lowest to start out. I've found no need to turn fast and even at low yaw speed, it requires a very light touch to achieve a gentle turn. The gimbal speed should be pretty slow as well for the MA2, smoothness is dependent on your ability to do manage 3-input control for complicated combination cinematic moves.

Spotlight and POI provides some of the best and easiest moves with visual parallax and allows you to control elevation changes, pull away and boomerang type shots while maintaining your focal point.

The gimbal is your key to dramatic shots with less effort, but you'll need to manage multiple inputs. Your opening shot traveling low over the water starts out good, but as you descend, you need to tilt gimbal up maintaining the axis from the center point of rotation. Same applies to the gimbal tilt down... progressively slow your forward/backward speed and increase elevation as you tilt gimbal down over a feature, both of which help to maintain the axial relationship. You'll need to slow your forward movement to a crawl as you come over your feature or you'll pass over it while it's still in motion blur. Then descend as you tilt gimbal back up to continue your travel. You can do this a couple/few times in a long segment over a rocky shoreline or mountain ridge, but don't overdo the move.

My last point is that you really have to decide before launching whether you're shooting photos or video. Realistically, you can't have it both ways. 1/50 shutter speed is not good for shooting still images from a flying object that's unstable even with a gimbal. Just like DSLR/Mirrorless photography, slower shutter speeds will result in unsharp images even on a tripod. If your intention is to shoot photos, use a polarizing filter or clear and shoot the lowest ISO, fastest shutter speed you can using AEB so you have 3-5 images from which to choose or mask for the final image.
That is a brilliant response!
 
My last point is that you really have to decide before launching whether you're shooting photos or video. Realistically, you can't have it both ways. 1/50 shutter speed is not good for shooting still images from a flying object that's unstable even with a gimbal. Just like DSLR/Mirrorless photography, slower shutter speeds will result in unsharp images even on a tripod. If your intention is to shoot photos, use a polarizing filter or clear and shoot the lowest ISO, fastest shutter speed you can using AEB so you have 3-5 images from which to choose or mask for the final image.

This point just needs some clarity IMO.

Regarding still images from a traditional camera, slow shutter speeds do not result in un-sharp images from a tripod. That is the most common reason one would be using a tripod in the first place. You can easily take extremely long exposures from a tripod including multi-minute exposures with no loss in sharpness. Even without a tripod, modern lens-based image stabilization is so good that it is not difficult to take sharp handheld shots down to 1/5sec or so depending on the focal length of the lens. It very much depends on your equipment, subject distance, and the focal length of the lens.

Regarding shutter speed, DJI drones are actually more than capable of shooting much slower than 1/50sec as long as you aren't in crazy winds or some other unusual scenario. Here is a photo I took at 1/13sec on my M2P (would be the same on an A2S):

i-wLR9Rtn-XL.jpg


--------------------------
Regarding polarizers, they are actually extremely difficult to use effectively on drones due to how the degree of polarization changes the moment the drone moves. Whether it's for a traditional camera or a drone, you absolutely do not want to be using one all the time. The first reason you don't want to use one unless you have to is that they will cut around 1 full stop of light, meaning you will be using half the shutter speed or double the ISO, all else equal, to get the same exposure compared to the bare lens

If the filter is going on a drone rather than a normal camera, there is little value in an adjustable/rotating one because chances are you want maximum polarization if you are bothering to use a polarizing filter in the first place. Basically, rotating it toggles the angle relative to the sun that receives maximum polarization, but it cannot magically produce a polarized effect at any angle - think of it more as changing the strength of polarization at any given orientation to the sun. Rotating it would also allow you to reduce the amount of polarization while flying in the direction of maximum polarization (90 degrees to the sun), but that would be something you would have to set on the ground anyway and there are far fewer scenarios where you only want a partial polarization.

Whether you have a filter capable of rotating or not, for videos, you are bound to a single direction of flight if you don't want your footage to change mid-flight. At 180 degrees and 0 degrees to the sun there is no polarization. Maximum polarization is always at 90 degrees to the sun. If the sun is directly above you at high noon in an area near equator, you can get pretty broad polarization because most horizontal orientations will be roughly 90 degrees to the sun. If the sun is lower in the sky, there is a much tighter and less useful range that you will be able to achieve good polarization (basically straight up or straight down).

So let's say you were in Hawaii and wanted to get a nice shot over a coal reef, a polarizer would be great for that but you would just have to very carefully plan the flight. If you wanted to fly or take a photo in a different direction, you would need to bring the drone all the way back 'home' to adjust or remove the filter which is extremely tedious.

It's a good tool to have in the tool box, it just requires careful planning to get the most out of it and it's definitely not something you want to just leave on and forget about like you can do with a standard ND filter. Most filter companies do a very poor job of explaining this to people and simply choose to market their PL filters as "vivid" or whatever, giving the customer the impression that they can just use them for any scenario and get better colors, which is far too simple and not at all the case. Graduated ND filters are equally as annoying to use on drones for similar reasons.
 
Regarding shutter speed, DJI drones are actually more than capable of shooting much slower than 1/50sec as long as you aren't in crazy winds or some other unusual scenario. Here is a photo I took at 1/13sec on my M2P (would be the same on an A2S):

i-wLR9Rtn-XL.jpg
I am not one of those folks that praise everyone's shots, so trust me when I say that is a beautiful shot. Did you manually set the shutter speed? Other details?

Thanks,
Robert
 
Lycus Tech Mavic Air 3 Case

DJI Drone Deals

New Threads

Members online

Forum statistics

Threads
131,112
Messages
1,559,936
Members
160,088
Latest member
robqwe