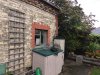
The normal "Super Resolution" image is a 8000 x 6000 .jpg file ("original" - below) but by choosing the option to simultaneously save the RAW .dng images you have more control.
Mavic 2 Zoom saves 10 RAW images in the "PANORAMA" sub folder. The first is a reference image of the chosen scene and the remaining 9 are the basis of the montage.
In my, case each RAW image was about 24MB (3992 x 2242) and after "tweaking" the RAW images I saved them in Photoshop as individual .TIF files, each now about 70MB.
Using Photoshop - File / Automate / Photomerge - I blended the images. The resulting file is huge (3.8GB) if you keep the layers but a more manageable 639MB if flattened, in my view more sensible as you still have the original images.
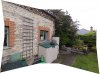
The blended panorama contains the full extents of all of the images ("Stitched" - below) and is 12173 x 8961 16bit .tif
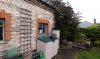
Crop the centre part of the image and you now have an excellent 16bit 11177 x 6508 file ready for printing ("Final Cropped" - below).
The images shown are reduced in quality to 500px wide for speed of loading but they give some idea what to expect.
Mavic 2 Zoom saves 10 RAW images in the "PANORAMA" sub folder. The first is a reference image of the chosen scene and the remaining 9 are the basis of the montage.
In my, case each RAW image was about 24MB (3992 x 2242) and after "tweaking" the RAW images I saved them in Photoshop as individual .TIF files, each now about 70MB.
Using Photoshop - File / Automate / Photomerge - I blended the images. The resulting file is huge (3.8GB) if you keep the layers but a more manageable 639MB if flattened, in my view more sensible as you still have the original images.
The blended panorama contains the full extents of all of the images ("Stitched" - below) and is 12173 x 8961 16bit .tif
Crop the centre part of the image and you now have an excellent 16bit 11177 x 6508 file ready for printing ("Final Cropped" - below).
The images shown are reduced in quality to 500px wide for speed of loading but they give some idea what to expect.
")