DJI Mavic, Air and Mini Drones
Friendly, Helpful & Knowledgeable Community
Join Us Now

Two flights in and the stillpicture quality is outstanding allowing details and colours to be brought out in post processing.

GeraldV

Well-Known Member
Joined
May 12, 2018
Messages
89
Reactions
66
Age
51
Location
Portugal
Seeing many posts about picture quality of the m2p so thoight would share my findings.

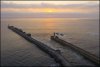
Out of the box the images can be soft but dont be fooled, the raw images allow for some superb colour and contrast stretching. You have a lot of control over the camera and need to ensure your settings are correct for the image. The inages out of the drone need post processing to realise their full potential.IMG_20181003_105336_255.jpegIMG_20181002_230044_476.jpegIMG_20180929_233329_723.jpegIMG_20180929_234218_778.jpeg
 

Attachments

  • IMG_20180929_233329_723.jpeg
    IMG_20180929_233329_723.jpeg
    71.5 KB · Views: 7
Hi Gerald, wonderful pics, especially the first one. Would you be kind enough to list the steps you went thru for enhancement
from the raw pic to the end product. What the original settings were, program used for processing, Thank you
 
Hi Gerald, wonderful pics, especially the first one. Would you be kind enough to list the steps you went thru for enhancement
from the raw pic to the end product. What the original settings were, program used for processing, Thank you

I use lightroom for the edits. Original was shot using these settings:

ISO: 100
F-Stop: 4.5
Shutter Speed: 1/500
Exposure Basis: -0.7 (I prefer to shoot darker to have more options with post processing, else highlights are blown. Always try to be at least -0.3 under exposed)


My workflow in lightroom goes like this:

1. Straighten the image if needed and then do a crop
2. Change the exposure
3. Change the white balance
4. Check exposure and adjust as required
5. Contrast
6. Change white and black clipping to get the right look
7. Play with colours such as overall luminance / vibrance
8. Check contrast / exposure again and apply any detail / dehaze effect
9. Start applying colour shifts (in this case adjusting blue and purple to bring out the sky)
10 Highlights
11. Final contract / exposure / saturation check

You can see all the steps in the workflow history attached. (Sorry for quality but remote accessed pc at home to get it).

It may sound a lot, but it took around 5 minutes to complete.

Hope this helps. If you have any more questions I'll be happy to help.
 

Attachments

  • workflow.JPG
    workflow.JPG
    39.1 KB · Views: 8
Lycus Tech Mavic Air 3 Case

DJI Drone Deals

New Threads

Forum statistics

Threads
131,382
Messages
1,562,615
Members
160,312
Latest member
Cryhav0c