Thanks CG.
Buy multi row panos I mean rather than a single row of shots from left to right that are stitched, we actually shoot several rows. Similar to what a camera does when it’s on an auto 360 x 1 80, but just a portion of that.
You look at the area that you want to shoot and I usually do a test swivel of the drone from left to right to see how much I’ll need to pan or how many shots I’ll need to pan to get the area that I want, with a 30 to 50% overlap on each shot.
Since I live in a big city, and I shoot a lot of skylines with buildings, I want to make sure that there is not a huge amount of distortion, so I will make sure that one of my rows is dead level.
A simple one row pano is start at the left, giving yourself some generous space on the end from where you intend to end the shot because you’ll end up cropping, shoot a frame, see where the centerpoint is (always use the grid , diagonal and center point guides) , then rotate to the right until whatever landmark in the photo quotes, such as a building, or a tree, or some other detail) center point reaches the edge of the frame, shoot another frame.
See what the center point is, rotate to the right, till that point reaches the edge of the frame, shoot a frame, then do it again. Now you have three frames for a pano.
For two rows, I’ll shoot the first frame paying attention to where my horizon line is and tip the camera down until the Horizon
reaches the upper 1/3 line and shoot, use your C-1 or C-2 button to recenter the gimbal, rotate until your centerpoint, hits the edge of the frame. Shoot a frame, tip the gimbal down a third shoot, re-center, rotate, and do it again.
Now you have 2 rows, 3 frames across with generous overlap so that Lightroom or Photoshop or whatever you use for stitching I have an easy time matching up details in the frame for a seamless stitch.
Takes longer to describe it than it does to shoot it. I’ve gotten very fast. And it’s much faster than hitting the auto nine frame three roll panel and waiting for it to stitch a subpar JPEG image in Camera because I’m shooting raw.
And you can continue this as much as you want you can do two, three, four, five, eight… Frames across and news two or three rows. But the farther you go from side to side if you go more than approximately 120° field of you start getting a little bit of a fisheye effect where the center is closer to you than the ends And the landscape starts to bend.
If you’re shooting rural landscapes, sometimes you can’t even tell, but the cityscapes you definitely will. But the most important thing in the city skyline is to make sure that you have at least one row t
View attachment 161861hat’s completely level to anchor all those buildings without parallax distortion.
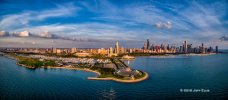
This one is prob 3 rows, maybe 4 frames accross. I’ll have to look at my original frames to be sure, but often on a scene like this my top row is level. Then I do two rows tipping down only. I See no point into tipping up and seeing an empty sky.
The advantage to doing it this way is twofold. First being, you can get closer to your foreground subjects and see more detail looking down into the area that’s near you and the second of course is that you end up with much greater resolution and detail in the scene then you would if you had to back off and shoot a single frame, that would encompass the whole area.
In my film days I had a 6 x 17 cm panoramic camera. My eye naturally looks at scenes in this format and I’m very comfortable with it.
View attachment 161861
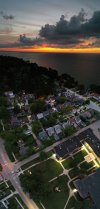
Here’s one or I didn’t worry about keeping the buildings level. This is probably at least six frames across. It might be even seven. And the full resolution is huge. I could probably print this five or 6 feet wide. I don’t think it’s quite 180° field of you but it’s pretty close.
View attachment 161862


