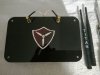
Here is the completed mod. Sweet. One power unit two different types of antennas.
Parts:
2 90degree RA sma reverse polarity connectors
1ft lms 100 low loss microwave cable
2 sma reverse polarity bulkhead BH
Two sided tape
Tools:
T10 torx driver
Spudger
Scissors
1/4 inch plastic drill bit or modify twist bit via YouTube video to drill two front plate holes.
1/8 carbide bit to mill slot for circular antennas wires to go external.
Solder station if assembling cables yourself.
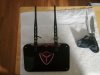
Disassemble front plate with the 4 T10 screws. Remove front plate with spudger as it is secured with light two sided tape.
Use spudger to pry both amps loose from two sided tape.
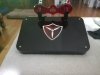
Remove the circular antennas leads from amps.
Remove circular antennas from front face with spudger.
Scribe inside of front plate at vertical center.
Scribe inside top of front plate horizontally at 1/2 inch from edge.
Remove t connector bracket from rc and separate the plate from plastic block via 2 Phillips head screws.
Mark center line on metal bracket.
Use bracket centered on inside of front plate to scribe the two hole locations centered over horizontal scribe line on inside of front plate.
I can not stress this enough. Your holes need to be exact for the antenna spacer to fit correctly. Take your time and go very slow drill rpm. If you choose to modify a bit and you are not educated in drill bits, use the 1/4 inch plastic bit. Use twist bit at your own risk. I used a modified twist bit from the inside 50 percent and then finished the hole from the front of plate. Worked well.
Next, you will need to drill a 1/8 inch hole in the top of the antenna body. You will see it is constructed of 1/4 inch thick rings. Drill the ring closest to front face centered on ring.
Next, use the carbide bit to open the hole into a u slot towards the front face side.
At this point, assemble cables or purchase cables already assembled. Showmecables.com
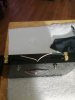
Install sma bulkheads into front plate and tighten slightly.
Install the 90 degree end to the amps.
Push amps down firmly to reset two sided tape.
Route wires for clearance. I chose to have the left amp connect to the right bulkhead and ran cables across inside top of controller.
Reinstall circular polarized antennas on inside of front plate.
Route circular antennas connector to outside of antenna box via slot.
Reinstall front plate.
Install two small vecro tabs to secure inner antenna connectors while using whips.
Wipe massive amount of fingerprints from unit and GO FLY!
View attachment 22014 View attachment 22015 View attachment 22016 View attachment 22017 View attachment 22014 View attachment 22015 View attachment 22016 View attachment 22017