DJI Mavic, Air and Mini Drones
Friendly, Helpful & Knowledgeable Community
Join Us Now

Da vinci resolve and cleaning up an area (path)

RonanCork

Well-Known Member
Joined
Jan 22, 2019
Messages
327
Reactions
250
Age
46
Location
Cork. Ireland
Hey Guys,

Wanted to ask you guys if anyone could advise me on if I can clean up part of a video I'm producing (shot on my Air2S).

If it was a photo using Lightroom CC or Photoshop I could fix with "Fill - content assist/aware" (Photoshop) or "Spot Heal" (Lightroom) but I'm not sure if it can be done in Resolve v17

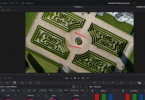
The below video (while looking straight down) raises upwards and turns (like a corkscrew) to give that cool spiral effect.

Is there any way I can "clean up" the scruffy parts pointed to by the red arrows ?
1654032871401.png

Thanks Ro
 
Hey Guys,

Wanted to ask you guys if anyone could advise me on if I can clean up part of a video I'm producing (shot on my Air2S).

If it was a photo using Lightroom CC or Photoshop I could fix with "Fill - content assist/aware" (Photoshop) or "Spot Heal" (Lightroom) but I'm not sure if it can be done in Resolve v17

The below video (while looking straight down) raises upwards and turns (like a corkscrew) to give that cool spiral effect.

Is there any way I can "clean up" the scruffy parts pointed to by the red arrows ?


Thanks Ro
A million ways to do it but I’d start with the clone tool. The difficulty with video is you’ll need to track the the effect so it moves with the movements of the camera. For this situation I would open it in the fusion tab and use a planar tracker since you a tracking a flat surface.
 
Yes you can. As Brett said you would do it in Fusion. I haven't gotten far enough into Fusion to advise you how to do it, though I've watched video doing exactly that and know it can be done. I'm sure Casey Faris has a tutorial on his channel as well as others teaching exactly what you're looking to do.
 
  • Like
Reactions: RonanCork
Ok maybe an easier way would be to make a power window in the color tab and use negative midtone contrast (MD) or even a little blur to soften it up and then use the tracking feature in the color tab to track the power window to the footage. Not as precise as a planar tracker but you wouldn’t have to dip your toes into Fusion and you should have enough contrast in that footage to get a good track
 
Ok maybe an easier way would be to make a power window in the color tab and use negative midtone contrast (MD) or even a little blur to soften it up and then use the tracking feature in the color tab to track the power window to the footage. Not as precise as a planar tracker but you wouldn’t have to dip your toes into Fusion and you should have enough contrast in that footage to get a good track
Cheers. Any pointers to tutorials for that as I've never done it. Great suggestions on this thread gud really appreciate it. Going to try these things out. Thanks Ro
 
Ok maybe an easier way would be to make a power window in the color tab and use negative midtone contrast (MD) or even a little blur to soften it up and then use the tracking feature in the color tab to track the power window to the footage. Not as precise as a planar tracker but you wouldn’t have to dip your toes into Fusion and you should have enough contrast in that footage to get a good track
Hey, sounds good, would you've any links to any tutorials on it. I've never used the color tab. Main stuff I've done in resolve is trim clips, changes colour / saturation etc and some other basic bits and pieces.
thanks ! Ro
 
Hey Guys,

Wanted to ask you guys if anyone could advise me on if I can clean up part of a video I'm producing (shot on my Air2S).

If it was a photo using Lightroom CC or Photoshop I could fix with "Fill - content assist/aware" (Photoshop) or "Spot Heal" (Lightroom) but I'm not sure if it can be done in Resolve v17

The below video (while looking straight down) raises upwards and turns (like a corkscrew) to give that cool spiral effect.

Is there any way I can "clean up" the scruffy parts pointed to by the red arrows ?

View attachment 149126

Thanks Ro
Looking at the path areas, those square impressions look like they are old access points, perhaps for underground reticulation services laid through the gardens. As a great aerial photo record for archiving, I would be hesitant to “clean them up” in an editor. They don’t look like lens failings. 👀
 
Cheers. Any pointers to tutorials for that as I've never done it. Great suggestions on this thread gud really appreciate it. Going to try these things out. Thanks Ro
Just Google tutorials for Power Windows in DaVinci Resolve and pick one that suits your fancy.

You are attempting to do a fairly advanced thing when it comes to video so maybe the best place to start is to get real comfortable with the color tab and watch some tutorials on that first. Quick hint, the basic node is a serial node and they are just like layers in Adobe software. You can go very far just by just using serial nodes so don’t get too side tracked by other node types.

I actually thought of an even easier way to do it, like I said a million ways to do it, you could just use the qualifier tool to pick out the dirt colors and apply the blur/negative midtone detail to that. Google videos on DaVinci qualifier. You can even stack power windows with the qualifier to get even more precise or easier selections.

There’s also the magic mask you could try. I haven’t used this that much but probably worth a try.
 
Last edited:
  • Like
Reactions: Grandpa
Just Google tutorials for Power Windows in DaVinci Resolve and pick one that suits your fancy.

You are attempting to do a fairly advanced thing when it comes to video so maybe the best place to start is to get real comfortable with the color tab and watch some tutorials on that first. Quick hint, the basic node is a serial node and they are just like layers in Adobe software. You can go very far just by just using serial nodes so don’t get too side tracked by other node types.

I actually thought of an even easier way to do it, like I said a million ways to do it, you could just use the qualifier tool to pick out the dirt colors and apply the blur/negative midtone detail to that. Google videos on DaVinci qualifier. You can even stack power windows with the qualifier to get even more precise or easier selections.

There’s also the magic mask you could try. I haven’t used this that much but probably worth a try.
Great advice. Your reference to the layers in photoshop is excellent. Davinci Color nodes are the same thing except they naturally line up horizontally in free space (and can be moved around) rather than vertically in a list.

If I may suggest, as every program has different names and locations for what are essentially the same tools, if it's not too much trouble, screen shots (hopefully with arrows pointed at the tool(s) in question) would be extremely helpful. I probably know what the "qualifier tool" is, but don't recognize the name. I'm at the point with DR that it's time to learn Fusion.

As I watch tutorials, particularly by Casey Faris, I often have trouble keeping up because there are SO many options in so many places and enough steps that it's hard to identify.
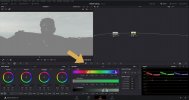
7300944E-A6F8-481F-A378-D5047FF1F978.jpeg
The qualifier is the eye dropper looking tool. It lets you select areas based on any combination of hue, saturation, and luminance. Using this with power windows to mask out certain areas can be really powerful to make selections.
 
I have a love hate relationship with Fusion. Its really great at doing complex things easily but can be convoluted to do simple things in my opinion.
I do a lot with 3D cameras, basically duplicating what you would see with FPV flying, and a lot with 3D motion graphics.
 
I do a lot with 3D cameras, basically duplicating what you would see with FPV flying, and a lot with 3D motion graphics.
Yea I like Fusion’s 3D interface. I love the little depth map they put in there so you can see where things are in relation to others in the 3D space. I just find real simple things like making a series of lines in different colors and have them move to require a frustrating number of steps and nodes. I can do that much quicker in something like after effects.
 

DJI Drone Deals

New Threads

Members online

Forum statistics

Threads
134,484
Messages
1,595,517
Members
163,011
Latest member
Rckern85
Want to Remove this Ad? Simply login or create a free account