DJI Mavic, Air and Mini Drones
Friendly, Helpful & Knowledgeable Community
Join Us Now

Harbor Freight $29 case

wsettle, It's only that long if you hate what you are doing.It's about a labor of love. And It only takes that long when you first try .98 hours that you are talking about is someone telling oneself they can be bothered.I find in my life it takes a shorter time to do what I need to do than saying I don't or want to do it! Lucky for me I learned that young! Making mistakes, following blindly what is being sold.Think of it this way, Even if DJI made the best case or bag in the world, Do you think they will make a spot for your third party battery charger or anything else other then their stuff?pockets cor cords or whatever. I can put a lot of **** in a pillow case. that doesn't make it a custom Mavic 2 Pro case! You got to make it, your own! Put in what you want, So do you really need that heavy and large 12v and 120v charging system for a 30 mins run out your door or at a park nearby in your case? If so do it, But use wisely every inch of space whatever case you work with. You are paying for it. I never cared much for the pluck out foam that comes with some of the cases. Gym floor tiles from eBay were what I used at first. because that was leftovers I had just sitting there doing nothing. Easy to cut. I was using the stuff for whatever I could find to use it for. just to get rid of them. landing pads, 
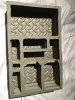
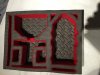
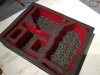
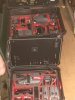
FPV Goggles. Cases and so on. A few photos below. The first thing I made was the housing that formed around the Mavic for a case and all that comes with the flymore package. The first case I put in everything! I would not want to be without my 6 pairs of spare props.all my mounts. Not to mention my 1, 4, 6,10, USB cables and cords.both house and car charger all in. Why? Because I could! After all, it is my case. The first case I worked on was for 2 Mavic pros using a Pelican, mid-size case13 pounds alone with nothing in it. Was it just a box right? Went a little overboard with the first one. even batteries warmers for the cold. You learn from your mistakes. I still fly in the cold the colder the better as long as she was up to it. But from the comfort of my warm heated car. So why did I need batteries warmers? O ya, I remembered so I could freeze my *** off telling myself I am having fun.when I can't even feel the dam joy stacks.Just so my batteries can stay warm, outside of my warm car seat to fly.That is why they put in RTH button. And Dam I swear, That case did not look that heavy on eBay! 13 pounds and that is before any of your gears. Total 36 pounds all done with 2 craft 2 remote 7 batteries and so on and on. I thought maybe with wheels. What was I thinking I don't want something that take 2 persons to just put the dam thing it in the car. My next 3 builds all using the lighter weight but still strong HF cases. I build all my cases has two levels.the new largest case even 3. If you see something on top of my cases, There is custom space made for the said item below. Everything has its own space. That is what I think of when I think of custom cases. Just thinking now all the $$$$ I have waisted, on said custom cases.:mad: 
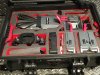
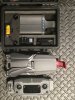
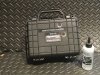
Moving on! Trying smaller and lighter case each time but still amped to see what I can get in. I keep one case in my car at all time. I have to admit I did keep both chargers on board on all the builds so far. But by installing them on the top of the lid, not the bottom. So there is room on the lid and leaves more room on the bottom half. Each time you screw up and learn. You learn to do it faster and you learn to do it better. But, That is only if you don't give up after the first time! Start from fresh. the foam may be good or easy to work with. But it will break down in time. I use the floor mats because it is somewhat soft but very strong. I found HP mats is much cheaper and softer to work with because it does not have that hard gloss top that the gym floors do. $7 for 5 tiles at HF try to buy even cheap foam for that. Just a suggestion, if you are doing one with any amping keep all the batteries on the handle side right from the start and as close as you can against the wall. That is where it all starts. You don't want it so, as soon as you take out your craft it starts to tip over and if you install anything on the lid keep it low. no matter how good you think it looks to think of balance. I have another HF case. this one that looks likes a kids lunch box. the Apache 1800 their smallest case they have. It was a joke I told myself, I'll use it for the USB cables I THOUGHT. But, I got it and stuck in my tracker and warning system for now. BUT, I do believe I can get the new Mavic 2 Pro even 1/2 inch longer noise with everything to fit in that case. The two extra batteries of cause would have to lay flat on the bottom of the case with the controller tray on top. I'll make it work. a 9.7inch iPad will be installed on the inside top lid so you can fly from the box or Mavmount, or whatever. The sad part is I can't amp this lunch box. The lid is just way too shallow, A little more than a 3/4 of an inch. can't fit much in that. But my 9.7 built-in screen, all my 1,4,6,10 USB cables and yeah, Can't forget about my extra props that I just have to have! my thinking pluck foam wesette, won't work here or cut it for me. Think and plan before you do. It's easier than you think! I am stuck with that build because, I need every single item on hand for dry fitting before cutting a thing, ND filter, landing gears, and so on all in the mail. Sorry to say it's not like the shipping time of the new Mavic2. Think what if, I raise the Mavic just one inch higher from the base. Think out of the box a bit, Just think what you can fit there in the center under the Mavic. how much bottom contact point does the Mavic really need to stand safely. Don't do standard or you will not have that extra space for the 6 pairs of props Just Saying. It is felt and car carpet from pep boy that I use for all my linings and covering. And felt is another easy material to cut and spray glue. Just KEEP THE WINDOWS OPEN. or you will be gluing more then you planned to.:confused: Sorry it was so long:rolleyes:

Happy and Safe Flying
 

Attachments

  • file2-2.jpeg
    file2-2.jpeg
    1.4 MB · Views: 118
  • file3-1.jpeg
    file3-1.jpeg
    2.3 MB · Views: 131
  • file4-1.jpeg
    file4-1.jpeg
    2.2 MB · Views: 131
  • file-161.jpeg
    file-161.jpeg
    1.6 MB · Views: 128
  • file1-3 - Copy.jpeg
    file1-3 - Copy.jpeg
    1.4 MB · Views: 134
  • file8.jpeg
    file8.jpeg
    2.7 MB · Views: 131
  • 1.jpeg
    1.jpeg
    1.4 MB · Views: 128
  • file-21.jpeg
    file-21.jpeg
    1.1 MB · Views: 125
  • 2.jpeg
    2.jpeg
    1.6 MB · Views: 124
$29 plus 100 hours in making it, lol! That is nice! How did you do the cutting and what material did you use?

Doesn't look like foam. And the red material, is that felt? Schweet!

100 hours? More like 20 minutes.
 
100 hours? More like 20 minutes.

I think Wanna (?) put more than 20 minutes into that case. I'd not do it that way but I must say, it does look pretty good.

Some time people want to comment about how much time I put into something and change that into a dollar amount. News flash, no one works 100% of their life. So not every second equates to a dollar amount. Somethings we do to entertain ourselves and that time does not result in a loss of money.
 
I'm retired and do well and would agree, it's not just about the money. It's the creative process, whether that means 20 minutes or 100 hours. That said, if anyone has a pressing need for a MP2 case before they become widely available, like the original poster, I wanted to demonstrate how easy it is to make your own on the cheap and with little time. Cheers and happy flying.
 
  • Like
Reactions: Anndybo and wsettle
I think Wanna (?) put more than 20 minutes into that case. I'd not do it that way but I must say, it does look pretty good.

Some time people want to comment about how much time I put into something and change that into a dollar amount. News flash, no one works 100% of their life. So not every second equates to a dollar amount. Somethings we do to entertain ourselves and that time does not result in a loss of money.

I do not think for one second all the time that I have spent on it. It is only the joy of accomplishment as a result that I’m happy with. Like they say time flies when you’re having fun. Thanks guy
 
@Don't Wanna , great reply! Thanks for the detail. You have me itching to throw my pluck foam out and start over with some HF mat. Going to head to HF tomorrow and get some to start playing with. The felt is brilliant. It easily hides any rough cuts in the foam and makes it look great. Speaking of cutting, what did you use to cut the mat?

A utility knife, electric carving knife, hot knife, etc?

I tried an electric carving knife on a pelican foam insert and I didn't do so good so there has got to be a better way. Maybe it's just practice but foam is expensive. The mat will be much cheaper to try different things. I'm pumped, lol!
 
Don't Wanna, I sincerely hope you didn't think I was taking a jab at you, not at all. Your work is impressive to say the least. I was only attempting to say it can be done as quickly and simply as you want and not to be intimidated as your imagination is your only limitation. Please except my apologies if I came off that way as it was not my intent.
 
Haha! I love that you used the HF EVA floor mats. I did the same for my Mavic Air case but used a CNC. Now I need to make one for my Mavic 2 but the CNC won't fit the larger HF case (I need to fit my CrystalSky 7.8" and batteries and charger as well).

Did you cut that by hand?

I think I saw yours somewhere if it,s in the site. First one was hand cut with razors and finetooth mini saw. Pain in the butt. Ban saw is the way to go. Let me know how you make out, Great minds think a like!
 
  • Like
Reactions: wsettle
@Don't Wanna , great reply! Thanks for the detail. You have me itching to throw my pluck foam out and start over with some HF mat. Going to head to HF tomorrow and get some to start playing with. The felt is brilliant. It easily hides any rough cuts in the foam and makes it look great. Speaking of cutting, what did you use to cut the mat?

A utility knife, electric carving knife, hot knife, etc?

I tried an electric carving knife on a pelican foam insert and I didn't do so good so there has got to be a better way. Maybe it's just practice but foam is expensive. The mat will be much cheaper to try different things. I'm pumped, lol!
I started with razors and small saw blades. Never looked right, Ban saw did the trick. But you have to cut it in a certain way. Size up the case with paper or cardboard. and place and mark all the parts with a marker for each item. make sure everything fits as it should first on cardboard before cutting and fitting the mat for real. You will make many mistakes along the way. Like I did. The good news is. You can reuse whatever you screwed up pieces of mat you overcut or undercut...Like to see what you come up with. Never stop learning:p
 
Don't Wanna, I sincerely hope you didn't think I was taking a jab at you, not at all. Your work is impressive to say the least. I was only attempting to say it can be done as quickly and simply as you want and not to be intimidated as your imagination is your only limitation. Please except my apologies if I came off that way as it was not my intent.
No, Please accept my apologies! It was wrong for me to presume you were like some of the others in here. It's my fault.
 
Not a problem. Seriously brother, my ADHD brain has been trying to multitask way too much today for this old man. I seriously thought the post I was responding to was a response to my post with my picture, a project that only took me 20 minutes, minus the Plasti Dip. Serious egg on my face my friend. Thank you for responding, I really did feel like a horse's.....o_O
 
@Don't Wanna , great reply! Thanks for the detail. You have me itching to throw my pluck foam out and start over with some HF mat. Going to head to HF tomorrow and get some to start playing with. The felt is brilliant. It easily hides any rough cuts in the foam and makes it look great. Speaking of cutting, what did you use to cut the mat?

A utility knife, electric carving knife, hot knife, etc?

I tried an electric carving knife on a pelican foam insert and I didn't do so good so there has got to be a better way. Maybe it's just practice but foam is expensive. The mat will be much cheaper to try different things. I'm pumped, lol!
PLUCK FOAM= ROUND BALL IN SQUARE HOLE? BUT IF THAT'S ALL YOU HAVE AND YOURE ARE FINE WITH IT WHY NOT USE IT AS IS? BUT IF YOU WANT JUST A LITTLE MORE? PLANT A SEED AND WATCH IT GROW! :cool:
 
Not a problem. Seriously brother, my ADHD brain has been trying to multitask way too much today for this old man. I seriously thought the post I was responding to was a response to my post with my picture, a project that only took me 20 minutes, minus the Plasti Dip. Serious egg on my face my friend. Thank you for responding, I really did feel like a horse's.....o_O
:p NO PROBLEM
SAFE FLYING
 
@Don't Wanna , great reply! Thanks for the detail. You have me itching to throw my pluck foam out and start over with some HF mat. Going to head to HF tomorrow and get some to start playing with. The felt is brilliant. It easily hides any rough cuts in the foam and makes it look great. Speaking of cutting, what did you use to cut the mat?

A utility knife, electric carving knife, hot knife, etc?

I tried an electric carving knife on a pelican foam insert and I didn't do so good so there has got to be a better way. Maybe it's just practice but foam is expensive. The mat will be much cheaper to try different things. I'm pumped, lol!
This is a good place to start. a cheap coping saw under $10. The finer tooth the better the cut..if you have a band saw, The deeper the better also. If done correctly those cuts you made that allowed you to cut all the other holes for your acc. Can now be reglued seam to seam together with contact cement only if you are going to cover it. contact cement is thicker so you do see something if not covered or better yet Gorilla crazy glue thin (not the GEL). and you will never see it. I cut my stuff with precision tools. like a band saw. think of a plastic surgeon scalpel. leaving little or no marks behind. You are using a carving knife=chainsaw to do the same job. Tough to seam any corners and joints with rough cuts and tears. which makes a pool joint. You want something that is not just easy on the eyes, But also strong.
 

Attachments

  • s-l500.jpg
    s-l500.jpg
    15.8 KB · Views: 41
  • Like
Reactions: wsettle
I cut the HF mats with a small CNC machine and it worked great once we found the right speed. 3M Super 90 worked extremely well to get a good bond between layers, even with the texture.
 
The 3M stuff?

Yea, I actually used the Loctite equivalent because I have it but having used both in other scenarios they seem pretty much like the same thing. You just need to apply a bit of pressure as you layer each to make sure the texture "squishes" and the layers make good contact. But once together I couldn't tear them apart without tearing the foam.
 

DJI Drone Deals

New Threads

Forum statistics

Threads
131,254
Messages
1,561,318
Members
160,205
Latest member
DaleUt.