

Yeah the 180 panos work well too. The sad thing though is -- when the 9-frame panos work, they are wonderful because they allow you to set the camera to a lower-degree starting point. The 180 or 360 will not allow that. Also, when you are in a rush, taking 9 frames is much faster.

You are using an out of date browser. It may not display this or other websites correctly.
You should upgrade or use an alternative browser.
You should upgrade or use an alternative browser.
Mavic 3 (9-Frame / Wide Angle) Pano Stitching Issues - Anyone else?
- Thread starter rmajoran
- Start date
What is the purpose of the setting the camera to a lower-degree starting point? If you use 360, it covers the full 180 of the vertical (with a cloned ceiling for the very top). Crop whatever FOV you want out of it. Likely, same with the 180, but I don't shoot 180's, so not sure about the ceiling cloning.Yeah the 180 panos work well too. The sad thing though is -- when the 9-frame panos work, they are wonderful because they allow you to set the camera to a lower-degree starting point. The 180 or 360 will not allow that. Also, when you are in a rush, taking 9 frames is much faster.
The purpose is so that you don’t have to sit around and wait for the camera to take dozens of photos. Often times, I have about five minutes of perfect light. I don’t want to waste it taking photos that I don’t need.
It only takes 40 seconds to shoot all 26 images of a 360° spherical pano. Just move the sticks to cancel the stitching, after it reaches 50% completion, if you are stitching manually. Select the images covering the area of interest, and stitch the DNG's.The purpose is so that you don’t have to sit around and wait for the camera to take dozens of photos. Often times, I have about five minutes of perfect light. I don’t want to waste it taking photos that I don’t need.
Vanzeppelin
Member
- Joined
- Nov 22, 2016
- Messages
- 7
- Reactions
- 4
- Age
- 49
Just checking in to say I have the same exact issue with the M3 and 9 shot panos. It is incredibly annoying, and the Mavic 2 did not have this problem. I really wish they'd fix it.
Sure, taking a 360 or 180 and picking out the photos you want works, but it's a silly/more time consuming work around for something that we did not have to do on the previous generation of the Mavic.
Sure, taking a 360 or 180 and picking out the photos you want works, but it's a silly/more time consuming work around for something that we did not have to do on the previous generation of the Mavic.
You have a decent automated workaround until it is fixed. You can also easily and quickly shoot them manually. It's only 9 images.Is it too much to just ask for it to work like it should?")
It will likely be fixed in the next FW update. In the meantime, you have reasonable workarounds like shooting a 180 or shooting the 9 shots manually.Just checking in to say I have the same exact issue with the M3 and 9 shot panos. It is incredibly annoying, and the Mavic 2 did not have this problem. I really wish they'd fix it.
Sure, taking a 360 or 180 and picking out the photos you want works, but it's a silly/more time consuming work around for something that we did not have to do on the previous generation of the Mavic.
yes same crap.. need to revert back to mavic 2 pro code or code in dji go4... then everything goes back to good... add ability to switch of internal stitch and get properly angled raws
.jpg")
could also try 3 vertical panos 3 frame and see if that worksIt will likely be fixed in the next FW update. In the meantime, you have reasonable workarounds like shooting a 180 or shooting the 9 shots manually.
Eagle Eye 62
Well-Known Member
Why don't you just stitch in the computer? Yes it is a little more work but you have a lot more control.
If you want to use the automated pano capture, start with the camera level (not pointing down or up.yes same crap.. need to revert back to mavic 2 pro code or code in dji go4... then everything goes back to good... add ability to switch of internal stitch and get properly angled raws
If you want flexibility and the best pano, shoot manually and stitch in your computer.

jephoto
Well-Known Member
Just purchased a M3 - will have it lat4er this week. Been shooting multi frame/ multi-row panos for years on P3P's & P4P. Always do it manually though and my overlap is usually30- 50% of the frame.
For multi row- say a 3x3- I start with dead level, then tilt down until what was the midline horizon hits the first line or 1/3 up. Then I do tilting up until what was the horizon hits the bottom 1/3 line.
I wonder of the Auto pano function is going both Higher and lower for those same 9 frames. Causing more distortion when stitched.
This is a 9 frame manually shot pano from my P3P
Stitched flawlessly in Lightroom.
If the M3 isn't able to do rectilinear Panos I'g going to be seriously upset.
But maybe we will just have to do them manually.
Attachments
jephoto
Well-Known Member
I just downloaded these files. And yes I was correct - the auto-pano action takes the overlap to the extreme both up and down.So tonight I finally decided to use the (9-shot / wide angle) pano mode on the Mavic 3 (latest firmware). On the MP2, the files seamlessly stitched in Lightroom.
But when the M3 shot the images (using the 9-shot pano mode), it doesn't look like it the gimbal aligned itself properly.
*If I use the full 360 pano mode, the gimbal does seem to align correctly and stitches fine. It's specifically with the 9-shot pano.* (I haven't tried the 180 yet.)
Interestingly enough, the auto-generated JPEG looks straight, but when I try and stitch the RAW (DNG) images in Lightroom, the horizon just looks like a sphere. I have tried stitching in Lightroom and Photoshop; none of them work properly with these images.
I am attaching the 9 DNG files along with the auto-generated JPEG. I'd be interested to know if anyone else is having this problem as well. Again, as you'll see, the 9 images that the Mavic 3 took (on the 9-shot mode) don't look right at all.
Dropbox
www.dropbox.com
So two questions:
1. Anyone else having this issue ***specifically*** with the 9-shot / wide angle pano mode?
2. If you downloaded the files, was anyone able to figure out how to properly stitch it? I've tried Cylindrical, Spherical and Perspective; no luck with any of them.
Thanks in advance.
Ray
Not only that, none of the rows are set to 0º - level.
You need a row of level frames to anchor the lines. Then go up/ down and rotate from there.
And that tilt on the outside frames is no good at all. Its all wrong- if your goal is a rectilinear image.
Do a test with the next time you are out.
-Don't go more than 1/3 the frame up and down for the rows and do a 50% overlap side to side.
-Side to side- Take your midpoint and move that to the edge of the frame.
As soon as I get my M3 I will do tests. Too bad we can't control the degree of overlap in the Auto function. Would be nice. But Ive gotten pretty fast doing them manually.
Helps if. you have the controller that has a button for -90º or reset back to 0º level. I do that in-between each frame and before rotating to the next set.
Last edited:
jephoto
Well-Known Member
Ok gang. Heres the deal. All was as I said above.
But the work around is to open in PTGui or similar panorama editor. And it does appear as a partial sphere with camera tilted down. You have to pull down the center so Horizon ends up flat.
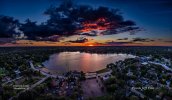
Heres what it looks like Stitched in Lightroom, then opened in PTGui, Horizon pulled down in PTGui, Export as JPG (or Tiff for fine prints),
Open in Photoshop (or Lightroom or similar) and crop as you like.
I feel better about this now knowing I could automate a 9 frame if I wanted, but there's a lot of wasted space - and file size. Or rather a lot of EXTRA image area I usually wouldn't need. But you do get a lot more either ground or sky than my method. Fine for landscapes, not so much for architecture...


But the work around is to open in PTGui or similar panorama editor. And it does appear as a partial sphere with camera tilted down. You have to pull down the center so Horizon ends up flat.
Heres what it looks like Stitched in Lightroom, then opened in PTGui, Horizon pulled down in PTGui, Export as JPG (or Tiff for fine prints),
Open in Photoshop (or Lightroom or similar) and crop as you like.
I feel better about this now knowing I could automate a 9 frame if I wanted, but there's a lot of wasted space - and file size. Or rather a lot of EXTRA image area I usually wouldn't need. But you do get a lot more either ground or sky than my method. Fine for landscapes, not so much for architecture...
Attachments
jephoto
Well-Known Member
Update: It's been a while since I was stitching 360º x 180º panos, so I'm out of practice with PtGui.
Also there's another option in choosing the type of projection. Lightroom only has Spherical.
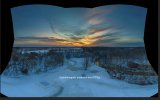
In PTGui you can choose a number of options - Equirectangular is what many Pano VR viewers use and in this situation - again if you are going for a Flat image- the equirectangular is a more pleasing and less distorted image. Here is what choosing that projection looks like, and then brought into Photoshop and cropped to what I like as a pleasing composition. The ground is much less distorted than the Spherical.
I made this full size, but low quality JPG for file size. Much better image now.
Also there's another option in choosing the type of projection. Lightroom only has Spherical.
In PTGui you can choose a number of options - Equirectangular is what many Pano VR viewers use and in this situation - again if you are going for a Flat image- the equirectangular is a more pleasing and less distorted image. Here is what choosing that projection looks like, and then brought into Photoshop and cropped to what I like as a pleasing composition. The ground is much less distorted than the Spherical.
I made this full size, but low quality JPG for file size. Much better image now.
Attachments
jephoto
Well-Known Member
OOPs- tigerFan- I hadn't seen all the posts when I did my tests. You beat me to it.Thanks for the question. I know many don't like the price of PTGui Pro, but I get some very nice results with it. I took your nine RAW Photos from your. Mavic 3 and input them into PTGui Pro v12.9. I set up an equirectangular (360x180) panorama and let the software align the images, taking lens parameters from the EXIF data. I then set Yaw to -120 degrees, Roll to -25 degrees, and Pitch to -10 degrees, one at a time in this order. Here is the final image. I let PTGui Pro do its thing as far as default adjustments for tone/HDR etc. This picture is greatly reduced in size to show here but illustrates the flat horizon and excellent dynamic range. The full image is breathtaking.
View attachment 144414
I think I missed the whole second page of this thread. Sorry for the replication everyone....
I'm willing to try manually shot panos but you really need 1/3 or 1/2 overlap?
Also, how do you mow which shots are part of a set of panos if they dump it all in the same folder?
At least with the programmed panos, they dump the shots into separate folders, if you're saving RAWs.
Also, how do you mow which shots are part of a set of panos if they dump it all in the same folder?
At least with the programmed panos, they dump the shots into separate folders, if you're saving RAWs.
jephoto
Well-Known Member
It’s very easy. And you SHOULD have at least 30% overlap for good stitches, but can get away with less.I'm willing to try manually shot panos but you really need 1/3 or 1/2 overlap?
Also, how do you mow which shots are part of a set of panos if they dump it all in the same folder?
At least with the programmed panos, they dump the shots into separate folders, if you're saving RAWs.
But I’ve found with aerials, especially if there’s a lot of sky, really benefit from more overlap. You need as many points to match frame to frame on the ground as possible to make up for lack of them in the sky.
This takes longer to read than to shoot. Just make sure the drone has stabilized and not drifting up or down much. That will create bad stitches too.
Always start with a level shot. The row of 0° angle frames anchors your horizon.
Then tip up - I do about 1/3 frame using the grid lines. Shoot then tip down the same.
The Mavic 3 has more clearance going up than my P4P did without seeing props so maybe you can do less overlap, the the more extreme you get, more distortion.
Then hit the C1 button (or whatever you have that snaps lens back to level, before rotating.
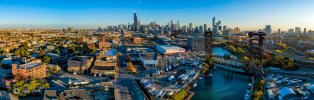
Again, I like a lot of overlap, but you can get away with less as long as there’s good details to match next frame. I shoot a lot of cityscapes so I try to minimize distortion.
Also try just 2 rows as well. Works great.
As for separating the pano shots, shoot a straight down (-90°) after each set. Easy to see the break in each set when in Grid view in Lightroom or your image browser.
This is 2 rows either 4 or 5 frames across with P4P w/approx 50‰ overlap on all frames
Attachments
Similar threads
- Replies
- 10
- Views
- 682
- Replies
- 22
- Views
- 4K
- Replies
- 13
- Views
- 2K


DJI Drone Deals
New Threads
-

-

-

-
-
DJI Fly 1.5 keeps crashing on new OS Android 13, if I update will I lose CJD and DH?
- Started by phad
- Replies: 1
Members online
Total: 4,719 (members: 13, guests: 4,706)
Forum statistics
