You are using an out of date browser. It may not display this or other websites correctly.
You should upgrade or use an alternative browser.
You should upgrade or use an alternative browser.
Motor replacement question.
- Thread starter heshiebee
- Start date
LoudThunder
Part 107 Licensed
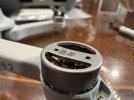
Have you tried to scan the QR Code on the Propeller mount. Without removing the propellers on my Mini 2, the QR Codes on the two Front motors are different, but the props obscure part so I cannot scan them. It might only refer to whether they are Clockwise and Counter-Clockwise rotators. Or, perhaps the code will give the manufacturers info. Scan them and let us know what you find out, inquiring minds want to know...
Thanks, I’ll take a look tomorrow. Hypothetically if they’re just CW or CCW I can probably flip the wiring. I’ll test tomorrow and let you know.Have you tried to scan the QR Code on the Propeller mount. Without removing the propellers on my Mini 2, the QR Codes on the two Front motors are different, but the props obscure part so I cannot scan them. It might only refer to whether they are Clockwise and Counter-Clockwise rotators. Or, perhaps the code will give the manufacturers info. Scan them and let us know what you find out, inquiring minds want to know...
cheddar-man
Well-Known Member
Awesome, will try!That must have been a heck of a bang to bend the rotor plate!
The clockwise/anti-clockwise rotation is determined by the connection to the ESC.
These are effectively three phase motors, reverse any two of the three wires and the motor will go the other way.
The QR codes all seem to be different so it’s probably as @cheddar-man said just CW and CCW connections.Have you tried to scan the QR Code on the Propeller mount. Without removing the propellers on my Mini 2, the QR Codes on the two Front motors are different, but the props obscure part so I cannot scan them. It might only refer to whether they are Clockwise and Counter-Clockwise rotators. Or, perhaps the code will give the manufacturers info. Scan them and let us know what you find out, inquiring minds want to know...
Attachments
LoudThunder
Part 107 Licensed
I'm guessing that the "FR, FL, and the BL" are referring to Front Right, Front Left, and Back Left, so yes it probably refers to the CW and CCW Motor Rotation, but it also means that the Wiring Length and connections are probably different. Otherwise the FR and BL would have the same part number.The QR codes all seem to be different so it’s probably as @cheddar-man said just CW and CCW connections.
Both the FR and BL motors are CCW rotating, which use the "Marked" propellers, while the FL and BR motors are CW rotating motors without marks on the propellers…
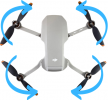
You should have no problem finding a replacement motor on eBay (Crashed Unit) or one of the many "Drone Rehab Houses." I do not know if you can get a motor directly from DJI, but it's worth a try, it may cost more, but you'll know you are getting an exact replacement, not a "almost perfect" replacement…
Good Luck
Thanks for that! I just went ahead and ordered a FL arm with motor off amazon for $59, a bit pricey but as you said rather an exact replacement. I’ll be following this video here. I’ll film my work as well. Thx everyone for your help.I'm guessing that the "FR, FL, and the BL" are referring to Front Right, Front Left, and Back Left, so yes it probably refers to the CW and CCW Motor Rotation, but it also means that the Wiring Length and connections are probably different. Otherwise the FR and BL would have the same part number.
Both the FR and BL motors are CCW rotating, which use the "Marked" propellers, while the FL and BR motors are CW rotating motors without marks on the propellers…
View attachment 149968
You should have no problem finding a replacement motor on eBay (Crashed Unit) or one of the many "Drone Rehab Houses." I do not know if you can get a motor directly from DJI, but it's worth a try, it may cost more, but you'll know you are getting an exact replacement, not a "almost perfect" replacement…
Good Luck
LoudThunder
Part 107 Licensed
Good Luck to you, Last two pieces of advice is to look at some YouTube Videos. You'll get to learn from other's mistakes, you'll get to see where all the little snaps and hidden screws might be…I’ll be following this video here
Besides filming your work, snap lots of photos as you take it apart so you will see how parts are positioned and how and where the wires run. Some connectors can be installed right and wrong, you just have to know which side the "little dot faces…"
cheddar-man
Well-Known Member
Good advice there from LoudThunder! Also, you'll need a bit of soldering skill.
Before you put all the covers back on, just fire it up and make sure you have the correct rotation!!
Before you put all the covers back on, just fire it up and make sure you have the correct rotation!!
LoudThunder
Part 107 Licensed
Also, you'll need a bit of soldering skill.
Cheddar-Man brings up a good point, you will need "Good Soldering skills", If you have never done this before, watch several YouTube Videos. Soldering electronics is different from general purpose soldering. You must be exceedlingly accurate with the soldering iron, you do not want to create a "solder bridge," you need to use a soldering iron that is not too hot, but one made for electronics, otherwise you can over heat components and even unsolder adjacent components. Not to mention, the need for lead-free rosin core solder. If you've ever soldered copper water pipes, forget everything you've learned, that knowledge will turn your Drone into a pile of smoking plastic…
If I've not scared you off and you still want to give it a go. Stop by a thrift shop and buy some cheap piece of electronics: a clock, old DVD player, car radio, and practice unsoldering some parts and re-soldering them back in place… a Good Video to watch…
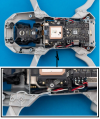
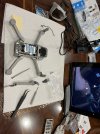
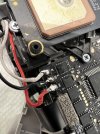
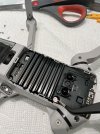
Finally got around to repair today, here is the video I followed and some pics I took. I gotta say it was actually quite straightforward and not very complex especially compared to the original Mavic mini. My soldering skills are amateur at best so be kind  I also used some hot glue to secure the wires in position and reduce vibration before putting it back together as DJI did. The only annoying step was the arm hinge which is a bit tricky to get back into position. Did a test flight where I let it hover for a few minutes before putting the covers back in place. Thanks everyone for your help!
Attachments
-
 3D97F35E-3268-46DE-8A4C-15521C15497D.jpeg2 MB · Views: 14
 -
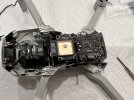 3FD60BDA-254C-487C-85B3-1E7E3FFC46FD.jpeg2.5 MB · Views: 12
 -
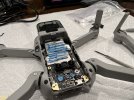 C34740FD-078E-4646-86BD-875B84E7B6D5.jpeg2.6 MB · Views: 12
 -
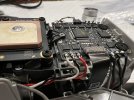 681EEA09-4804-41B8-B5D6-1B263E3CA0A6.jpeg2.5 MB · Views: 12
 -
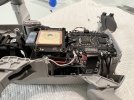 E43C538D-E96B-426B-B941-BF09B9069E04.jpeg2.5 MB · Views: 13
 -
 ECFFBC4D-6EA1-4B6F-9D39-507252216873.jpeg1.3 MB · Views: 14
 -
 9F6D4260-8718-4EBA-9DFA-D448E6B7D5D1.jpeg1.4 MB · Views: 14
cheddar-man
Well-Known Member
Excellent, and thanks for all the pictures! Often wondered what it looked like inside!!
LoudThunder
Part 107 Licensed
Lol, true.Congratulations and What Cheddar-Man said... Now, do not get cocky, the next repair may not be so straightforward...
LoudThunder
Part 107 Licensed
Those are fantastic shots, now you need to really stretch your flying, you need to start photosphereing…Some pics I took today
Here is the link that I wrote on shooting, editing, and publishing your photospheres in Google Maps and on Google Earth… This is third in the series, but it contains links to all earlier posts.
Photospheres III -- Let's put it on the Map…
Photospheres III -- Let's put it on the Map… This is the final chapter of "Am I the Only One Who Knows This--Photospheres…" Well, as it turns out, many folks knew this, but in many cases, their methods were not necessarily the easiest way to create and publish Photospheres. After I discovered...
Fly Safe…
Last edited:
cheddar-man
Well-Known Member
Thanks LT. Started to go through your wonderfully detailed description on how to create a Photosphere and then thought, why am I flogging through this, what is the end result? Perhaps you could show me exactly what can be achieved with this technique so that I can see whether it's something I want to get into.
Cheers
Cheers
Wow, that is really cool. I’ll try that next time!Those are fantastic shots, now you need to really stretch your flying, you need to start photosphereing…
Here is the link that I wrote on shooting, editing, and publishing your photospheres in Google Maps and on Google Earth… This is third in the series, but it contains links all earlier posts.
Photospheres III -- Let's put it on the Map…
Photospheres III -- Let's put it on the Map… This is the final chapter of "Am I the Only One Who Knows This--Photospheres…" Well, as it turns out, many folks knew this, but in many cases, their methods were not necessarily the easiest way to create and publish Photospheres. After I discovered...mavicpilots.com
Fly Safe…
Similar threads
- Replies
- 0
- Views
- 276
- Replies
- 8
- Views
- 966
- Replies
- 4
- Views
- 3K
- Replies
- 7
- Views
- 751
Share:
DJI Drone Deals
New Threads
-
Mini 3 Lotte World Tower, Seoul. Looking for editing advices
- Started by OrangeBlue
- Replies: 0
-
-
-
-


